Sea Cave: Difference between revisions
No edit summary |
|||
| (10 intermediate revisions by 4 users not shown) | |||
| Line 1: | Line 1: | ||
{{LocationInfobox | {{LocationInfobox | ||
|game = {{ | |game = {{Dragon Quest II}} | ||
|title = Sea Cave | |title = Sea Cave | ||
|type= Dungeon | |type= Dungeon | ||
|image = | |image = [[File:DQ II Android Sea Cave Entrance 2.jpg|250px]] | ||
|caption = | |caption = | ||
|japanese=海底の洞窟 | |japanese=海底の洞窟 | ||
|romaji=kaitei no dōkutsu (Seafloor Cave) | |romaji=kaitei no dōkutsu (Seafloor Cave) | ||
}} | }} | ||
The '''Sea Cave''' is an island dungeon in {{DQ2}}. It is located in the ocean of eastern [[Torland]]. | |||
The '''Sea Cave''' is an island dungeon in {{DQ2}}. | |||
It is located in the ocean of eastern [[Torland]]. | |||
==Appearances== | ==Appearances== | ||
The Sea Cave is normally surrounded by | The Sea Cave is normally surrounded by shoals. This keeps the [[Luminaries]] from gaining access to it until later in the game. After acquiring the [[Moonshard]], the [[Luminaries|Heroes]] can remove the shoals by using it in front of the cave entrance. | ||
The cave is one of the more difficult dungeons in the game, along with the [[Cave to | The cave is one of the more difficult dungeons in the game, along with the [[Cave to Rendarak]]. There are multiple basements with many misleading and dead end staircases, along with powerful enemies on the lower basement levels. In addition, this is the only location in the game where lava is a hazard which will damage the [[Luminaries|heroes]] with each step. However, it can be avoided like other hazards with [[Safe Passage]]. | ||
Also included in the cave are | Also included in the cave are {{Chest}} which when opened sap some of your characters' {{HP}}. | ||
=== | ===False Idol=== | ||
To get to the [[ | To get to the [[False Idol]], first find your way to floor B1. From there, head west down the passage, and take the second south opening. Continue west, and head north through the lava once you hit the wall. On floor B2, head past all the tempting staircases marked with torches, and follow the path around to the south. Take the first staircase you see on the main path. On floor B3, go straight northwest into the lava lake, and take the only staircase. Now that you're on floor B4, simply follow the path around to the altar, and defeat the two [[Whackolyte]]s guarding the artifact. | ||
===Notable attribute=== | ===Notable attribute=== | ||
| Line 26: | Line 29: | ||
{| border="0" cellpadding="5" cellspacing="0" width="100%" | {| border="0" cellpadding="5" cellspacing="0" width="100%" | ||
| valign="top" width="50%" | | | valign="top" width="50%" | | ||
====( | ====({{NES}} version)==== | ||
* | *350 {{Gold}} | ||
*[[ | *[[Banishing bell]] | ||
* | *[[Medicinal herb]] | ||
| valign="top" width="50%" | | | valign="top" width="50%" | | ||
====( | ====({{GBC}} version)==== | ||
*[[ | *1,200 {{Gold}} | ||
*[[ | *[[Banishing bell]] | ||
*[[ | *[[Magic armour]] | ||
*[[ | *[[Prayer ring]] | ||
*[[ | *[[Seed of magic]] | ||
*[[Seed of strength]] | |||
|} | |} | ||
=== | ==={{Monster}}s=== | ||
*[[ | *[[Whackolyte]] | ||
*[[ | *[[Chasmonaut]] | ||
*[[Treevil | *[[Heyedra]] | ||
*[[ | *[[Treevil]] | ||
*[[ | *[[Hunter mech]] | ||
*[[ | *[[Miasma]] | ||
*[[ | *[[Mummy]] | ||
*[[ | *[[Orc chieftain]] | ||
*[[Bloody hand]] | |||
*[[Liquid metal slime]] | |||
*[[Magic marionette]] | |||
*[[Striking sabrecat]] | |||
===Nearby | ===Nearby {{MFamilies}}s=== | ||
*[[Gargoyle]] | *[[Gargoyle]] | ||
*[[ | *[[Dragonfry]] | ||
*[[ | *[[Smog]] | ||
*[[ | *[[Terrordactyl]] | ||
==Remake Changes== | ==Remake Changes== | ||
The HP trap | The {{HP}} trap {{Chest}}s are replaced by a poison trap, which affects the character opening the {{Chest}}. | ||
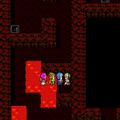
==Gallery== | ==Map & Gallery== | ||
<center><gallery>> | |||
[[ | DQ II NES Sea Cave.png|Map. ({{NES}}) | ||
DQ II SFC Sea Cave.png|Map. ({{SFC}}) | |||
DQ II Android Sea Cave Entrance 1.jpg|The Sea Cave before the [[Moonshard]] is used. ([[Cell phone]]) | |||
DQ II Android Sea Cave 1.jpg|Sea Cave. ([[Cell phone]]) | |||
DQ II Android Sea Cave 2.jpg| | |||
DQ II Android Sea Cave 3.jpg|[[Wrecktor]] duo. ([[Cell phone]]) | |||
DQ II Android Sea Cave 4.jpg| | |||
DQ II Android Sea Cave 5.jpg|[[False Idol]]. ([[Cell phone]]) | |||
</gallery></center> | |||
==References== | ==References== | ||
{{DQII}} | |||
[[Category:Dragon Quest II locations]] | [[Category:Dragon Quest II locations]] | ||
Latest revision as of 18:55, 18 February 2023
| Dungeon | |
|---|---|
| Sea Cave | |

| |
| Japanese | 海底の洞窟 |
| Rōmaji | kaitei no dōkutsu (Seafloor Cave) |
| Game | Dragon Quest II |
The Sea Cave is an island dungeon in Dragon Quest II: Luminaries of the Legendary Line.
It is located in the ocean of eastern Torland.
Appearances[edit]
The Sea Cave is normally surrounded by shoals. This keeps the Luminaries from gaining access to it until later in the game. After acquiring the Moonshard, the Heroes can remove the shoals by using it in front of the cave entrance.
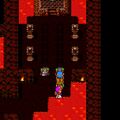
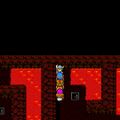
The cave is one of the more difficult dungeons in the game, along with the Cave to Rendarak. There are multiple basements with many misleading and dead end staircases, along with powerful enemies on the lower basement levels. In addition, this is the only location in the game where lava is a hazard which will damage the heroes with each step. However, it can be avoided like other hazards with Safe Passage.
Also included in the cave are chest which when opened sap some of your characters' HP.
False Idol[edit]
To get to the False Idol, first find your way to floor B1. From there, head west down the passage, and take the second south opening. Continue west, and head north through the lava once you hit the wall. On floor B2, head past all the tempting staircases marked with torches, and follow the path around to the south. Take the first staircase you see on the main path. On floor B3, go straight northwest into the lava lake, and take the only staircase. Now that you're on floor B4, simply follow the path around to the altar, and defeat the two Whackolytes guarding the artifact.
Notable attribute[edit]
![]() This location contains lava marshes/swamps.
This location contains lava marshes/swamps.
Treasures[edit]
(NES version)[edit]
|
(GBC version)[edit] |
Monsters[edit]
- Whackolyte
- Chasmonaut
- Heyedra
- Treevil
- Hunter mech
- Miasma
- Mummy
- Orc chieftain
- Bloody hand
- Liquid metal slime
- Magic marionette
- Striking sabrecat
Nearby monsters[edit]
Remake Changes[edit]
The HP trap chests are replaced by a poison trap, which affects the character opening the chest.
Map & Gallery[edit]

Map. (NES)
Map. (SFC)
The Sea Cave before the Moonshard is used. (Cell phone)
Sea Cave. (Cell phone)
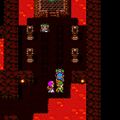
Wrecktor duo. (Cell phone)