Shrine of Mysteries
| Temple | |
|---|---|
| Shrine of Mysteries | |
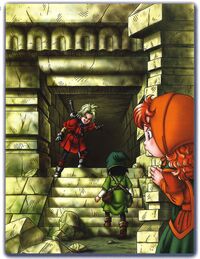
 The Hero, Kiefer, and Maribel exploring the Shrine | |
| Japanese | 謎の遺跡 謎の神殿 |
| Romaji | nazo no iseki (Mysterious ruins) nazo no shinden (Mysterious temple) |
| Game | Dragon Quest VII |
| Old localization | Ancient Ruins/Ancient Fane (PS1) |
The Shrine of Mysteries is a temple in Dragon Quest VII: Fragments of the Forgotten Past.
It is located on the island of Estard and it holds the key to the truth as to why it is the only island in the world.
Story
The prologue takes place after the Hero and his best friend, Prince Kiefer, have spent all day exploring the shrine exterior, trying to unlock its secrets. According to Kiefer, it is forbidden for anyone to go exploring in the ruins, which just makes him want to figure out the truth behind them.
After a lengthy introduction to the setting of Estard, the duo of explorers enlist the aid of Dermot the hermit to decipher the castle tomes concerning the crypt. By following the sage's lead, the two pray before the statue in the courtyard of the fane and the massive gate gives way in response.
Purpose
The shrine was created by The Almighty as His fail safe against the Demonlord's assault on the world in wake of his own weakening powers. The pedestals housed within activate portals through time that send the chosen one to islands beset by the monsters serving the demonlord's will at the precise moment of their darkest hour to bring them to salvation.
Through the will of The Almighty the shrine does not create parallel universes through it's functions--each island restored immediately appears in the present alongside Estard as if the rout had never taken place. NPCs in each area will reference other villages, castles, and regions as if they were present as well, even if they have not been restored by the party yet.
Once all eighteen regions have been saved, the Roamers can begin their ceremony to restore The Almighty Himself and bring lasting peace to the world.
Pedestals
With the correct Fragments on their corresponding pedestal, a person or more are capable of traveling to the past, protected from logical paradoxes by divine guidance.
The following areas include:
| Pedestal Color | Region |
|---|---|
| Yellow | Ballymolloy, Al-Balad, Gröndal, Gröndal, Wetlock, Vogograd |
| Red | Emberdale, Greenthumb Gardens, El Ciclo, Nottagen, Hubble |
| Blue | Regenstein, Faraday, Alltrades Abbey,Buccanham |
| Green | L'Arca, Encampment of The Roamers, Providence, Aeolus Vale |
| Grey | Cave to Another World Cave to Yet Another World |
Teleportals
As certain regions are saved in the past, a Teleportal relating to that Region will activate and allow for shortcuts to an area of a region. The following are:
- Blue Teleportal - Rainbow Cove of Estard
- Red Teleportal - Burnmont of Emberdale
- Yellow Teleportal - The Oasis of Al-Balad
- Green Teleportal - Sanctum of the Cirrus of Aeolus Vale
These teleportals correspond to the locations that most strongly resonate with one of the four cardinal elements, and lead the way to the resurrection of the spirit who dwells there.
Notable attribute
- This feature is present only in the Sony PlayStation version.
![]() This location can be reached using the Zoom spell.
This location can be reached using the Zoom spell.
Treasures
- 10 gold coins (Sony PlayStation version only)
- Ancient tome (See more details below)
- Chimaera wing (Up a hill east of the Shrine)
- Seed of life (Sony PlayStation version only)
- Saint's armour (Sony PlayStation version only, see equipment below for more detail)
- Saint's helm (Sony PlayStation version only, see equipment below for more detail)
- Saint's shield (Sony PlayStation version only, see equipment below for more detail)
- Saint's sword (Sony PlayStation version only, see equipment below for more detail)
Nearby monsters
(After the Demon King's resurrection)
- Grave of Earth and Fire - Opened after speaking to the guide in the Shrine of Mysteries. East of Estard Castle and has the Saint's helm & armour. Made for the Nintendo 3DS version.
- Grave of Wind and Water - Along the beach path behind the Grave of Earth and Fire. Has the Saint's shield and sword. Made for the Nintendo 3DS version.
- Rainbow Cove - Accessed through the Blue Teleportal, Rainbow Cove is near the ocean area where a particular spirit resides. Aside from that the cave is filled with nothing but sandy grounds and water.
| Image | Original English Name | Current English Name | Location | Effect | Description |
|---|---|---|---|---|---|
| Ancient Scroll | Ancient tome | From Kiefer upon entering the Shrine of Mysteries the first time. | Take to Dermot the Hermit at Estard. | Book of an odd writing.[1] A dusty old book filled with odd illustrations and strange scrawlings.[2] | |
| Ancient Key (Sony PlayStation version only.) | NA | Chest in Shrine of Mysteries. | Take to Dermot the Hermit at Estard. | Open certain doors.[1] | |
| Saint's Armor | Saint's armour | Chest in Shrine of Mysteries. (PS1 version) Under the right tomb in the Grave of Earth and Fire. (3DS version) |
Place on the second statue to the left in the Shrine of Mysteries. | Molded Armor.[1] A carving in the shape of a suit of armour set on a plinth.[2] | |
| Saint's Shield | Saint's shield | Chest in Shrine of Mysteries. (PS1 version) Under the left tomb in the Grave of Wind and Water. (3DS version) |
Place on the first statue to the left in the Shrine of Mysteries. | Molded shield.[1] A carving in the shape of a shield set on a plinth.[2] | |
| Saint's Helm | Saint's helm | Chest in Shrine of Mysteries. (PS1 version) Under the left tomb in the Grave of Earth and Fire. (3DS version) |
Place on the first statue to the right in the Shrine of Mysteries. | Molded helmet.[1] A carving in the shape of a helmet set on a plinth.[2] | |
| Saint's Sword | Saint's sword | Chest in Shrine of Mysteries. (PS1 version) Under the right tomb in the Grave of Wind and Water. (3DS version) |
Place on the second statue to the right in the Shrine of Mysteries. | Molded sword.[1] A carving in the shape of a sword set on a plinth.[2] |
Remake changes
The Shrine of Mysteries was greatly simplified for the 3DS remake, limited to a pair of chambers and two basement levels. Rather than forcing the player to walk between four rooms to each individual plinth to set Fragments, a ghostly faerie hovers above a balcony that stretches over the large central area and allows the player to access all plinths at once from a menu. As a further convenience, the Faerie will also give hints as to where missing fragments may be found. In the English version of Dragon Quest Illustrations: 30th Anniversary Edition, the Faerie is known as "The Host".
Trivia
- In the 3DS version the citizens of Estard and Pilchard Bay will state that man-eating bears are known to roam the forest surrounding the shrine, yet no bears are ever encountered on the island. Whether this is merely ArtePiazza being conscious of the data limits of the 3DS cartridge or a rumor spread by the original settlers of Estard to keep potential ne'er-do-wells from the fane is unknown.
Map & Gallery
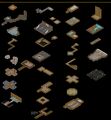
Map of the Ruins. (Sony PlayStation)
Map of the Fragment Rooms. (Sony PlayStation)
The Fragment Faerie tasked by The Almighty to service the shrine.


