Swagman: Difference between revisions
No edit summary |
No edit summary |
||
| Line 59: | Line 59: | ||
}} | }} | ||
The Swagman should be taken out first because of his ability to throw [[Coagulant]], which can confuse one {{Party 7}} member. He can also attack everyone with its [[Stone's Throw]]. He can also be taken out of action easily by putting him to sleep with [[Maribel]]'s [[Snooze]] or using a [[Snooze stick]] on him. If the player managed to get their hands on a [[Lucida shard]] at the [[Precipice Pass]], one can give him a taste of his own medicine and send him into confusion, as well, since he has no resistance against it. | The Swagman should be taken out first because of his ability to throw [[Coagulant]], which can confuse one {{Party 7}} member. He can also attack everyone with its [[Stone's Throw]]. He can also be taken out of action easily by putting him to sleep with [[Maribel]]'s [[Snooze]] or using a [[Snooze stick]] on him. If the player managed to get their hands on a [[Lucida shard]] at the [[Precipice Pass]], one can give him a taste of his own medicine and send him into confusion, as well, since he has no resistance against it. | ||
== | ==={{DQ7R}}=== | ||
{{DQ7REnemy | |||
|name=Swagman | |||
< | |kanji=さんぞく | ||
|romanji=Sanzoku | |||
|icon= | |||
|bestiary=No. 069 | |||
|family=[[??? family|???]] | |||
|exp=225 | |||
|gold=8 | |||
|hp=144/192/235 | |||
|mp=15 | |||
|attack=78 | |||
|defense=42 | |||
|agility=70/78/90 | |||
|evasion=N/A | |||
|in-game-description=Though on the lowest rung of the ladder among the pack of thieves he's put in with, he's come to be content with his lack of career advancement | |||
|spells=None | |||
|skills=Chucks a pouch of [[coagulant]] (paralysis)<br>[[Stone's Throw]] | |||
|habitat=[[Ruins Near Alltrades Abbey]] (present) | |||
|drop=[[Seed of deftness]] (1/256) | |||
|steal=None | |||
|fire-resist=25% | |||
|ice-resist=25% | |||
|wind-resist=25% | |||
|earth-resist=0% | |||
|electricity-resist=0% | |||
|light-resist=0% | |||
|dark-resist=0% | |||
|blunt-resist=0% | |||
|sap-resist=0% | |||
|deceleratle-resist=0% | |||
|divine-resist=0% | |||
|elemental-resist=0% | |||
|status-resist=0% | |||
|mp-absorption-resist=0% | |||
|poof-resist=100% | |||
|instant-death-resist=50% | |||
|sleep-resist=-120% | |||
|confusion-resist=50% | |||
|paralysis-resist=0% | |||
|poison-resist=0% | |||
|bedazzlement-resist=50% | |||
|antimagic-resist=100% | |||
|stun-resist=-140% | |||
|stumble-resist=0% | |||
|laugh-resist=100% | |||
|beguile-resist=100% | |||
|enthrall-resist=100% | |||
|charm-resist=100% | |||
}} | |||
==Related enemies== | ==Related enemies== | ||
| Line 75: | Line 121: | ||
*[[Bag snatcher]] | *[[Bag snatcher]] | ||
*[[Swag bagger]] | *[[Swag bagger]] | ||
==Gallery== | |||
<center><gallery> | |||
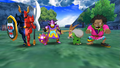
DQVII Bandits.png|Boss encounter in the 3DS version | |||
</gallery></center> | |||
{{clear}} | {{clear}} | ||
{{DQVII}} | {{DQVII}} | ||
{{DQVIIR}} | |||
[[Category:Dragon Quest VII characters]] | |||
[[Category:Dragon Quest VII enemies]] | [[Category:Dragon Quest VII enemies]] | ||
[[Category:Dragon Quest VII bosses]] | [[Category:Dragon Quest VII bosses]] | ||
[[Category:Dragon Quest VII Reimagined characters]] | |||
[[Category:Dragon Quest VII Reimagined enemies]] | |||
[[Category:Dragon Quest VII Reimagined bosses]] | |||
Revision as of 00:19, 11 August 2026
| Dragon Quest monster | |
|---|---|
| Swagman | |
 Art by Akira Toriyama | |
| Japanese | さんぞく |
| Romaji | Sanzoku |
| First appearance | Dragon Quest VII |
| Old localization | Bandit |
The Swagman is a boss in the Dragon Quest series that was introduced in Dragon Quest VII. He fights alongside his fellow bandits in the Alltrades Abbey region where Pilgrim's Perdition once stood.
Characteristics
In battle, the Swagman has the appearance of a Bag snatcher, a sneaky humanoid with jaundiced yellow skin, pointed ears, and a large pair of lips. He wears a ragged red-orange robe over grey clothes, a blue pair of boots, and a blue horned mask that covers his entire face. Over his left shoulder, the Swagman carries a sack of stolen goods, where he also stashes coagulant which he can hurl in order to cause confusion among opponents. In the Nintendo 3DS version, his robe is now mossy green and he wears a brown mask.
Appearances
Dragon Quest VII: Fragments of the Forgotten Past


The Swagman should be taken out first because of his ability to throw Coagulant, which can confuse one party member. He can also attack everyone with its Stone's Throw. He can also be taken out of action easily by putting him to sleep with Maribel's Snooze or using a Snooze stick on him. If the player managed to get their hands on a Lucida shard at the Precipice Pass, one can give him a taste of his own medicine and send him into confusion, as well, since he has no resistance against it.
Dragon Quest VII Reimagined

| Bestiary | Family | ||
| No. 069 | ??? | ||
| Experience* | Gold* | HP* | MP* |
| 225 | 8 | 144/192/235 | 15 |
| Attack* | Defence* | Agility* | Evasion |
| 78 | 42 | 70/78/90 | N/A |
| In-game description | Though on the lowest rung of the ladder among the pack of thieves he's put in with, he's come to be content with his lack of career advancement |
| Spell(s) | None |
| Skill(s) | Chucks a pouch of coagulant (paralysis) Stone's Throw |
| Location(s) | Ruins Near Alltrades Abbey (present) |
| Items dropped | Seed of deftness (1/256) |
| Fire Resistance * | Ice Resistance * | Wind Resistance * | Earth Resistance * | |
| 25% | 25% | 25% | 0% | |
| Light Resistance * | Dark Resistance * | Electricity Resistance * | Drain Magic Resistance | |
| 0% | 0% | 0% | 0% | |
| Instant Death Resistance * | Poof resistance | Bedazzlement Resistance * | Fizzle Resistance | |
| 50% | 100% | 50% | 100% | |
| Confusion Resistance * | Paralysis Resistance * | Poison Resistance * | Sleep Resistance * | |
| 50% | 0% | 0% | -120% | |
| Blunt Resistance * | Decelerate Resistance * | Divine Intervention Resistance * | Sap Resistance * | |
| 0% | 0% | 0% | 0% | |
| Beguile Resistance * | Charm Resistance * | Laughter Resistance * | Stumble Resistance * | |
| 100% | 100% | 100% | 0% | |
| Stun Resistance * | Elemental Resistance * | Status Resistance * | ||
| -140% | 0% | 0% | ||
Related enemies
Similar species
Gallery
Boss encounter in the 3DS version
