Knightmare Towers: Difference between revisions
Antiyonder (talk | contribs) |
Antiyonder (talk | contribs) |
||
| (4 intermediate revisions by the same user not shown) | |||
| Line 74: | Line 74: | ||
DQ V Android Knightmare Towers 3.jpg| | DQ V Android Knightmare Towers 3.jpg| | ||
DQ V Android Knightmare Towers Healing Spring.jpg|[[Healing Spring]]. ([[Cell phone]]) | DQ V Android Knightmare Towers Healing Spring.jpg|[[Healing Spring]]. ([[Cell phone]]) | ||
DQ V Android Kamikazee Bracer 2.jpg|[[Kamikazee bracer]]. ([[Cell phone]]) | |||
DQ V Android Found Zombie Mail.jpg|[[Zombie mail]] ([[Cell phone]]) | |||
DQ V Android Yggdrasil Leaf.jpg|[[Yggdrasil leaf]]. ([[Cell phone]]) | |||
DQ V Android Knightmare Towers Battle Background 1.jpg| | |||
DQ V Android First Knightmare Towers Ambush 1.jpg|First {{MFamilies}} ambush. ([[Cell phone]]) | DQ V Android First Knightmare Towers Ambush 1.jpg|First {{MFamilies}} ambush. ([[Cell phone]]) | ||
DQ V Android First Knightmare Towers Ambush 2.jpg| | DQ V Android First Knightmare Towers Ambush 2.jpg| | ||
| Line 89: | Line 93: | ||
DQ V Android Rockbomb Boulder 3.jpg|Third [[Rockbomb]] boulder. ([[Cell phone]]) | DQ V Android Rockbomb Boulder 3.jpg|Third [[Rockbomb]] boulder. ([[Cell phone]]) | ||
DQ V Android Rockbomb In Knightmare Towers.jpg| | DQ V Android Rockbomb In Knightmare Towers.jpg| | ||
DQ V Android Knightmare Towers Monsters 1.jpg| | |||
DQ V Android Knightmare Towers Monsters 2.jpg| | |||
DQ V Android Knightmare Towers Monsters 3.jpg| | |||
DQ V Android Knightmare Towers Monsters 4.jpg| | |||
DQ V Android Knightmare Towers Monsters 5.jpg| | |||
DQ V Android Knightmare Towers Monsters 6.jpg| | |||
DQ V Android Knightmare Towers Monsters 7.jpg| | |||
DQ V Android Knightmare Towers Monsters 8.jpg| | |||
DQ V Android Knightmare Towers Monsters 9.jpg| | |||
DQ V Android Knightmare Towers Monsters 10.jpg| | |||
DQ V Android Knightmare Towers Monsters 11.jpg| | |||
DQ V Android Knightmare Towers Monsters 12.jpg| | |||
DQ V Android Knightmare Towers Monsters 13.jpg| | |||
DQ V Android Knightmare Towers Monsters 14.jpg| | |||
DQ V Android Knightmare Towers 4.jpg| | DQ V Android Knightmare Towers 4.jpg| | ||
DQ V Android Knightmare Towers Battle Background 2.jpg| | |||
DQ V Android Orc Pawn 1.jpg|[[Orc Pawn]]. ([[Cell phone]]) | DQ V Android Orc Pawn 1.jpg|[[Orc Pawn]]. ([[Cell phone]]) | ||
DQ V Android Orc Pawn 2.jpg| | DQ V Android Orc Pawn 2.jpg| | ||
| Line 97: | Line 116: | ||
DQ V Android Chimaera Pawn 2.jpg| | DQ V Android Chimaera Pawn 2.jpg| | ||
DQ V Android Chimaera Pawn 3.jpg| | DQ V Android Chimaera Pawn 3.jpg| | ||
DQ V Android Knightmare Towers Barricade 2.jpg| | DQ V Android Knightmare Towers Barricade 2.jpg| | ||
DQ V Android Knightmare Towers 5B.jpg| | DQ V Android Knightmare Towers 5B.jpg| | ||
| Line 103: | Line 121: | ||
DQ V Android Knightmare Towers 6B.jpg| | DQ V Android Knightmare Towers 6B.jpg| | ||
DQ V Android Knightmare Towers 6N.jpg| | DQ V Android Knightmare Towers 6N.jpg| | ||
DQ V Android Knightmare Towers Battle Background 3.jpg| | |||
DQ V Android Knightmare Towers 7.jpg| | DQ V Android Knightmare Towers 7.jpg| | ||
DQ V Android Knightmare Towers 8.jpg| | DQ V Android Knightmare Towers 8.jpg| | ||
| Line 108: | Line 127: | ||
DQ V Android Knightmare Towers 9N.jpg| | DQ V Android Knightmare Towers 9N.jpg| | ||
DQ V Android Knightmare Towers 10B.jpg| | DQ V Android Knightmare Towers 10B.jpg| | ||
DQ V Android Knightmare Towers 10N.jpg| | |||
DQ V Android Knightmare Towers 11.jpg| | DQ V Android Knightmare Towers 11.jpg| | ||
DQ V Android Knightmare Towers 12B.jpg| | DQ V Android Knightmare Towers 12B.jpg| | ||
DQ V Android Knightmare Towers 12N.jpg| | |||
</gallery></center> | </gallery></center> | ||
Latest revision as of 04:58, 20 February 2026
| Tower | |
|---|---|
| Knightmare Towers | |

| |
| Japanese | デモンズタワー |
| Romaji | Demon's Tower |
| Game | Dragon Quest V |
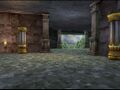
Knightmare Towers is a tower in Dragon Quest V: Hand of the Heavenly Bride.
It is the stronghold of Kon the Knight, a member of the Order of Zugzwang, who has kidnapped the Hero's wife.
Detail[edit]
To access Knightmare Towers, players must first receive the Talaria from Chancellor Jeeve's drawer in Gotha. Once used, it will take players to a neighboring continent, next to a church called Northminster which is just south of this dungeon. This church has both an inn to heal and a priest who will save your game. Players can use the Zoom spell to revisit this church at any time once it has been entered.
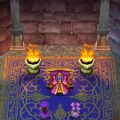
The dungeon is notable for having two kinds of traps. The first one is a single room filled with spikes hidden underneath the floor that pop out of the ground once players approach them. Fortunately, they don't actually do any harm to the player, they simply block the path and are easily circumvented. This room contains a single chest with a Kamikazee bracer.
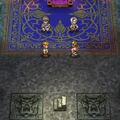
The other kind of trap are a corridor containing flame emitting statues towards the end of the dungeon, which, unlike the spikes, are extremely dangerous and will do large amounts of damage to HP. To get past them safely, players will need to push rocks in front of them, which can be located on a floor just above this corridor. However, some of these rocks are actually Rockbombs, so be wary. Note that if you are killed by these flame throwing statues, then you will be sent back to a man near the beginning of the dungeon who is looking for his brother, and you won't lose half your gold.
Treasures[edit]
- 880 gold coins
- Chimaera wing
- Kamikazee bracer
- Legerdemantle
- Magic water
- Mini medal (5, two of which is dropped by a Mimic)
- Seed of strength
- Yggdrasil leaf
- Zombie mail
Notable attribute[edit]
![]() This area contains a Healing Spring.
This area contains a Healing Spring.
Monsters[edit]
- Air duckt
- Hawk man *
- Hellion *
- Hex hellmet
- Hippoblockomus
- Hocus chimaera
- Hula ghoul
- Liquid metal slime *
- Mimic (x2)
- Minidemon *
- Orc king *
- Quack up
- Rockbomb (x3)
- Samigina *
- Toxtongue
- Urnexpected (x1)
- Chimaera Pawn
- Orc Pawn
- Kon the Knight
Other languages[edit]
| Language | Translation | Meaning |
| Torres Enrocadas | ||
| Tours du Cauchemar | ||
| Zwillingszinnen | ||
| Torri dell'Incubo |
Map & Gallery[edit]

Map. (SFC)


First monster ambush. (Cell phone)


Second monster ambush. (Cell phone)


Third monster ambush. (Cell phone)


First Mimic chest. (Cell phone)

Second Mimic chest. (Cell phone)


First Rockbomb boulder. (Cell phone)

Second Rockbomb boulder. (Cell phone)

Third Rockbomb boulder. (Cell phone)