Kol: Difference between revisions
Antiyonder (talk | contribs) No edit summary |
No edit summary |
||
| Line 87: | Line 87: | ||
*[[Skelegon]] | *[[Skelegon]] | ||
==={{DQ3HD}}=== | |||
====Shops & services==== | |||
{{ItemShop/Start|title=|subtitle=|float=}} | |||
{{ItemShop/Item|name=Medicinal herb III HD|display='''[[Medicinal herb]]'''|price=8|attributes=Restores at least 30 HP to a single ally}} | |||
{{ItemShop/Item|name=Strong medicine III HD|display='''[[Strong medicine]]'''|price=48|attributes=Restores at least 50 HP to a single ally}} | |||
{{ItemShop/Item|name=Chimaera wing III HD|display='''[[Chimaera wing]]'''|price=25|attributes=Can be used to return to previously visited locations}} | |||
{{ItemShop/Item|name=Moonwort bulb III HD|display='''[[Moonwort bulb]]'''|price=30|attributes=Cures paralysis}} | |||
{{ItemShop/Item|name=Dazzle-me-not III HD|display='''[[Dazzle-me-not]]'''|price=120|attributes=Lifts illusions}} | |||
{{ItemShop/Item|name=Falcon blade III HD|display='''[[Falcon blade]]'''|price=38,500|attributes=Attack +55}} | |||
{{ItemShop/Item|name=Sandstorm spear III HD|display='''[[Sandstorm spear]]'''|price=13,700|attributes=Attack +76<br>Casts [[Dazzle]]}} | |||
{{ItemShop/Item|name=Dragon dojo duds III HD|display='''[[Dragon dojo duds]]'''|price=31,500|attributes=Defence +87<br>-25% breath damage}} | |||
{{ItemShop/Item|name=Flowing dress III HD|display='''[[Flowing dress]]'''|price=26,000|attributes=Defence +75<br>-25% Fire, Ice, & Explosion damage}} | |||
{{ItemShop/Item|name=Spiked armour III HD|display='''[[Spiked armour]]'''|price=11,500|attributes=Defence +88<br>50% recoil damage}} | |||
{{ItemShop/Item|name=Slime earrings III HD|display='''[[Slime earrings]]'''|price=950|attributes=Defence +5}} | |||
{{ItemShop/End|note=}} | |||
{{Clear}} | |||
{{WeaponShop/Start|title=Weapon & armour shop|subtitle=|float=}} | |||
{{ItemShop/Item|name=Zombiesbane III HD|display='''[[Zombiesbane (Weapon)|Zombiesbane]]'''|price=12,800|attributes=Attack +68<br>+130% damage to [[Undead family|zombies]]}} | |||
{{ItemShop/Item|name=War hammer III HD|display='''[[War hammer]]'''|price=12,100|attributes=Attack +81}} | |||
{{WeaponShop/Item|name=Sage’s staff III HD|display='''[[Sage's staff]]'''|price=22,600|attributes=Attack +84<br>Casts [[Midheal]]}} | |||
{{WeaponShop/Item|name=Dragontail whip III HD|display='''[[Dragontail whip]]'''|price=6,200|attributes=Attack +62<br>+130% damage to [[Dragon family|dragons]]}} | |||
{{WeaponShop/Item|name=Silver shield III HD|display='''[[Silver shield]]'''|price=13,700|attributes=Defence +63}} | |||
{{WeaponShop/Item|name=Mirror shield III HD|display='''[[Mirror shield]]'''|price=26,000|attributes=Defence +81<br>20% chance to [[Bounce]] spells}} | |||
{{WeaponShop/End|note=}} | |||
{{Clear}} | |||
==={{DQB}}=== | ==={{DQB}}=== | ||
In this game, Kol (along with [[Galenholm]]) consists of different areas that can be reached by using teleportals: the Ruins, the Island of Lava, and the Island of Ice. The boss at the end of Chapter 3 is a [[Magmalice]] and a [[Firn fiend]]. The articles for each area within the region are: | In this game, Kol (along with [[Galenholm]]) consists of different areas that can be reached by using teleportals: the Ruins, the Island of Lava, and the Island of Ice. The boss at the end of Chapter 3 is a [[Magmalice]] and a [[Firn fiend]]. The articles for each area within the region are: | ||
| Line 116: | Line 141: | ||
{{DQI}} | {{DQI}} | ||
{{DQIII}} | {{DQIII}} | ||
{{DQIIIHD}} | |||
{{DQBI}} | {{DQBI}} | ||
[[Category:Dragon Quest I locations]] | [[Category:Dragon Quest I locations]] | ||
[[Category:Dragon Quest III locations]] | [[Category:Dragon Quest III locations]] | ||
[[Category:Dragon Quest III HD-2D Remake locations]] | |||
[[Category:Dragon Quest Builders locations]] | [[Category:Dragon Quest Builders locations]] | ||
[[Category:Dragon Quest Tact locations]] | [[Category:Dragon Quest Tact locations]] | ||
Revision as of 02:34, 4 February 2025
| Village | |
|---|---|
| Kol | |
 Official art of Kol. | |
| Japanese | マイラ |
| Romaji | Maira |
| Game | Dragon Quest Dragon Quest III Dragon Quest Builders |
| Old localization | Same |
Kol is a village in northeastern Alefgard. It sits in the middle of a large forest with a tall mountain chain to the north, and the buildings are made of timber rather than stone.
It is visited in Dragon Quest, Dragon Quest III: The Seeds of Salvation and Dragon Quest Builders.
Appearances
Dragon Quest
Kol is typically the third town the player visits. It is a quiet forest village with a large hot spring for bathing, and it does not contain any essential items for completing the game. The Faerie Flute is hidden four steps south of the bath and is useful for defeating the Golem outside Cantlin, especially so in the remade versions of the game.
Puff-Puff
In all versions of the game, the Hero can receive a Puff-Puff from one of the ladies near the bath for 20 gold coins. All references to the hero's indulgence and the woman's sultry behavior were removed from the original NES version as they were seen as too risque for a Western audience, but this censorship was revoked for the Cell phone version.
- The Famicom version of the scene is different from how the act would be portrayed in later games, with the screen fading to black instead of the usual onomatopoeia playing. It also costs 50 gold coins instead of just 20.
Shops and Services
 Item Shop
 | Item | Price | Attributes |
 Medicinal herb Medicinal herb | 24g | Heals a small amount of HP |
 Torch Torch | 8g | Lights a radius around the Hero |
 Dragon's scale Dragon's scale | 20g | Provides a small amount of Defense |
 Chimaera wing Chimaera wing | 70g | Warps the Hero back to Tantegel |
 Weapon Shop
 | Item | Price | Attributes |
 Copper sword Copper sword | 180 | Attack +10 |
 Iron axe Iron axe | 560 | Attack +15 |
 Iron armour Iron armour | 1000 | Defense +16 |
 Full plate armour Full plate armour | 3000 | Defense +24 |
 Leather shield Leather shield | 90 | Defense +4 |
Treasures
Nearby monsters
Dragon Quest II: Luminaries of the Legendary Line
As is the case with most of the towns/villages in Alefgard, Kol is not accessible in Dragon Quest II. Its location on the world map is covered with forest.
Dragon Quest III: The Seeds of Salvation
The people of Kol frequently mention the legendary Sword of Kings and how it was so dangerous to the devil that he spent three years doing all he could to destroy it. Furthermore, a merchant sitting in the large common room mentions that the blade was forged of the infallible Orichalcum metal. The remarkable smithing skills of the item merchant are also told to the player, which tells them that all three are related and bringing the ore to the merchant will result in the sword.
The item merchant was once a blacksmith living in Jipang, who fled with his wife once she was selected to be the next sacrifice to Orochi. The couple wandered the world until they stumbled upon The Great Pit of Giaga and fell through the crack in the firmament, possibly leading to the construction of the guard post at the site when their fall was mistaken for attempted suicide. The husband has adopted the speaking mannerisms of their new home, but his wife still speaks in haiku.
In order to obtain the Sword of Kings, the player must sell the oricalchum found in Damdara to the Jipangese merchant. The sword can then be purchased for 35,000 gold coins.
Shops and Services
Item Shop | Item | Price | Attributes |
| Medicinal herb | 8g | Heals a small amount of HP |
 Holy water Holy water | 20g | Keeps away low level monsters |
| Chimaera wing | 25g | Same effect as zoom spell |
 Moonwort bulb Moonwort bulb | 30g | Cures paralysis |
Weapon Shop | Item | Price | Attributes |
 Steel broadsword Steel broadsword | 1500 | Attack +33 |
 Sledgehammer Sledgehammer | 6500 | Attack +55 |
 Dragon mail Dragon mail | 9800 | Defence +45 |
 Flowing dress Flowing dress | 12500 | Defence +50 |
 Silver shield Silver shield | 8800 | Defence +40 |
 Iron mask Iron mask | 3500 | Defence +25 |
Treasures
- Faerie Flute
- Mini medals (3)
- Plain clothes
- Seed of magic
- T'n'T ticket (3) (removed for Cell phone version)
Nearby monsters
Dragon Quest III HD-2D Remake
Shops & services
Item Shop | Item | Price | Attributes |
 Medicinal herb Medicinal herb | 8 | Restores at least 30 HP to a single ally |
 Strong medicine Strong medicine | 48 | Restores at least 50 HP to a single ally |
 Chimaera wing Chimaera wing | 25 | Can be used to return to previously visited locations |
 Moonwort bulb Moonwort bulb | 30 | Cures paralysis |
 Dazzle-me-not Dazzle-me-not | 120 | Lifts illusions |
 Falcon blade Falcon blade | 38,500 | Attack +55 |
 Sandstorm spear Sandstorm spear | 13,700 | Attack +76 Casts Dazzle |
 Dragon dojo duds Dragon dojo duds | 31,500 | Defence +87 -25% breath damage |
 Flowing dress Flowing dress | 26,000 | Defence +75 -25% Fire, Ice, & Explosion damage |
 Spiked armour Spiked armour | 11,500 | Defence +88 50% recoil damage |
 Slime earrings Slime earrings | 950 | Defence +5 |
Weapon & armour shop | Item | Price | Attributes |
 Zombiesbane Zombiesbane | 12,800 | Attack +68 +130% damage to zombies |
 War hammer War hammer | 12,100 | Attack +81 |
 Sage's staff Sage's staff | 22,600 | Attack +84 Casts Midheal |
 Dragontail whip Dragontail whip | 6,200 | Attack +62 +130% damage to dragons |
 Silver shield Silver shield | 13,700 | Defence +63 |
 Mirror shield Mirror shield | 26,000 | Defence +81 20% chance to Bounce spells |
Dragon Quest Builders
In this game, Kol (along with Galenholm) consists of different areas that can be reached by using teleportals: the Ruins, the Island of Lava, and the Island of Ice. The boss at the end of Chapter 3 is a Magmalice and a Firn fiend. The articles for each area within the region are:
Dragon Quest Tact
The Master and Majellan pay a visit to the town in Chapter 2, Episode 1 of the game's limited Dragon Quest I event. Majellan wants to relax in the town's hot springs before he remembering they're trying to locate the missing Mindini, much to his dismay. In the town, they encounter a fortune-telling old man who points them in the direction of the Quagmire Cave.
Map & Gallery

Villager's greeting.

The flute's location. (GBC)
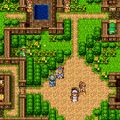

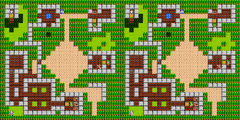
Map for Dragon Warrior. (NES)
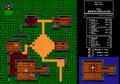
Map for Dragon Warrior III. (NES)

Kol from DQ. (Cell phone)

Former site of Kol from II. (Cell phone)
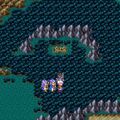
Kol from III. (Cell phone)

Majellan visiting Kol in Tact.


