Grave of Galen: Difference between revisions
(Created page with "The '''Grave of Galen''' (ガライの墓, ''Garai no Haka'', '''Grave of Garinham''') is a dungeon in ''Dragon Quest'' where in it lies beneath the town of...") |
No edit summary |
||
| (16 intermediate revisions by 9 users not shown) | |||
| Line 1: | Line 1: | ||
The '''Grave of Galen''' (ガライの墓, ''Garai no Haka'', '''Grave of Garinham''') is a dungeon in | {{LocationInfobox | ||
|game = {{DQ}}<br>{{DQ1HD}}<br>{{DQ2HD}} | |||
|title = Grave of Galen | |||
|type= Dungeon | |||
|image = [[File:DQ Android Grave Of Galenholm Entrance 1.jpg|250px]] | |||
|caption = | |||
|japanese=ガライの墓 | |||
|romaji=Garai no haka | |||
|old=Grave of Garinham | |||
}} | |||
The '''Grave of Galen''' (ガライの墓, ''Garai no Haka'', '''Grave of Garinham''') is a dungeon in {{Dragon Quest}} where in it lies beneath the town of [[Galenholm]]. As its name implies, it is the resting place of the storied [[Troubadour]] known as [[Galen]] and houses the harp that made him a legend in his time, the [[lyre of ire]]. | |||
==Appearances== | |||
==={{DQ}}=== | |||
A [[magic key]] is required to enter the building blocking the path to the entrance. Before entering for the first time, you'll be met by a strange old man who ominously tells you that no one entering the tomb is seen from again, before fading away... | |||
== | ===Treasures=== | ||
The main treasure within the dungeon is the [[Lyre of Ire]], which is an essential item for completing the trial that the [[Sage of Rain]] placed on the {{Hero 1}}. | |||
=== | In order to get into the room containing the lyre, players must find reach the bottom floor before taking the stairs back up into it's chamber. | ||
Other items found in the dungeon are as follows: | |||
*Floor B1 = NE corner - [[Magic Key]] | |||
*Floor B1 = NE corner - 537 {{Gold}} | |||
*Floor B1 = NE corner - [[Seed of life]] | |||
*Floor B3 = NW corner - 343 {{Gold}} | |||
===={{Monster}}s==== | |||
*[[Bewarewolf]] | |||
*[[Drohl diabolist]] | |||
*[[Raving lunatick]] | |||
*[[Scarewolf]] | |||
*[[Skeleton]] | |||
*[[Skeleton soldier]] | |||
*[[Fightgeist]] | |||
*[[Spitegeist]] | |||
*[[Drackyma]] | |||
*[[Legerdeman (Dragon Quest)|Legerdeman]] | |||
*[[Iron scorpion]] | |||
==={{DQ1HD}}=== | |||
The door to the tomb can be opened with the [[thief's key]], allowing early access to the first floor of the dungeon and giving players a chance to acquire useful treasure while dealing with weakling monsters. The deeper floors, however, require the [[ultimate key]] to access; the Hero will be sent to retrieve the lyre of ire at the behest of the [[Dream-Whisperer]] as it is necessary to summon the Goddess [[Rubiss]] back to [[Alefgard]], making this one of the final destinations before setting out for the [[Dragonlord's Castle]]. | |||
=== | ====Galen's poem==== | ||
A poem is etched on to Galen's tombstone, the last verses the bard ever wrote, celebrating the might and tragedy of [[Erdrick]]: | |||
{{quote|style=1|quote='''''A sound so soft as to entrance,<br>And set the human heart to dance, <br>Throughout the years,<br>And though one strum its silver strings,<br>As west wind bends the boughs of spring,<br>No fiend appears.<br><br>My lyre once summoned wicked things,<br>The curse now gone, instead it sings,<br>Of Erdrick's might.<br>So let its song ring out, and praise,<br>The hero, who throughout the days,<br>Did for us fight.<br><br>But know this also, Erdrick bold,<br>Though mighty as in tales of old,<br>Was human yet.<br>And suffered as would I or you,<br>When forced to venture forth and to,<br>Sweet home forget.<br><br>'Neath helm of legend thus was hid,<br>Great woe, but blade our hero did,<br>Imbue with hope.<br>And onward went, and demon slew,<br>Though homeland lost and all they knew,<br>Full few could cope.<br><br>O Erdrick, hero, bold and brave,<br>Who did our world from darkness save,<br>Thy pain I feel.<br>And so, I take up harp in turn,<br>And pen these words, that all might learn,<br>Of thine ordeal.'''''|source=|console=]|align=center|bgcolor=ffffff}} | |||
====Treasures==== | |||
{| class="wikitable" | |||
|- | |||
| [[File:ICON-Lyre of ire III HD.png|link=Lyre of ire]] || [[File:ICON-Mini medal III HD.png|link=List of mini medals in Dragon Quest I HD-2D Remake]] || [[File:ICON-Medicinal herb III HD.png|link=Medicinal herb]] || [[File:ICON-Magic water III HD.png|link=Magic water]] || [[File:ICON-Tangleweb III HD.png|link=Tangleweb]] || [[File:ICON-Seed of agility III HD.png|link=Seed of agility]] || [[File:ICON-Seed of life III HD.png|link=Seed of life]] || [[File:ICON-Seed of stamina III HD.png|link=Seed of stamina]] || [[File:ICON-Cower ring III HD icon.png|link=Cower ring]] || [[File:ICON-Dark robe III HD.png|link=Dark robe]] || [[File:ICON-Plain clothes III HD.png|link=Plain clothes]] | |||
|- | |||
| x1 || x2 || x1 || x3 || x2 || x1 || x2 || x1 || x1 || x1 || x1 | |||
|} | |||
====Monsters==== | |||
{| class="wikitable" | |||
|- | |||
| [[File:Drohl drone I & II HD sprite.png|64px|link=Drohl drone]] || [[File:Fightgeist I & II HD sprite.png|64px|link=Fightgeist]] || [[File:Ghoul DQ III HD sprite.png|link=Ghoul]] || [[File:Legerdeman I & II HD sprite.png|64px|link=Legerdeman (Dragon Quest)]] [[File:Morphean mushroom DQ III HD sprite.png|link=Morphean mushroom]] || [[File:Shade DQ III HD sprite.png|link=Shade]] || [[File:Silhouette DQ III HD sprite.png|link=Silhouette]] || [[File:Skeleton I & II HD sprite.png|64px|link=Skeleton]] || [[File:Skeleton swordsman DQ III HD sprite.png|link=Skeleton swordsman (recurring)]] || [[File:Skelegon DQ III HD sprite.png|link=Skelegon]] || [[File:Spitegeist I & II HD sprite.png|64px|link=Spitegeist]] || [[File:Vladdy DQ III HD sprite.png|link=Vladdy]] | |||
|} | |||
==={{DQ2HD}}=== | |||
The Grave of Galen is an optional dungeon in ''Dragon Quest II'', with the only plot point being the conclusion of the [[Firstborn Protector]]'s sidequest. Beyond this it houses some useful treasures and ability scrolls, but still has the harsh restriction of requiring the ultimate key to fully explore. | |||
====Treasures==== | |||
{| class="wikitable" | |||
|- | |||
| [[File:ICON-Mini medal III HD.png|link=List of mini medals in Dragon Quest II HD-2D Remake]] || [[File:ICON-Medicinal herb III HD.png|link=Medicinal herb]] || [[File:ICON-Magic water III HD.png|link=Magic water]] || [[File:ICON-Holy water III HD.png|link=Holy water]] || [[File:ICON-Seed of agility III HD.png|link=Seed of agility]] || [[File:ICON-Seed of strength III HD.png|link=Seed of strength]] || [[File:ICON-Seed of wisdom III HD.png|link=Seed of wisdom]] || [[File:ICON-Chimaera wing III HD.png|link=Chimaera wing]] || [[File:ICON-Dancer's costume I & II HD.png|link=Dancer's costume]] || [[File:ICON-Plain clothes III HD.png|link=Plain clothes]] || [[File:ICON-Shimmering dress III HD.png|link=Shimmering dress]] || [[File:ICON-Hocus hat III HD.png|link=Hocus hat]] || [[File:ICON-Leather hat III HD.png|link=Leather hat]] | |||
|- | |||
| x1 || x1 || x1 || x1 || x1 || x1 || x1 || x2 || x1 || x1 || x1 || x1 || x1 | |||
|} | |||
====Monsters==== | |||
{| class="wikitable" | |||
|- | |||
| [[File:Bloody hand I & II HD sprite.png|64px|link=bloody hand]] || [[File:Chasmonaut I & II HD sprite.png|64px|link=chasmonaut]] || [[File:Dancing flame I & II HD sprite.png|64px|link=Dancing flame]] || [[File:Ghoul DQ III HD sprite.png|link=Ghoul]] || [[File:One-man army DQ III HD sprite.png|link=One-man army]] || [[File:Skelegon DQ III HD sprite.png|link=Skelegon]] || [[File:Voodoogooder DQ III HD sprite.png|link=Voodoogooder]] | |||
|} | |||
==={{DQTact}}=== | |||
Chapter 1, Episode 5 of the limited {{Dragon Quest}} event takes place in the Grave of Galen. After [[Mindini]] is separated from both the [[Hero (Dragon Quest Tact)|Master]] and [[Majellan]], she finds herself in the dungeon and finds the lyre and starts to play it. The cacophony caused by her bad playing draws the ire of nearby {{MFamilies}}s, causing her companions to have to come to her rescue. However, after the battle a [[Drohl drone]] kidnaps [[Mindini]] when it realizes she was the one behind the discordant music. | |||
==Maps & Gallery== | |||
<center><gallery> | |||
DW NES Grave of Garinham.gif|{{I}} ({{NES}}) | |||
DQ SFC Garin's Tomb.png|{{I}} {{SFC}} map. ({{SFC}}) | |||
Grave of Galen 1B map I HD2D.png| ''Dragon Quest I HD-2D'' map | |||
Grave of Galen 2B map I HD2D.png | |||
Grave of Galen 3B map I HD2D.png | |||
Grave of Galen 4B map I HD2D.png | |||
Grave of Galen 5B map I HD2D.png | |||
Grave of Galen 1B map II HD2D.png| ''Dragon Quest II HD-2D'' map | |||
Grave of Galen 2B map II HD2D.png | |||
Grave of Galen 3B map II HD2D.png | |||
Grave of Galen 4B map II HD2D.png | |||
Grave of Galen 5B map II HD2D.png | |||
DQ Android Grave Of Galenholm Entrance 2.jpg|Grave entrance. ([[Cell phone]]) | |||
DQ Android Grave Of Galen.jpg|Finding [[Lyre of Ire]]. ([[Cell phone]]) | |||
Illustration Booklet (Pg. 16 & 17).png|thumb|Galen's Grave portrayed in the [[Dragon Quest I CD Theater]] booklet | |||
</gallery></center> | |||
{{clear}} | |||
{{DQI}} | {{DQI}} | ||
{{DQI&IIHD}} | |||
[[Category:Dragon Quest I locations]] | |||
[[Category:Dragon Quest I HD-2D Remake locations]] | |||
[[Category:Dragon Quest II HD-2D Remake locations]] | |||
[[Category:Dragon Quest Tact locations]] | |||
Latest revision as of 01:49, 2 May 2026
| Dungeon | |
|---|---|
| Grave of Galen | |

| |
| Japanese | ガライの墓 |
| Romaji | Garai no haka |
| Game | Dragon Quest Dragon Quest I HD-2D Remake Dragon Quest II HD-2D Remake |
| Old localization | Grave of Garinham |
The Grave of Galen (ガライの墓, Garai no Haka, Grave of Garinham) is a dungeon in Dragon Quest where in it lies beneath the town of Galenholm. As its name implies, it is the resting place of the storied Troubadour known as Galen and houses the harp that made him a legend in his time, the lyre of ire.
Appearances[edit]
Dragon Quest[edit]
A magic key is required to enter the building blocking the path to the entrance. Before entering for the first time, you'll be met by a strange old man who ominously tells you that no one entering the tomb is seen from again, before fading away...
Treasures[edit]
The main treasure within the dungeon is the Lyre of Ire, which is an essential item for completing the trial that the Sage of Rain placed on the Hero.
In order to get into the room containing the lyre, players must find reach the bottom floor before taking the stairs back up into it's chamber. Other items found in the dungeon are as follows:
- Floor B1 = NE corner - Magic Key
- Floor B1 = NE corner - 537 gold coins
- Floor B1 = NE corner - Seed of life
- Floor B3 = NW corner - 343 gold coins
Monsters[edit]
- Bewarewolf
- Drohl diabolist
- Raving lunatick
- Scarewolf
- Skeleton
- Skeleton soldier
- Fightgeist
- Spitegeist
- Drackyma
- Legerdeman
- Iron scorpion
Dragon Quest I HD-2D Remake[edit]
The door to the tomb can be opened with the thief's key, allowing early access to the first floor of the dungeon and giving players a chance to acquire useful treasure while dealing with weakling monsters. The deeper floors, however, require the ultimate key to access; the Hero will be sent to retrieve the lyre of ire at the behest of the Dream-Whisperer as it is necessary to summon the Goddess Rubiss back to Alefgard, making this one of the final destinations before setting out for the Dragonlord's Castle.
Galen's poem[edit]
A poem is etched on to Galen's tombstone, the last verses the bard ever wrote, celebrating the might and tragedy of Erdrick:
"A sound so soft as to entrance,
And set the human heart to dance,
Throughout the years,
And though one strum its silver strings,
As west wind bends the boughs of spring,
No fiend appears.
My lyre once summoned wicked things,
The curse now gone, instead it sings,
Of Erdrick's might.
So let its song ring out, and praise,
The hero, who throughout the days,
Did for us fight.
But know this also, Erdrick bold,
Though mighty as in tales of old,
Was human yet.
And suffered as would I or you,
When forced to venture forth and to,
Sweet home forget.
'Neath helm of legend thus was hid,
Great woe, but blade our hero did,
Imbue with hope.
And onward went, and demon slew,
Though homeland lost and all they knew,
Full few could cope.
O Erdrick, hero, bold and brave,
Who did our world from darkness save,
Thy pain I feel.
And so, I take up harp in turn,
And pen these words, that all might learn,
Of thine ordeal."
Treasures[edit]
 |
 |
 |
 |
 |
 |
 |
 |
 |
 |

|
| x1 | x2 | x1 | x3 | x2 | x1 | x2 | x1 | x1 | x1 | x1 |
Monsters[edit]
 |
 |
 |
  |
 |
 |
 |
 |
 |
 |

|
Dragon Quest II HD-2D Remake[edit]
The Grave of Galen is an optional dungeon in Dragon Quest II, with the only plot point being the conclusion of the Firstborn Protector's sidequest. Beyond this it houses some useful treasures and ability scrolls, but still has the harsh restriction of requiring the ultimate key to fully explore.
Treasures[edit]
|
|
|
 |
|
 |
 |
 |
 |
|
 |
 |

|
| x1 | x1 | x1 | x1 | x1 | x1 | x1 | x2 | x1 | x1 | x1 | x1 | x1 |
Monsters[edit]
 |
 |
 |
|
 |
|

|
Dragon Quest Tact[edit]
Chapter 1, Episode 5 of the limited Dragon Quest event takes place in the Grave of Galen. After Mindini is separated from both the Master and Majellan, she finds herself in the dungeon and finds the lyre and starts to play it. The cacophony caused by her bad playing draws the ire of nearby monsters, causing her companions to have to come to her rescue. However, after the battle a Drohl drone kidnaps Mindini when it realizes she was the one behind the discordant music.
Maps & Gallery[edit]
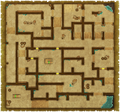
Dragon Quest I HD-2D map


Dragon Quest II HD-2D map


Grave entrance. (Cell phone)

Finding Lyre of Ire. (Cell phone)

Galen's Grave portrayed in the Dragon Quest I CD Theater booklet


.png)