Dirkandor: Difference between revisions
No edit summary |
No edit summary |
||
| Line 9: | Line 9: | ||
|old=Osterfair | |old=Osterfair | ||
}} | }} | ||
'''Dirkandor''' is a castle in the eastern sea of greater [[Alefgard]]. It is located on an island accessible only via [[Ship]] or [[Teleportal]] in {{Dragon Quest II}}. | '''Dirkandor''' is a castle in the eastern sea of greater [[Alefgard]]. It is located on an island accessible only via [[Ship]] or [[Teleportal]] in {{Dragon Quest II}}, and in the original versions of the game it is the only kingdom not connected to the legend of [[Erdrick]]. | ||
==Appearances== | ==Appearances== | ||
==={{DQ2}}=== | ==={{DQ2}}=== | ||
[[Image:KingOfOsterfair.png|thumb|right|200px|The King with his pet rabbits]] | [[Image:KingOfOsterfair.png|thumb|right|200px|The King with his pet rabbits]] | ||
Dirkandor is home to the [[moon sigil]], which is held by the [[King of Dirkandor|eponymous King]]. Speaking with the | Dirkandor is home to the [[moon sigil]], which is held by the [[King of Dirkandor|eponymous King]]. Speaking with the King gives the [[Scions of Erdrick]] an opportunity to win the moon sigil by defeating a single [[striking sabrecat]]. | ||
====Shop & services==== | ====Shop & services==== | ||
| Line 31: | Line 26: | ||
{{WeaponShop/Item|name=Iron helmet|price=3150|attributes=+6 Defense}} | {{WeaponShop/Item|name=Iron helmet|price=3150|attributes=+6 Defense}} | ||
{{WeaponShop/End|note=}} | {{WeaponShop/End|note=}} | ||
====Treasure==== | |||
*[[Divine dagger]] | |||
*[[Seed of strength]] | |||
*[[Tectonic plate]] | |||
====Nearby {{MFamilies}}s==== | ====Nearby {{MFamilies}}s==== | ||
| Line 42: | Line 42: | ||
==={{DQ2HD}}=== | ==={{DQ2HD}}=== | ||
Dirkandor has been expanded into a proper kingdom, with the castle town sheltered by ramparts rivaling those of [[Cantlin]]. The kingdom places an immense value on physical fitness and martial prowess, with even the granny sitting on the church pews boasting of her strict regimen and reputation as the "Iron Tigress". As one of the kingdom guards explains, one's might takes priority over birth-status and the King hire anyone sufficiently great into his soldiery regardless of being a peasant or aristocrat. | |||
The teleportal in the ramparts now connects to the [[Shrine of Flames]], but players cannot enter the castle or town as the door is sealed and requires the [[magic key]] to unlock. Players also cannot enter the castle through the gate unless the [[faded blade]] has been obtained, with the guards demanding the [[Scions of Erdrick]] prove their might before being allowed entry, but even then the children will not be seen by the King unless they possess the [[priest's missive]]. This letter of recommendation is granted by the [[Aged Priest]] of [[Beran]], and effectively means the plot involving Dirkandor cannot be advanced until the [[Princess of Cannock]] joins her family on the adventure. The castle itself resembles a fortress, with scant few windows and large braziers providing light. | |||
Upon speaking to the King he alludes to the impostor [[Princess of Moonbrooke]] creeping from kingdom to kingdom but boasts that his vast information network has assured him the genuine article stands before him. he also confirms that he possesses one of the [[five sigils]], but the quartet must test their might in a series of battles before he will give it to them―his logic is founded on the grounds that if they cannot defeat his pit beasts then they will stand no chance against [[Hargon]] himself, and the sigil would be safer in his kingdom. Notably, the King mentions the Aged Priest of Beran when throwing down the gauntlet; the Princess of Moonbrooke presses him on his connection to the mysterious old man, but the King quickly makes up a flimsy cover. | |||
The three fights are against a trio of [[hades' condor]]s, a pair of [[smackanape]]s, and the infamous [[striking sabrecat]]. Upon defeating the apes a humorous scene will play out where the King of Dirkandor congratulates the heroes on their progress, which causes the Princess of Cannock to erupt with excitement as the challenge is among the first boss battles she will have faced since joining the party. Once the battle cat is bested the King congratulates the four young heroes by stating their victory was worn through their own might and not just by the blood of their storied ancestor, and gives them the [[moon sigil]]. The holy relic allows spells cast by the Scions to go [[haywire]], greatly increasing their attack power, healing power, and the chance to debilitate foes. Before the group departs the King warns them that his information network has told him grim tales of Hargon's own might, especially his ability to rob his enemies of their senses through his cunning illusions. | |||
Players have the option of returning to speak to the King before obtaining the [[water sigil]] to get a clue to its whereabouts, but the Scions are obliged to return once the [[moonshard]] is obtained in order to track down a way into Hargon's realm of [[Rendarak]]. The King will put the children to his ultimate test and face them himself in battle, and once they prove victorious he will inform them that the secret of entering the frozen plateau of Rendarak lay with the Aged Priest of Beran. | |||
Dirkandor is also home to a [[Fortune Teller]] who will provide players with hints regarding the happenings taking place in Cantlin, the [[Deserted Village]], & [[Slewse]], providing perspective on these events from that of the commoners not related to the game's story. The old soothsayer also warns of the dangerous Lords of the Sea, [[Abysmerelda]] and [[Helliphantes]]. Players are also given a direct hint to the whereabouts of the [[tectonic plate]] courtesy of the swordsman in the weapon shop. | |||
====Shops & services==== | |||
<div style="float:left; margin-right:1em;"> | |||
{{ItemShop/Start|title=|subtitle=|float=}} | |||
{{ItemShop/Item|name=Medicinal herb|price=8|attributes=Heals 35~45 HP<br>Restores 45~53 HP with the [[water sigil]]}} | |||
{{ItemShop/Item|name=Strong medicine III HD|display='''[[Strong medicine]]'''|price=48|attributes=Restores 50~60 HP<br>Restores 67~79 HP with [[water sigil]]}} | |||
{{ItemShop/Item|name=Antidotal herb III HD|display='''[[Antidotal herb]]'''|price=10|attributes=Cures poison<br>Cures party with [[water sigil]]}} | |||
{{ItemShop/Item|name=Moonwort bulb III HD|display='''[[Moonwort bulb]]'''|price=30|attributes=Cures paralysis<br>Cures party with [[water sigil]]}} | |||
{{ItemShop/Item|name=Coagulant III HD|display='''[[Coagulant]]'''|price=310|attributes=Casts [[Fuddle]]<br>Targets all foes with [[water sigil]]}} | |||
{{ItemShop/Item|name=Tangleweb III HD|display='''[[Tangleweb]]'''|price=35|attributes=Casts [[Deceleratle]]}} | |||
{{ItemShop/Item|name=Holy water III HD|display='''[[Holy water]]'''|price=20|attributes=Repels weaker monsters for 64 steps<br>Deals 15~32 damage to one foe<br>Deals 30~64 damage with [[water sigil]]}} | |||
{{ItemShop/Item|name=Musk III HD|display='''[[Musk]]'''|price=150|attributes=Monsters attack more often for a brief time}} | |||
{{ItemShop/Item|name=Chimaera wing III HD|display='''[[Chimaera wing]]'''|price=25|attributes=Casts [[Zoom]]}} | |||
{{ItemShop/End|note=}} | |||
</div> | |||
<div style="float:left; margin-right:1em;"> | |||
{{WeaponShop/Start|title=|subtitle=|float=}} | |||
{{WeaponShop/Item|name=Serpent sword I & II HD|display='''[[Serpent sword]]'''|price=2,700|attributes=Attack +31}} | |||
{{WeaponShop/Item|name=Kestrel claws I & II HD|display='''[[Kestrel claws]]'''|price=2,700|attributes=Attack +60<br>Agility +10<br>+30% damage to [[Floating "family"|floating monsters]]}} | |||
{{WeaponShop/Item|name=Battle-axe III HD|display='''[[Battle-axe]]'''|price=8,200|attributes=Attack +62}} | |||
{{WeaponShop/Item|name=Warrior's helm I & II HD|display='''[[Warrior's helm]]'''|price=5,200|attributes=Defence +36<br>Bedazzlement resistance +6.25%}} | |||
{{WeaponShop/Item|name=Warrior's armour I & II HD|display='''[[Warrior's armour]]'''|price=4,100|attributes=Defence +41<br>[[Whack]] resistance +6.25%}} | |||
{{WeaponShop/Item|name=Warrior's shield I & II HD|display='''[[Warrior's shield]]'''|price=6,900|attributes=Defence +50<br>-6.25% spell & breath damage}} | |||
{{WeaponShop/End|note=}} | |||
</div> | |||
<div style="float:left;"> | |||
{{Clear}} | |||
====Treasures==== | |||
{| class="wikitable sortable" | |||
|- | |||
| [[File:ICON-Moon sigil I & II HD icon.png|link=Moon sigil]] | |||
| [[Moon sigil]] | |||
| x1 | |||
|Unmissable | |||
|- | |||
| [[File:Tectonic plate I & II HD icon.png|link=Tectonic plate]] | |||
| [[Tectonic plate]] | |||
| x1 | |||
|[[Ultimate key]] | |||
|- | |||
| [[File:ICON-Mini medal III HD.png|link=List of mini medals in Dragon Quest II HD-2D Remake]] | |||
| [[Mini medal]] | |||
| x1 | |||
| [[Magic key]] | |||
|- | |||
| [[File:ICON-Tombola Ticket I & II HD.png|link=Tombola ticket]] | |||
| [[Tombola ticket]] | |||
| x6 | |||
| [[Magic key]] (4) | |||
|- | |||
| [[File:ICON-Medicinal herb III HD.png|link=Medicinal herb]] | |||
| [[Medicinal herb]] | |||
| x1 | |||
|N/A | |||
|- | |||
| [[File:ICON-Magic water III HD.png|link=Magic water]] | |||
| [[Magic water]] | |||
| x1 | |||
|N/A | |||
|- | |||
| [[File:ICON-Dazzle-me-not III HD.png|link=Dazzle-me-not]] | |||
| [[Dazzle-me-not]] | |||
| x2 | |||
|N/A | |||
|- | |||
| [[File:Coagulant III HD icon.png|link=Coagulant]] | |||
| [[Coagulant]] | |||
| x1 | |||
|N/A | |||
|- | |||
| [[File:Seed of defence III HD icon.png|link=Seed of defence]] | |||
| [[Seed of defence]] | |||
| x1 | |||
|N/A | |||
|- | |||
| [[File:Seed of luck III HD icon.png|link=Seed of luck]] | |||
| [[Seed of luck]] | |||
| x1 | |||
|N/A | |||
|- | |||
| [[File:Seed of strength III HD icon.png|link=Seed of strength]] | |||
| [[Seed of strength]] | |||
| x1 | |||
| [[Magic key]] | |||
|- | |||
| [[File:ICON-Holy water III HD.png|link=Holy water]] | |||
| [[Holy water]] | |||
| x1 | |||
|N/A | |||
|- | |||
| [[File:Divine dagger III HD icon.png|link=Divine dagger]] | |||
| [[Divine dagger]] | |||
| x1 | |||
| [[Magic key]] | |||
|- | |||
| [[File:Beastly bullwhip III HD icon.png|link=Beastly bullwhip]] | |||
| [[Beastly bullwhip]] | |||
| x1 | |||
|N/A | |||
|- | |||
| [[File:Leather helm III HD icon.png|link=Leather hat]] | |||
| [[Leather hat]] | |||
| x1 | |||
|N/A | |||
|} | |||
====[[Tombola]]==== | |||
Each play requires two [[tombola ticket]]s. | |||
{| cellspacing="0" cellpadding="2" border="1" | |||
!style="background:#77479B; color: white;"|Rarity | |||
!style="background:#77479B; color: white;"|Prize | |||
|- | |||
|Ultimate | |||
|[[File:ICON-Golden bamboo lance I & II HD.png|link=Golden bamboo lance]] | |||
|- | |||
|1st Class | |||
|[[File:Glombolero III HD icon.png|link=Glombolero]] | |||
|- | |||
|2nd Class | |||
|[[File:Platinum sword I & II HD icon.png|link=Platinum sword]] | |||
|- | |||
|3rd Class | |||
|[[File:Oomph powder III HD icon.png|link=Oomph powder]] | |||
|- | |||
|4th Class | |||
|[[File:Unsealant III HD icon.png|link=Unsealant]] | |||
|- | |||
|} | |||
====Nearby {{MFamilies}}s==== | |||
{| class="wikitable" | |||
| [[File:Battering ram DQ III HD sprite.png|link=Battering ram]] || [[File:Metal slime DQ III HD sprite.png|link=Metal slime]] || [[File:Magic marionette I & II HD sprite.png|64px|link=Magic marionette]] || [[File:Miasma I & II HD sprite.png|64px|link=Miasma]] || [[File:Walking corpse DQ III HD sprite.png|link=Walking corpse]] || [[File:Whackanape DQ III HD sprite.png|link=Whackanape]] | |||
|} | |||
==Map & Gallery== | ==Map & Gallery== | ||
Latest revision as of 03:37, 16 June 2026
| Castle | |
|---|---|
| Dirkandor | |
 | |
| Japanese | デルコンダル |
| Romaji | Derukondaru |
| Game | Dragon Quest II Dragon Quest II HD-2D Remake |
| Old localization | Osterfair |
Dirkandor is a castle in the eastern sea of greater Alefgard. It is located on an island accessible only via Ship or Teleportal in Dragon Quest II, and in the original versions of the game it is the only kingdom not connected to the legend of Erdrick.
Appearances[edit]
Dragon Quest II: Luminaries of the Legendary Line[edit]

Dirkandor is home to the moon sigil, which is held by the eponymous King. Speaking with the King gives the Scions of Erdrick an opportunity to win the moon sigil by defeating a single striking sabrecat.
Shop & services[edit]
The shopkeeper has the tectonic plate and a divine dagger in his personal chests behind the counter. This room is locked behind a door that requires the golden key.
| Item | Price | Attributes |
| 1500 | +30 Attack | |
| 4000 | +35 Attack (NES) +40 Attack (remakes) | |
| 8000 | +50 Attack (NES) +55 Attack (remakes) | |
| 1250 | +20 Defense (NES) +35 Defense | |
| 4300 | +25 Defense (NES) +35 Defense (remakes) 33% magic damage reduction | |
| 3150 | +6 Defense |
Treasure[edit]
Nearby monsters[edit]
Dragon Quest II HD-2D Remake[edit]
Dirkandor has been expanded into a proper kingdom, with the castle town sheltered by ramparts rivaling those of Cantlin. The kingdom places an immense value on physical fitness and martial prowess, with even the granny sitting on the church pews boasting of her strict regimen and reputation as the "Iron Tigress". As one of the kingdom guards explains, one's might takes priority over birth-status and the King hire anyone sufficiently great into his soldiery regardless of being a peasant or aristocrat.
The teleportal in the ramparts now connects to the Shrine of Flames, but players cannot enter the castle or town as the door is sealed and requires the magic key to unlock. Players also cannot enter the castle through the gate unless the faded blade has been obtained, with the guards demanding the Scions of Erdrick prove their might before being allowed entry, but even then the children will not be seen by the King unless they possess the priest's missive. This letter of recommendation is granted by the Aged Priest of Beran, and effectively means the plot involving Dirkandor cannot be advanced until the Princess of Cannock joins her family on the adventure. The castle itself resembles a fortress, with scant few windows and large braziers providing light.
Upon speaking to the King he alludes to the impostor Princess of Moonbrooke creeping from kingdom to kingdom but boasts that his vast information network has assured him the genuine article stands before him. he also confirms that he possesses one of the five sigils, but the quartet must test their might in a series of battles before he will give it to them―his logic is founded on the grounds that if they cannot defeat his pit beasts then they will stand no chance against Hargon himself, and the sigil would be safer in his kingdom. Notably, the King mentions the Aged Priest of Beran when throwing down the gauntlet; the Princess of Moonbrooke presses him on his connection to the mysterious old man, but the King quickly makes up a flimsy cover.
The three fights are against a trio of hades' condors, a pair of smackanapes, and the infamous striking sabrecat. Upon defeating the apes a humorous scene will play out where the King of Dirkandor congratulates the heroes on their progress, which causes the Princess of Cannock to erupt with excitement as the challenge is among the first boss battles she will have faced since joining the party. Once the battle cat is bested the King congratulates the four young heroes by stating their victory was worn through their own might and not just by the blood of their storied ancestor, and gives them the moon sigil. The holy relic allows spells cast by the Scions to go haywire, greatly increasing their attack power, healing power, and the chance to debilitate foes. Before the group departs the King warns them that his information network has told him grim tales of Hargon's own might, especially his ability to rob his enemies of their senses through his cunning illusions.
Players have the option of returning to speak to the King before obtaining the water sigil to get a clue to its whereabouts, but the Scions are obliged to return once the moonshard is obtained in order to track down a way into Hargon's realm of Rendarak. The King will put the children to his ultimate test and face them himself in battle, and once they prove victorious he will inform them that the secret of entering the frozen plateau of Rendarak lay with the Aged Priest of Beran.
Dirkandor is also home to a Fortune Teller who will provide players with hints regarding the happenings taking place in Cantlin, the Deserted Village, & Slewse, providing perspective on these events from that of the commoners not related to the game's story. The old soothsayer also warns of the dangerous Lords of the Sea, Abysmerelda and Helliphantes. Players are also given a direct hint to the whereabouts of the tectonic plate courtesy of the swordsman in the weapon shop.
Shops & services[edit]
| Item | Price | Attributes |
| 8 | Heals 35~45 HP Restores 45~53 HP with the water sigil | |
| 48 | Restores 50~60 HP Restores 67~79 HP with water sigil | |
| 10 | Cures poison Cures party with water sigil | |
| 30 | Cures paralysis Cures party with water sigil | |
| 310 | Casts Fuddle Targets all foes with water sigil | |
| 35 | Casts Deceleratle | |
| 20 | Repels weaker monsters for 64 steps Deals 15~32 damage to one foe Deals 30~64 damage with water sigil | |
| 150 | Monsters attack more often for a brief time | |
| 25 | Casts Zoom |
| Item | Price | Attributes |
| 2,700 | Attack +31 | |
| 2,700 | Attack +60 Agility +10 +30% damage to floating monsters | |
| 8,200 | Attack +62 | |
| 5,200 | Defence +36 Bedazzlement resistance +6.25% | |
| 4,100 | Defence +41 Whack resistance +6.25% | |
| 6,900 | Defence +50 -6.25% spell & breath damage |
Treasures[edit]
| Moon sigil | x1 | Unmissable | |
| Tectonic plate | x1 | Ultimate key | |
| Mini medal | x1 | Magic key | |
| Tombola ticket | x6 | Magic key (4) | |
| Medicinal herb | x1 | N/A | |
| Magic water | x1 | N/A | |
| Dazzle-me-not | x2 | N/A | |
| Coagulant | x1 | N/A | |
| Seed of defence | x1 | N/A | |
| Seed of luck | x1 | N/A | |
| Seed of strength | x1 | Magic key | |
| Holy water | x1 | N/A | |
| Divine dagger | x1 | Magic key | |
| Beastly bullwhip | x1 | N/A | |
| Leather hat | x1 | N/A |
Tombola[edit]
Each play requires two tombola tickets.
| Rarity | Prize |
|---|---|
| Ultimate | |
| 1st Class | |
| 2nd Class | |
| 3rd Class | |
| 4th Class |
Nearby monsters[edit]
Map & Gallery[edit]
Map. (NES)
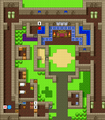
Map. (SFC)

HD map


Dirkandor. (Cell phone)


Facing a striking sabrecat. (Cell phone)


Hidden seed of strength. (Cell phone)

Appearance in Stars. (Cell phone)


