The Bowhole: Difference between revisions
Antiyonder (talk | contribs) No edit summary |
(Weird that this page does not link to the boss of this place) |
||
| (2 intermediate revisions by 2 users not shown) | |||
| Line 3: | Line 3: | ||
|type=Dungeon | |type=Dungeon | ||
|image = [[File:The Bowhole.PNG|200px]] | |image = [[File:The Bowhole.PNG|200px]] | ||
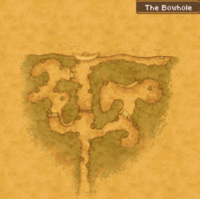
|caption = In game map of The Bowhole | |caption = In-game map of The Bowhole | ||
|title = The Bowhole | |title = The Bowhole | ||
|japanese= | |japanese=魔獣のどうくつ | ||
| | |romaji={{tt|Majū no dōkutsu|Cave of the demon/magic beast}} | ||
}} | }} | ||
'''The Bowhole''' is a dungeon in {{ | '''The Bowhole''' is a dungeon in {{Dragon Quest IX}}. It is located far to the northwest of [[Wormwood Creek]] in [[Western Wormwood]]. The entrance to the cave is sealed by a magic barrier that can only be removed by [[Serena (Dragon Quest IX)|Serena]]. After the barrier has been evaporated, Serena departs and the party is able to explore inside. | ||
The cave contains the Wyrmlight bow at the deepest level, which is required to progress in the game. It is guarded by a statue of a great beast named [[Gadrongo]], who is the keeper of the path of light. The statue will come to life and challenge the party to a battle to deem them worthy of unlocking the Wyrmward. The pedestal holding the bow and arrow is marked: | |||
''The path of light in this arrow is sealed, '' | ''The path of light in this arrow is sealed, '' | ||
''Cradled here 'til a chosen one be revealed. '' | ''Cradled here 'til a chosen one be revealed. '' | ||
''Let fly this bolt o'er the Wyrmward wide, '' | ''Let fly this bolt o'er the Wyrmward wide, '' | ||
''As the way unfolds, boldly onward stride. '' | ''As the way unfolds, boldly onward stride. '' | ||
==Treasures== | |||
{{LocationItem|header|title=Treasures}} | |||
{{LocationItem|entry|item=[[List_of_treasure_map_treasure_chest_ranks_in_Dragon_Quest_IX#Rank_4/F|Rank 4]] (F) blue treasure chest|location=Southeast corner of the exterior}} | |||
{{LocationItem|entry|item=[[List_of_treasure_map_treasure_chest_ranks_in_Dragon_Quest_IX#Rank_4/F|Rank 4]] (F) blue treasure chest|location=Exterior section, west of the northeast clearing}} | |||
{{LocationItem|entry|item=[[List_of_treasure_map_treasure_chest_ranks_in_Dragon_Quest_IX#Rank_5/E|Rank 5]] (E) blue treasure chest|location=Exterior section, east of the northeast clearing}} | |||
{{LocationItem|entry|item=[[List of party tricks in Dragon Quest IX|Weird Dance]] party trick|location=Speak to the ghost on L1 after the barrier has been removed}} | |||
{{LocationItem|entry|item=3,000 gold coins|location=Red treasure chest in southeast room on B1F}} | |||
{{LocationItem|entry|item=[[Image:DQIX Prayer ring.png]][[Prayer ring]]|location=Red treasure chest near center of B1F}} | |||
{{LocationItem|entry|item=[[List_of_treasure_map_treasure_chest_ranks_in_Dragon_Quest_IX#Rank_4/F|Rank 4]] (F) blue treasure chest|location=Southwest section of B1F}} | |||
{{LocationItem|entry|item=[[File:DQ9 MiniMedal.png|32px]][[Mini medal]]|location=Red treasure chest in northwest section of B1F}} | |||
{{LocationItem|entry|item=[[List_of_treasure_map_treasure_chest_ranks_in_Dragon_Quest_IX#Rank_5/E|Rank 5]] (E) blue treasure chest|location=Northwest section of B1F above red treasure chest}} | |||
{{LocationItem|entry|item=[[Image:DQIX Holy talisman.png]][[Holy talisman]]|location=Red treasure chest in northern room on B2F}} | |||
{{LocationItem|entry|item=[[List_of_treasure_map_treasure_chest_ranks_in_Dragon_Quest_IX#Rank_5/E|Rank 5]] (E) blue treasure chest|location=Northwest room on B2F surrounded by poisonous swamp}} | |||
{{LocationItem|entry|item=[[Image:DQIX light gauntlets.png|32px]][[Light gauntlets]]|location=Red treasure chest in southeast room on B2F}} | |||
{{LocationItem|entry|item=[[List_of_treasure_map_treasure_chest_ranks_in_Dragon_Quest_IX#Rank_4/F|Rank 4]] (F) blue treasure chest|location=Southeast room on B2F beneath red treasure chest}} | |||
{{LocationItem|entry|item=[[List_of_treasure_map_treasure_chest_ranks_in_Dragon_Quest_IX#Rank_5/E|Rank 5]] (E) blue treasure chest|location=North room on B3F}} | |||
{{LocationItem|entry|item=[[File:DQ9 GoldBar.png|32px]][[Gold bar]]|location=Red treasure chest in south section of central room on B3F}} | |||
{{LocationItem|entry|item=[[File:WyrmlightBow.png|32px]]Wyrmlight bow|location=Received from the pedestal on B4F after defeating Gadrongo}} | |||
{{LocationItem|footer}} | |||
==Monsters in the Area== | ==Monsters in the Area== | ||
| Line 28: | Line 49: | ||
{{9E|153}} | {{9E|153}} | ||
{{EnemyList|footer}} | {{EnemyList|footer}} | ||
[[Gadrongo]] | |||
==Other notable attributes== | |||
{{LocationAttr|poison}} | |||
==Trivia== | |||
*The name "Bowhole" describes the function of the dungeon, as the dungeon itself can be described as a "hole" which contains a special "bow". | |||
**The name is also a play on a geological feature "blowhole". | |||
*The name of the boss is '''Gadrongo''', after the {{Hero 9}} open the way to [[Upover]], the mayor of Wormwood Creek will apologize and say, "Sorry for bein' such ungrateful '''drongoes'''. " | |||
*On B3F of the dungeon, there is a method to easily encounter [[Liquid metal slime]]s. By standing in the upper right section of the platform in the southwest near the stairs to B4F, a monster will eventually spawn. After a moment, the monster will walk offscreen to the right and a liquid metal slime should spawn right after. Quickly run up to it from behind to prevent it from running away. This method is known as the "Liquid Metal Slime Conveyor" (はぐれメタルコンベアー, ''Hagure metaru konbeā'') among Japanese players since it looks like a conveyor belt. | |||
==Layout== | ==Layout== | ||
| Line 40: | Line 71: | ||
</gallery></center> | </gallery></center> | ||
{{clear}} | |||
{{DQIX}} | {{DQIX}} | ||
[[Category:Dragon Quest IX locations]] | [[Category:Dragon Quest IX locations]] | ||
Latest revision as of 06:57, 19 May 2024
| Dungeon | |
|---|---|
| The Bowhole | |
 In-game map of The Bowhole | |
| Japanese | 魔獣のどうくつ |
| Rōmaji | Majū no dōkutsu |
| Game | Dragon Quest IX |
The Bowhole is a dungeon in Dragon Quest IX. It is located far to the northwest of Wormwood Creek in Western Wormwood. The entrance to the cave is sealed by a magic barrier that can only be removed by Serena. After the barrier has been evaporated, Serena departs and the party is able to explore inside.
The cave contains the Wyrmlight bow at the deepest level, which is required to progress in the game. It is guarded by a statue of a great beast named Gadrongo, who is the keeper of the path of light. The statue will come to life and challenge the party to a battle to deem them worthy of unlocking the Wyrmward. The pedestal holding the bow and arrow is marked: The path of light in this arrow is sealed, Cradled here 'til a chosen one be revealed. Let fly this bolt o'er the Wyrmward wide, As the way unfolds, boldly onward stride.
Treasures[edit]
| Treasures | |
|---|---|
| Item | Location |
| Rank 4 (F) blue treasure chest | Southeast corner of the exterior |
| Rank 4 (F) blue treasure chest | Exterior section, west of the northeast clearing |
| Rank 5 (E) blue treasure chest | Exterior section, east of the northeast clearing |
| Weird Dance party trick | Speak to the ghost on L1 after the barrier has been removed |
| 3,000 gold coins | Red treasure chest in southeast room on B1F |
| Red treasure chest near center of B1F | |
| Rank 4 (F) blue treasure chest | Southwest section of B1F |
| Red treasure chest in northwest section of B1F | |
| Rank 5 (E) blue treasure chest | Northwest section of B1F above red treasure chest |
| Red treasure chest in northern room on B2F | |
| Rank 5 (E) blue treasure chest | Northwest room on B2F surrounded by poisonous swamp |
| Red treasure chest in southeast room on B2F | |
| Rank 4 (F) blue treasure chest | Southeast room on B2F beneath red treasure chest |
| Rank 5 (E) blue treasure chest | North room on B3F |
| Red treasure chest in south section of central room on B3F | |
| Received from the pedestal on B4F after defeating Gadrongo | |
Monsters in the Area[edit]
| Dragon Quest IX (DS) | ||||
|---|---|---|---|---|
| Enemy | Gold | Exp | Drop Item | |
| #145 Bloody manguini | 148 G | 1000 | Wing of bat Terrible tattoo |
1/8 1/16 |
| #146 Blood mummy | 108 G | 1200 | Grubby bandage Malicite |
1/8 1/128 |
| #147 Harmour | 120 G | 1300 | Silver mail Iron mask |
1/64 1/256 |
| #148 Python priest | 164 G | 950 | Watermaul wand Fizzle-retardant suit |
1/64 1/128 |
| #149 Sculpture vulture | 160 G | 1320 | Narspicious Resurrock |
1/32 1/128 |
| #150 Living statue | 172 G | 1500 | Flintstone Resurrock |
1/16 1/128 |
| #151 Goodybag | 336 G | 500 | Brighten rock Pink pearl |
1/16 1/64 |
| #152 Drakularge | 187 G | 1600 | Dragon's scale Gold bar |
1/16 1/256 |
| #153 Liquid metal slime | 40 G | 40200 | Agility ring Depressing shoes |
1/32 1/128 |
Other notable attributes[edit]
Trivia[edit]
- The name "Bowhole" describes the function of the dungeon, as the dungeon itself can be described as a "hole" which contains a special "bow".
- The name is also a play on a geological feature "blowhole".
- The name of the boss is Gadrongo, after the Hero open the way to Upover, the mayor of Wormwood Creek will apologize and say, "Sorry for bein' such ungrateful drongoes. "
- On B3F of the dungeon, there is a method to easily encounter Liquid metal slimes. By standing in the upper right section of the platform in the southwest near the stairs to B4F, a monster will eventually spawn. After a moment, the monster will walk offscreen to the right and a liquid metal slime should spawn right after. Quickly run up to it from behind to prevent it from running away. This method is known as the "Liquid Metal Slime Conveyor" (はぐれメタルコンベアー, Hagure metaru konbeā) among Japanese players since it looks like a conveyor belt.
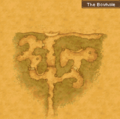
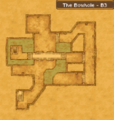
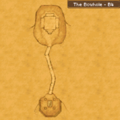
Layout[edit]


