Farebury: Difference between revisions
mNo edit summary |
|||
| (20 intermediate revisions by 5 users not shown) | |||
| Line 1: | Line 1: | ||
'''Farebury''' is the | {{LocationInfobox | ||
|game = {{Dragon Quest VIII}} | |||
|title = Farebury | |||
|type= Town | |||
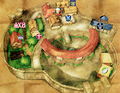
|image = [[Image:DQ VIII Android Munchie Finding Farebury.jpg|center|250px]] | |||
|caption = Map of Farebury | |||
|japanese=トラペッタ | |||
|romanji=Trapetta | |||
}} | |||
'''Farebury''' is a town and region in the {{DQSeries}} that appears in {{DQ8}}. | |||
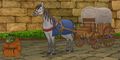
It is seen at the very beginning as {{Munchie}} comes across it before returning to the {{Hero 8}}. | |||
==Characteristics== | |||
Farebury is the home of the [[Fortune Teller]] [[Kalderasha]], who will occasionally dispense guidance to the {{Party 8}}. Another person of notable interest is a [[Merchant]] that mans the [[armor shop]], who will periodically hint at the location of [[Alchemy_recipe|recipe]]s as the adventure progresses if spoken to behind the counter. | |||
==Synopsis== | |||
{{spoiler|start}} | |||
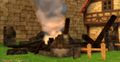
Farebury is the home of Master [[Rylus]], a teacher in the magical arts and former master of [[Dhoulmagus]]. The {{Hero 8}}, [[Yangus]], [[Trode]] and [[Medea]] enter the town with the intention of questioning Rylus on his pupil's whereabouts. The {{Hero 8}} finds a drunk [[Fortune Teller]] by the name of [[Kalderasha]] in the town's bar who mentions that Rylus was killed in a house-fire. Upon interacting with him, he starts an impromptu fortune-telling session which is interrupted by a man barging into the bar, crying that a "monster" is in town. This monster is in fact [[Trode]], causing the townsfolk to harass the party out of town. They then elect to leave Farebury behind and continue their search for [[Dhoulmagus]] before [[Valentina]], the daughter of [[Kalderasha]] stops them at the gate and pleads for their help. She says that she had a dream involving the {{Party 8}}, and that they may be able to assist her. | |||
Meeting her in [[Kalderasha]]'s home in the back of town, she explains that her father once possessed extraordinary clairvoyant powers and was known all over the world, but suddenly lost his powers one day. She suspects it's because he replaced his crystal ball with a glass one, throwing away the former. [[Kalderasha]] then enters the scene, becoming confused as to what Valentina is doing and why the {{Hero 8}} is in his house. He surmises that she was asking the Hero to help regain his powers, stating that he does not need any help before going off to bed. Valentina apologizes for her father's abrasive behavior and implores them to find and return his crystal ball. Upon saying yes, she will give further details of her dream, pointing the party towards the [[Waterfall Cave]]. | |||
After the party defeats a brain-damaged merman by the name of [[Geyzer]] and brings the crystal ball back to [[Kalderasha]]'s house, he will confront the {{Hero 8}} and explain that he foretold that they would retrieve his former fortune telling device. He states that the {{Hero 8}} wasted his time, and he will simply throw away the crystal ball again as many times as needed. Upon being told to not "throw things in the fallwater" as mentioned by [[Geyzer]], [[Kalderasha]] in a fit of anger demands the crystal ball be given to him, and that he will destroy it once and for all. [[Valentina]] then suddenly appears, saying that she knows why [[Kalderasha]] threw away his crystal ball. Many years ago, the fortune-teller foresaw the death of [[Valentina]]'s parents through it, and did nothing to change their fate. He took the orphaned Valentina in and, out of guilt, tossed the crystal ball deep into the [[Waterfall Cave]]. Despite knowing the truth, [[Valentina]] explains that she would dearly like to see Kalderasha in his former glory again. | |||
The {{Hero 8}} and [[Yangus]] are offered a night's rest, and in the morning [[Kalderasha]] thanks the {{Hero 8}}, saying that he feels in his element looking into the crystal ball. He then sees a [[Dhoulmagus|jester]] breaking down the southern checkpoint, allowing the party to continue their quest. | |||
{{spoiler|end}} | |||
==Shops== | ==Shops== | ||
{{ItemShop/Start|title=|subtitle=}} | |||
{{ItemShop/Item|name=Medicinal herb|price=8|attributes=}} | |||
{{ | {{ItemShop/Item|name=Antidotal herb|price=10|attributes=}} | ||
{{ | {{ItemShop/Item|name=Chimaera wing|price=25|attributes=}} | ||
{{ | {{ItemShop/Item|name=Plain clothes|price=30|attributes=Defense +4}} | ||
{{ | {{ItemShop/End|note=}} | ||
{{ | |||
{{ | {{WeaponShop/Start|title=|subtitle=|float=}} | ||
{{WeaponShop/Item|name=Cypress stick|price=10|attributes=Attack +4}} | |||
{{ | {{WeaponShop/Item|name=Oaken club|price=110|attributes=Attack +7}} | ||
{{ | {{WeaponShop/Item|name=Giant mallet|price=240|attributes=Attack +13}} | ||
{{ | {{WeaponShop/Item|name=Copper sword|price=270|attributes=Attack +13}} | ||
{{ | {{WeaponShop/Item|name=Boomerang|display='''{{Boomerang W}}'''|price=420|attributes=Attack +19}} | ||
{{ | {{WeaponShop/End|note=}} | ||
{{ | |||
{{ | {{ArmourShop/Start|title=|subtitle=|float=}} | ||
{{ArmourShop/Item|name=Bandit's grass skirt|price=35|attributes=Defense +5}} | |||
{{ | {{ArmourShop/Item|name=Wayfarer's clothes|price=70|attributes=Defense +7}} | ||
{{ | {{ArmourShop/Item|name=Leather armour|price=180|attributes=Defense +11}} | ||
{{ | {{ArmourShop/Item|name=Leather shield|price=70|attributes=Defense +4}} | ||
{{ | {{ArmourShop/Item|name=Leather hat|price=65|attributes=Defense +3}} | ||
{{ | {{ArmourShop/End|note=}} | ||
{{ | |||
{{ | ===Merchant with Alchemy Recipes=== | ||
The [[armour shop]] merchant if spoken to at various points during night behind the counter. The following include: | |||
*Thief's Key Recipe - Available after [[Trode]] is waiting outside town. Found under the [[church]] bell. | |||
*[[Eros' bow]] Recipe - Available after the {{Party 8}} obtains their [[ship]]. Behind the ladder of the watchtower in [[Pickham]]. | |||
*[[Imp knife]] Recipe - Available after the {{Party 8}} defeat [[Dhoulmagus]]. Found by searching the fountain in [[Trodain]]. | |||
==[[Inn]]== | ===[[Inn]]=== | ||
{|cellspacing="0" cellpadding="0" class="listTable" | {|cellspacing="0" cellpadding="0" class="listTable" | ||
!'''Price per person''' | !'''Price per person''' | ||
| Line 34: | Line 62: | ||
|3 [[Gold]] Coins | |3 [[Gold]] Coins | ||
|} | |} | ||
===Other notable attributes=== | |||
{{LocationAttr|save}} | |||
{{LocationAttr|zoom}} | |||
==Treasures== | ==Treasures== | ||
*56 [[Gold]] Coins | *56 [[Gold]] Coins | ||
* | *[[Antidotal herb]] (3) | ||
*[[Chimaera wing]] | *[[Chimaera wing]] | ||
* | *[[Cypress stick]] (2, one is in a chest requiring the [[Thief's Key]] to open) | ||
*[[Dagger]] ([[Thief's Key]] required) | *[[Dagger]] ([[Thief's Key]] required) | ||
*[[Holy water]] | *[[Holy water]] | ||
* | *[[Medicinal herb]] (4) | ||
*[[Mini medal]] ([[Thief's Key]] required) | *[[Mini medal]] ([[Thief's Key]] required) | ||
*2 [[Plain clothes]] | *2 [[Plain clothes]] | ||
*[[Pot lid]] | *[[Pot lid]] | ||
*[[Purple Orb]] (available after getting the [[Echo | *[[Purple Orb]] (available after getting the [[Echo Flute]]) | ||
*[[Seed of | *[[Seed of resilience]] | ||
*Thief's Key Recipe | |||
== | ==Remake changes== | ||
*[[ | *The following material is added in the [[Nintendo 3DS]] remake including: | ||
*[[ | **A book in the [[inn]] describing the blue [[treasure chest]]s on the overworld and their ability to respawn. | ||
*[[ | **Several new story elements from [[Kalderasha]] such as: | ||
*[[ | ***A cutscene showing [[Dhoulmagus]] as the apprentice of Rylus and the events leading to him stealing the [[Godbird sceptre|Sceptre]] from [[Trodain]], then murdering the first of the [[Seven Sages]]. | ||
*[[ | ***A prompt for the party to return to the ruins of a [[Neos|previous destination]], pointing them to a [[Altar of Wroth|new quest]]. | ||
{{ | |||
''( | ==Other languages== | ||
{{OtherLanguages | |||
|es=Villatránsito|es-meaning= | |||
{{ | |de=Farebury|de-meaning=Same as English name | ||
|fr=Lontania|fr-meaning= | |||
|it=Farebury|it-meaning=Same as English name | |||
|zh-tw=|zh-tw-meaning= | |||
}} | |||
==Map & Gallery== | |||
<center><gallery> | |||
Farebury.png| | |||
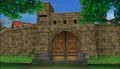
DQ VIII Android Farebury Left Entrance.jpg| | |||
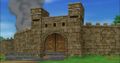
DQ VIII Android Farebury Right Entrance.jpg| | |||
DQ VIII Android Trode And Medea In Farebury.jpg| | |||
DQ VIII Android Remains Of Rylus' House.jpg| | |||
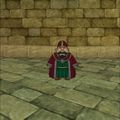
DQ VIII Android Farebury Man.jpg| | |||
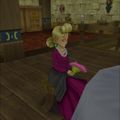
DQ VIII Android Farebury Woman.jpg| | |||
DQ VIII Android Alchemy Merchant.jpg|Armour shop. ([[Cell phone]]) | |||
DQ VIII Android Weapon Shop.jpg|Weapon shop. ([[Cell phone]]) | |||
DQ VIII Android Item Shop.jpg|Item shop. ([[Cell phone]]) | |||
DQ VIII Android Inn.jpg|Inn. ([[Cell phone]]) | |||
DQ VIII Android Thief's Key Recipe.jpg|[[Thief's Key]] recipe. ([[Cell phone]]) | |||
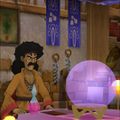
DQ VIII Android Kalderasha On Pirate's Cove 1.jpg|[[Kalderasha]] pointing the {{Hero 8}} and {{Party 8}} to a [[Pirate's Cove|cavern]] reachable only by [[ship]]. ([[Cell phone]]) | |||
DQ VIII Android Kalderasha On Pirate's Cove 2.jpg| | |||
</gallery></center> | |||
{{clear}} | |||
{{DQVIII}} | {{DQVIII}} | ||
[[Category:Locations]] | [[Category:Locations]] | ||
[[category:Dragon Quest VIII locations]] | [[category:Dragon Quest VIII locations]] | ||
Latest revision as of 16:17, 7 January 2024
| Town | |
|---|---|
| Farebury | |
 Map of Farebury | |
| Japanese | トラペッタ |
| Game | Dragon Quest VIII |
Farebury is a town and region in the Dragon Quest series that appears in Dragon Quest VIII: Journey of the Cursed King.
It is seen at the very beginning as Munchie comes across it before returning to the Hero.
Characteristics[edit]
Farebury is the home of the Fortune Teller Kalderasha, who will occasionally dispense guidance to the party. Another person of notable interest is a Merchant that mans the armor shop, who will periodically hint at the location of recipes as the adventure progresses if spoken to behind the counter.
Synopsis[edit]
Shops[edit]
| Item | Price | Attributes |
| 8 | ? | |
| 10 | ? | |
| 25 | ? | |
| 30 | Defense +4 |
| Item | Price | Attributes |
| 10 | Attack +4 | |
| 110 | Attack +7 | |
| 240 | Attack +13 | |
| 270 | Attack +13 | |
| 420 | Attack +19 |
| Item | Price | Attributes |
| 35 | Defense +5 | |
| 70 | Defense +7 | |
| 180 | Defense +11 | |
| 70 | Defense +4 | |
| 65 | Defense +3 |
Merchant with Alchemy Recipes[edit]
The armour shop merchant if spoken to at various points during night behind the counter. The following include:
- Thief's Key Recipe - Available after Trode is waiting outside town. Found under the church bell.
- Eros' bow Recipe - Available after the party obtains their ship. Behind the ladder of the watchtower in Pickham.
- Imp knife Recipe - Available after the party defeat Dhoulmagus. Found by searching the fountain in Trodain.
Inn[edit]
| Price per person |
|---|
| 3 Gold Coins |
Other notable attributes[edit]
![]() This is a location where the game can be saved.
This is a location where the game can be saved.
![]() This location can be reached using the Zoom spell.
This location can be reached using the Zoom spell.
Treasures[edit]
- 56 Gold Coins
- Antidotal herb (3)
- Chimaera wing
- Cypress stick (2, one is in a chest requiring the Thief's Key to open)
- Dagger (Thief's Key required)
- Holy water
- Medicinal herb (4)
- Mini medal (Thief's Key required)
- 2 Plain clothes
- Pot lid
- Purple Orb (available after getting the Echo Flute)
- Seed of resilience
- Thief's Key Recipe
Remake changes[edit]
- The following material is added in the Nintendo 3DS remake including:
- A book in the inn describing the blue treasure chests on the overworld and their ability to respawn.
- Several new story elements from Kalderasha such as:
- A cutscene showing Dhoulmagus as the apprentice of Rylus and the events leading to him stealing the Sceptre from Trodain, then murdering the first of the Seven Sages.
- A prompt for the party to return to the ruins of a previous destination, pointing them to a new quest.
Other languages[edit]
| Language | Translation | Meaning |
| Villatránsito | ||
| Lontania | ||
| Farebury | Same as English name | |
| Farebury | Same as English name |
Map & Gallery[edit]

Armour shop. (Cell phone)

Weapon shop. (Cell phone)

Item shop. (Cell phone)

Inn. (Cell phone)
Thief's Key recipe. (Cell phone)

Kalderasha pointing the Hero and party to a cavern reachable only by ship. (Cell phone)