Alltrades Abbey (Dragon Quest III): Difference between revisions
Antiyonder (talk | contribs) No edit summary |
mNo edit summary |
||
| (One intermediate revision by the same user not shown) | |||
| Line 14: | Line 14: | ||
The abbey is set in the mountains northeast of [[Baharata]], which would place it in approximately the same location as Tibet in the real world. In the remakes of the game, the resident abbot will comment on the choices the player makes if the character's [[Personality]] doesn't match the lifestyle they are undertaking. | The abbey is set in the mountains northeast of [[Baharata]], which would place it in approximately the same location as Tibet in the real world. In the remakes of the game, the resident abbot will comment on the choices the player makes if the character's [[Personality]] doesn't match the lifestyle they are undertaking. | ||
== | ==Appearances== | ||
==={{DQ3}}=== | |||
In order to change a character's vocation, that individual must first reach Level 20 in their current profession. Once this has been met, they may become any of the seven basic vocations and their stats will will be cut in half. An {{NPC}} advises to turn a [[Mage]] into a [[Warrior]] to have a caster with durability, and to change a [[Priest]] into a [[Martial Artist]] to make the group's healer lightning fast. | In order to change a character's vocation, that individual must first reach Level 20 in their current profession. Once this has been met, they may become any of the seven basic vocations and their stats will will be cut in half. An {{NPC}} advises to turn a [[Mage]] into a [[Warrior]] to have a caster with durability, and to change a [[Priest]] into a [[Martial Artist]] to make the group's healer lightning fast. | ||
| Line 21: | Line 22: | ||
Originally, the option to change a character into a [[Gadabout]] wasn't present, but later versions of the game allowed for the change. | Originally, the option to change a character into a [[Gadabout]] wasn't present, but later versions of the game allowed for the change. | ||
===Becoming a Sage=== | ====Becoming a Sage==== | ||
In order to become a [[Sage]] | In order to become a [[Sage]] a character must either possess the [[Words of Wisdom]] in their inventory or be a [[Gadabout]]. In the former case, the scroll will be removed from the character's possession and another must be acquired to change a non-[[Gadabout]] into a [[Sage]]. | ||
==Changing names== | ====Changing names==== | ||
In the remakes of {{Dragon Quest III}}, there is an {{NPC}} which can change the name of any character. This {{NPC}} is located on the far left side outside the abbey. | In the remakes of {{Dragon Quest III}}, there is an {{NPC}} which can change the name of any character. This {{NPC}} is located on the far left side outside the abbey. | ||
It is also possible to change the name of the player's | It is also possible to change the name of the player's bag when interacting with this {{NPC}}. | ||
==Treasure ( | ====Treasure (16-bit version only)==== | ||
*[[Mini medal]] | *[[Mini medal]] | ||
==Nearby {{MFamilies}}s== | ====Nearby {{MFamilies}}s==== | ||
*[[Antguzzler]] | *[[Antguzzler]] | ||
*[[Lump mage]] | *[[Lump mage]] | ||
| Line 37: | Line 38: | ||
*[[Ram raider]] | *[[Ram raider]] | ||
*[[Whackanape]] | *[[Whackanape]] | ||
==={{DQ3HD}}=== | |||
====Shops & services==== | |||
{{ItemShop/Start|title=|subtitle=|float=}} | |||
{{ItemShop/Item|name=Medicinal herb III HD|display='''[[Medicinal herb]]'''|price=8|attributes=Restores at least 30 HP to a single ally}} | |||
{{ItemShop/Item|name=Strong medicine III HD|display='''[[Strong medicine]]'''|price=48|attributes=Restores at least 50 HP to a single ally}} | |||
{{ItemShop/Item|name=Magic water III HD|display='''[[Magic water]]'''|price=600|attributes=Restores at least 15 MP to a single ally}} | |||
{{ItemShop/Item|name=Antidotal herb III HD|display='''[[Antidotal herb]]'''|price=10|attributes=Cures poison from one party member}} | |||
{{ItemShop/Item|name=Holy water III HD|display='''[[Holy water]]'''|price=20|attributes=Wards off weaker monsters}} | |||
{{ItemShop/Item|name=Chimaera wing III HD|display='''[[Chimaera wing]]'''|price=25|attributes=Can be used to return to previously visited locations}} | |||
{{ItemShop/Item|name=Moonwort bulb III HD|display='''[[Moonwort bulb]]'''|price=30|attributes=Cures paralysis}} | |||
{{ItemShop/Item|name=Musk III HD|display='''[[Musk]]'''|price=150|attributes=Monsters attack more often for a brief time}} | |||
{{ItemShop/Item|name=Gusterang III HD|display='''[[Gusterang]]'''|price=6,200|attributes=Attack +46<br>Wind element}} | |||
{{ItemShop/Item|name=Somatic staff III HD|display='''[[Somatic staff]]'''|price=6,600|attributes=Attack +96 +4<br>Drains 3 MP per smack}} | |||
{{ItemShop/Item|name=Full plate armour III HD|display='''[[Full plate armour]]''' III HD|price=3,500|attributes=Defence +39}} | |||
{{ItemShop/Item|name=Fizzle-retardant suit III HD|display='''[[Fizzle-retardant suit]]''' III HD|price=4,400|attributes=Defence +46<br>[[Fizzle]] res. +30%}} | |||
{{ItemShop/Item|name=Light shield III HD|display='''[[Light shield]]'''|price=2,050|attributes=Defence +32}} | |||
{{ItemShop/Item|name=Black bandana III HD|display='''[[Black bandana]]'''|price=1,900|attributes=Defence +24}} | |||
{{ItemShop/Item|name=Aerofoil III HD|display='''[[Aerofoil earrings]]'''|price=3,300|attributes=Wisdom +8<br>-25% Wind damage}} | |||
{{ItemShop/Item|name=Anti-freeze earrings III HD|display='''[[Anti-freeze earrings]]'''|price=3,300|attributes=Wisdom +8<br>-25% Ice damage}} | |||
{{ItemShop/Item|name=Ring of clarity III HD|display='''[[Ring of clarity]]'''|price=840|attributes=Defence +4<br>Fuddle res. +6%}} | |||
{{ItemShop/Item|name=Rousing ring III HD|display='''[[Rousing ring]]'''|price=550|attributes=Defence +4<br>Sleep res. +6%}} | |||
{{ItemShop/End|note=}} | |||
==Gallery== | ==Gallery== | ||
| Line 53: | Line 77: | ||
{{DQIII}} | {{DQIII}} | ||
{{DQIIIHD}} | |||
[[Category:Dragon Quest III locations]] | [[Category:Dragon Quest III locations]] | ||
[[Category:Dragon Quest III HD-2D Remake locations]] | |||
Latest revision as of 14:41, 2 February 2025
| Temple | |
|---|---|
| Alltrades Abbey | |
 Official art | |
| Japanese | ダーマ神殿 |
| Game | Dragon Quest III |
| Old localization | Dharma temple |
Alltrades Abbey is a large temple in Dragon Quest III: The Seeds of Salvation where characters can change their Vocation.
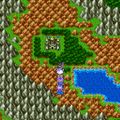
The abbey is set in the mountains northeast of Baharata, which would place it in approximately the same location as Tibet in the real world. In the remakes of the game, the resident abbot will comment on the choices the player makes if the character's Personality doesn't match the lifestyle they are undertaking.
Appearances[edit]
Dragon Quest III: The Seeds of Salvation[edit]
In order to change a character's vocation, that individual must first reach Level 20 in their current profession. Once this has been met, they may become any of the seven basic vocations and their stats will will be cut in half. An NPC advises to turn a Mage into a Warrior to have a caster with durability, and to change a Priest into a Martial Artist to make the group's healer lightning fast.
If the Hero attempts to change their vocation, the abbot will snap at them and ask who could save the world in their place.
Originally, the option to change a character into a Gadabout wasn't present, but later versions of the game allowed for the change.
Becoming a Sage[edit]
In order to become a Sage a character must either possess the Words of Wisdom in their inventory or be a Gadabout. In the former case, the scroll will be removed from the character's possession and another must be acquired to change a non-Gadabout into a Sage.
Changing names[edit]
In the remakes of Dragon Quest III, there is an NPC which can change the name of any character. This NPC is located on the far left side outside the abbey. It is also possible to change the name of the player's bag when interacting with this NPC.
Treasure (16-bit version only)[edit]
Nearby monsters[edit]
Dragon Quest III HD-2D Remake[edit]
Shops & services[edit]
| Item | Price | Attributes |
| 8 | Restores at least 30 HP to a single ally | |
| 48 | Restores at least 50 HP to a single ally | |
| 600 | Restores at least 15 MP to a single ally | |
| 10 | Cures poison from one party member | |
| 20 | Wards off weaker monsters | |
| 25 | Can be used to return to previously visited locations | |
| 30 | Cures paralysis | |
| 150 | Monsters attack more often for a brief time | |
| 6,200 | Attack +46 Wind element | |
| 6,600 | Attack +96 +4 Drains 3 MP per smack | |
| 3,500 | Defence +39 | |
| 4,400 | Defence +46 Fizzle res. +30% | |
| 2,050 | Defence +32 | |
| 1,900 | Defence +24 | |
| 3,300 | Wisdom +8 -25% Wind damage | |
| 3,300 | Wisdom +8 -25% Ice damage | |
| 840 | Defence +4 Fuddle res. +6% | |
| 550 | Defence +4 Sleep res. +6% |
Gallery[edit]
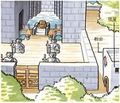
Famicom era illustration.
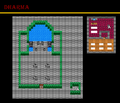
Map. (NES)

Map. (SFC)
Alltrades Abbey. (Cell phone)
.jpg)


