| Dragon Quest IV (All) | |
|---|---|
| Weapon | Modifier(s) |
| Cypress stick | Attack +2 |
| Staff of salvation | Attack +5 |
| Oaken club | Attack +7 |
| Copper sword | Attack +12 |
| Divine dagger | Attack +14 |
| Hunter's bow | Attack +18 |
| Iron lance | Attack +28 |
| Holy lance | Attack +33 |
| Thalian staff | Attack +33 |
| Staff of divine wrath | Attack +35 |
| Staff of antimagic | Attack +50 |
| Somatic staff | Attack +55 |
| Magma staff | Attack +63 |
| Miracle sword | Attack +100 |
| Liquid metal sword | Attack +130 |
Kiryl: Difference between revisions
Jump to navigation
Jump to search
Main article: Dragon Quest VI Party Chat
No edit summary |
Molacarthy (talk | contribs) No edit summary |
||
| Line 8: | Line 8: | ||
|Old=Cristo | |Old=Cristo | ||
|Title=Chancellor | |Title=Chancellor | ||
|Class=Priest | |Class=[[Priest]] | ||
|Race=Human | |Race=Human | ||
|Age=18 | |Age=18 | ||
|Voice Actor=[ | |Voice Actor=[https://www.imdb.com/name/nm8108902/ Daiki Nakamura] ([[Dragon Quest IV CD Theater|CD Theater]])<br>[https://www.imdb.com/name/nm0585640/ Hikaru Midorikawa] ([[Dragon Quest Heroes: The World Tree's Woe and the Blight Below|Heroes]] & [[Dragon Quest Heroes II: Twin Kings and the Prophecy's End|Heroes II]])<br>[http://www.behindthevoiceactors.com/Alec-Newman/ Alec Newman] ([[Dragon Quest Heroes: The World Tree's Woe and the Blight Below|Heroes]] & [[Dragon Quest Heroes II: Twin Kings and the Prophecy's End|Heroes II]], ''English'') | ||
|}} | |}} | ||
{{quote|style=1|quote='''''Thwack! Thwack! Thwack! Thwack! Thwack! Thwack! Thwack! Thwack! Be gone away!'''''|source=Kiryl, performing his High Tension attack in ''[[Dragon Quest Heroes: The World Tree's Woe and the Blight Below|Dragon Quest Heroes]]''.|console=|align=center|bgcolor=64c760}} | {{quote|style=1|quote='''''Thwack! Thwack! Thwack! Thwack! Thwack! Thwack! Thwack! Thwack! Be gone away!'''''|source=Kiryl, performing his High Tension attack in ''[[Dragon Quest Heroes: The World Tree's Woe and the Blight Below|Dragon Quest Heroes]]''.|console=|align=center|bgcolor=64c760}} | ||
'''Kiryl''' is a character in | '''Kiryl''' is a character in the {{DQSeries}} that appears as a playable party member in {{DQ4}}. He is an apprentice [[Priest|priest]] in the castle of [[Zamoksva]], and a close friend and retainer of Tsarevna [[Alena]]. When the latter escapes from the confines of her room to explore the world, he elects to accompany her along with the court magician [[Borya]] in the [[Dragon Quest IV Chapter 2|second chapter]]. | ||
==Appearance and | ==Appearance and personality== | ||
Kiryl wears a green and white Kalimavkion resembling the traditional hat of a priest, along with a green overcoat and a white long-sleeved undershirt. He carries a long and narrow sword on his back, and keeps a muted orange scarf around his neck. | Kiryl wears a green and white Kalimavkion resembling the traditional hat of a priest, along with a green overcoat and a white long-sleeved undershirt. He carries a long and narrow sword on his back, and keeps a muted orange scarf around his neck. | ||
| Line 22: | Line 22: | ||
In the remake version of the game, it is revealed that he is scared heights if you use the party chat in certain areas, most notably [[El Forado]]. | In the remake version of the game, it is revealed that he is scared heights if you use the party chat in certain areas, most notably [[El Forado]]. | ||
{{Section-Stub}} | |||
{{clear}} | |||
==Appearances== | ==Appearances== | ||
==={{DQ4}}=== | ==={{DQ4}}=== | ||
{{spoiler|start}} | |||
Chapter 2 begins with Alena begging her father, the Tsar of Zamoksva, to let her explore the world, since strong fighters are needed more and more in their troubled times, with the Underworld creeping out of dormancy. However, he refuses, saying that with monsters showing increasing aggression, it's simply too dangerous to let her leave the safety of the castle. Alena goes back to her room but, within a few minutes, has been overcome with frustration and escapes the castle. | Chapter 2 begins with Alena begging her father, the Tsar of Zamoksva, to let her explore the world, since strong fighters are needed more and more in their troubled times, with the Underworld creeping out of dormancy. However, he refuses, saying that with monsters showing increasing aggression, it's simply too dangerous to let her leave the safety of the castle. Alena goes back to her room but, within a few minutes, has been overcome with frustration and escapes the castle. | ||
| Line 30: | Line 32: | ||
Alena and her companions are not seen again until Chapter 5, when Kiryl has fallen under a dangerous fever and is bedridden in [[Mintos]]. Alena and a band of three mercenaries set out to the reported location of the [[Feverfew root]] to try & recover some to cure Kiryl, but fails. However, [[Hero (Dragon Quest IV)|The Hero]] succeeds, and upon learning of their destiny the three immediately join the party for the remainder of the game. Some time later, they return to Zamoksva, finding the cause of its troubles to be the demon [[Balzack|Baalzack]], whom they kill in retribution and for the greater good. | Alena and her companions are not seen again until Chapter 5, when Kiryl has fallen under a dangerous fever and is bedridden in [[Mintos]]. Alena and a band of three mercenaries set out to the reported location of the [[Feverfew root]] to try & recover some to cure Kiryl, but fails. However, [[Hero (Dragon Quest IV)|The Hero]] succeeds, and upon learning of their destiny the three immediately join the party for the remainder of the game. Some time later, they return to Zamoksva, finding the cause of its troubles to be the demon [[Balzack|Baalzack]], whom they kill in retribution and for the greater good. | ||
{{spoiler|end}} | |||
{{clear}} | |||
====Base stats==== | |||
{| style="width:65%; height:100px; text-align:center" border="1" | |||
|-<---!Headings are up first.!---> style="font-weight:bold; background:#64c760" | |||
| Attribute || Starting Stats || Maximum Stats | |||
|- style="font-weight:normal" | |||
| Level || 1 || 99 | |||
|- | |||
| HP || 18 || 618 | |||
|- | |||
| MP || 7 || 565 | |||
|- | |||
| Strength || 3 || 109 | |||
|- | |||
| Agility || 5 || 208 | |||
|- | |||
| Resilience || 9 || 144 | |||
|- | |||
| Wisdom || 7 || 238 | |||
|- | |||
| Luck || 2 || 190 | |||
|- | |||
| Initial gear ||colspan=2|[[Oaken club]], [[Wayfarer's clothes]] | |||
|} | |||
*PSX version | |||
{{clear}} | |||
====Spells==== | ====Spells==== | ||
Kiryl corresponds to the [[priest]] vocation, and as such he learns strong healing and defensive spells, but is fairly limited in the weapons and armor he can equip. | Kiryl corresponds to the [[priest]] vocation, and as such he learns strong healing and defensive spells, but is fairly limited in the weapons and armor he can equip. | ||
| Line 125: | Line 153: | ||
| | | | ||
|} | |} | ||
{{clear}} | |||
{ | |||
====Equipment==== | ====Equipment==== | ||
{{VersionTabs|Weapons|{{CharacterEquipmentList|header|title=Dragon Quest IV|subtitle=All|equipmentType=Weapon}} | {{VersionTabs|Weapons|{{CharacterEquipmentList|header|title=Dragon Quest IV|subtitle=All|equipmentType=Weapon}} | ||
{{CharacterEquipmentList|entry|item=[[Cypress | {{CharacterEquipmentList|entry|item=[[Cypress stick]]|statModifier=Attack +2}} | ||
{{CharacterEquipmentList|entry|item=[[Staff of | {{CharacterEquipmentList|entry|item=[[Staff of salvation]]|statModifier=Attack +5}} | ||
{{CharacterEquipmentList|entry|item=[[Oaken | {{CharacterEquipmentList|entry|item=[[Oaken club]]|statModifier=Attack +7}} | ||
{{CharacterEquipmentList|entry|item=[[Copper | {{CharacterEquipmentList|entry|item=[[Copper sword]]|statModifier=Attack +12}} | ||
{{CharacterEquipmentList|entry|item=[[Divine | {{CharacterEquipmentList|entry|item=[[Divine dagger]]|statModifier=Attack +14}} | ||
{{CharacterEquipmentList|entry|item=[[Hunter's | {{CharacterEquipmentList|entry|item=[[Hunter's bow]]|statModifier=Attack +18}} | ||
{{CharacterEquipmentList|entry|item=[[Iron | {{CharacterEquipmentList|entry|item=[[Iron lance]]|statModifier=Attack +28}} | ||
{{CharacterEquipmentList|entry|item=[[Holy | {{CharacterEquipmentList|entry|item=[[Holy lance]]|statModifier=Attack +33}} | ||
{{CharacterEquipmentList|entry|item=[[Thalian | {{CharacterEquipmentList|entry|item=[[Thalian staff]]|statModifier=Attack +33}} | ||
{{CharacterEquipmentList|entry|item=[[Staff of | {{CharacterEquipmentList|entry|item=[[Staff of divine wrath]]|statModifier=Attack +35}} | ||
{{CharacterEquipmentList|entry|item=[[Staff of | {{CharacterEquipmentList|entry|item=[[Staff of antimagic]]|statModifier=Attack +50}} | ||
{{CharacterEquipmentList|entry|item=[[Somatic | {{CharacterEquipmentList|entry|item=[[Somatic staff]]|statModifier=Attack +55}} | ||
{{CharacterEquipmentList|entry|item=[[Magma | {{CharacterEquipmentList|entry|item=[[Magma staff]]|statModifier=Attack +63}} | ||
{{CharacterEquipmentList|entry|item=[[Miracle | {{CharacterEquipmentList|entry|item=[[Miracle sword]]|statModifier=Attack +100}} | ||
{{CharacterEquipmentList|entry|item=[[Liquid | {{CharacterEquipmentList|entry|item=[[Liquid metal sword]]|statModifier=Attack +130}} | ||
{{CharacterEquipmentList|note|text=}} | {{CharacterEquipmentList|note|text=}} | ||
{{CharacterEquipmentList|footer}}|Helmets| | {{CharacterEquipmentList|footer}}|Helmets| | ||
{{CharacterEquipmentList|header|title=Dragon Quest IV|subtitle=All|equipmentType=Helmet}} | {{CharacterEquipmentList|header|title=Dragon Quest IV|subtitle=All|equipmentType=Helmet}} | ||
{{CharacterEquipmentList|entry|item=[[Leather | {{CharacterEquipmentList|entry|item=[[Leather hat]]|statModifier=Defense +2}} | ||
{{CharacterEquipmentList|entry|item=[[Hardwood | {{CharacterEquipmentList|entry|item=[[Hardwood headwear]]|statModifier=Defense +6}} | ||
{{CharacterEquipmentList|entry|item=[[Happy | {{CharacterEquipmentList|entry|item=[[Happy hat]]|statModifier=Attack +15}} | ||
{{CharacterEquipmentList|entry|item=[[Iron | {{CharacterEquipmentList|entry|item=[[Iron helmet]]|statModifier=Defense +16}} | ||
{{CharacterEquipmentList|entry|item=[[Liquid | {{CharacterEquipmentList|entry|item=[[Liquid metal helm]]|statModifier=Defense +50}} | ||
{{CharacterEquipmentList|entry|item=[[Death | {{CharacterEquipmentList|entry|item=[[Death mask]]|statModifier=Defense +200}} | ||
{{CharacterEquipmentList|note|text=}} | {{CharacterEquipmentList|note|text=}} | ||
{{CharacterEquipmentList|footer}}|Armor| | {{CharacterEquipmentList|footer}}|Armor| | ||
{{CharacterEquipmentList|header|title=Dragon Quest IV|subtitle=All|equipmentType=Armor}} | {{CharacterEquipmentList|header|title=Dragon Quest IV|subtitle=All|equipmentType=Armor}} | ||
{{CharacterEquipmentList|entry|item=[[Plain | {{CharacterEquipmentList|entry|item=[[Plain clothes]]|statModifier=Defense+4}} | ||
{{CharacterEquipmentList|entry|item=[[Wayfarer's | {{CharacterEquipmentList|entry|item=[[Wayfarer's clothes]]|statModifier=Defense+8}} | ||
{{CharacterEquipmentList|entry|item=[[Leather | {{CharacterEquipmentList|entry|item=[[Leather armour]]|statModifier=Defense+12}} | ||
{{CharacterEquipmentList|entry|item=[[Chain | {{CharacterEquipmentList|entry|item=[[Chain mail]]|statModifier=Defense+18}} | ||
{{CharacterEquipmentList|entry|item=[[Fur | {{CharacterEquipmentList|entry|item=[[Fur coat]]|statModifier=Defense+22}} | ||
{{CharacterEquipmentList|entry|item=[[Bronze | {{CharacterEquipmentList|entry|item=[[Bronze armor]]|statModifier=Defense+25}} | ||
{{CharacterEquipmentList|entry|item=[[Iron | {{CharacterEquipmentList|entry|item=[[Iron armour]]|statModifier=Defense+30}} | ||
{{CharacterEquipmentList|entry|item=[[Robe of | {{CharacterEquipmentList|entry|item=[[Robe of serenity]]|statModifier=Defense+33}} | ||
{{CharacterEquipmentList|entry|item=[[Glombolero]]|statModifier=Defense+47}} | {{CharacterEquipmentList|entry|item=[[Glombolero]]|statModifier=Defense+47}} | ||
{{CharacterEquipmentList|entry|item=[[Liquid | {{CharacterEquipmentList|entry|item=[[Liquid metal armor]]|statModifier=Defense+95}} | ||
{{CharacterEquipmentList|note|text=}} | {{CharacterEquipmentList|note|text=}} | ||
{{CharacterEquipmentList|footer}}|Shields| | {{CharacterEquipmentList|footer}}|Shields| | ||
{{CharacterEquipmentList|header|title=Dragon Quest IV|subtitle=All|equipmentType=Shields}} | {{CharacterEquipmentList|header|title=Dragon Quest IV|subtitle=All|equipmentType=Shields}} | ||
{{CharacterEquipmentList|entry|item=[[Leather | {{CharacterEquipmentList|entry|item=[[Leather shield]]|statModifier=Defense+4}} | ||
{{CharacterEquipmentList|entry|item=[[Scale | {{CharacterEquipmentList|entry|item=[[Scale shield]]|statModifier=Defense+7}} | ||
{{CharacterEquipmentList|entry|item=[[Iron | {{CharacterEquipmentList|entry|item=[[Iron shield]]|statModifier=Defense+12}} | ||
{{CharacterEquipmentList|entry|item=[[Power | {{CharacterEquipmentList|entry|item=[[Power shield]]|statModifier=Defense+40}} | ||
{{CharacterEquipmentList|entry|item=[[Mirror | {{CharacterEquipmentList|entry|item=[[Mirror shield]]|statModifier=Defense+45}} | ||
{{CharacterEquipmentList|entry|item=[[Liquid | {{CharacterEquipmentList|entry|item=[[Liquid metal shield]]|statModifier=Defense+60}} | ||
{{CharacterEquipmentList|note|text=}} | {{CharacterEquipmentList|note|text=}} | ||
{{CharacterEquipmentList|footer}}|Accessories| | {{CharacterEquipmentList|footer}}|Accessories| | ||
{{CharacterEquipmentList|header|title=Dragon Quest IV|subtitle=Remakes|equipmentType=Accessories}} | {{CharacterEquipmentList|header|title=Dragon Quest IV|subtitle=Remakes|equipmentType=Accessories}} | ||
{{CharacterEquipmentList|entry|item=[[Strength | {{CharacterEquipmentList|entry|item=[[Strength ring]]|statModifier=Strength+8}} | ||
{{CharacterEquipmentList|entry|item=[[Mighty | {{CharacterEquipmentList|entry|item=[[Mighty armlet]]|statModifier=Strength+25}} | ||
{{CharacterEquipmentList|entry|item=[[Mercury's | {{CharacterEquipmentList|entry|item=[[Mercury's bandana]]|statModifier=Agility+15}} | ||
{{CharacterEquipmentList|entry|item=[[Meteorite | {{CharacterEquipmentList|entry|item=[[Meteorite bracer]]|statModifier=Agilityx2}} | ||
{{CharacterEquipmentList|entry|item=[[Prayer | {{CharacterEquipmentList|entry|item=[[Prayer ring]]|statModifier=Defence+5}} | ||
{{CharacterEquipmentList|entry|item=[[Gold | {{CharacterEquipmentList|entry|item=[[Gold bracer]]|statModifier=Defence+5}} | ||
{{CharacterEquipmentList|entry|item=[[Fishnet | {{CharacterEquipmentList|entry|item=[[Fishnet stockings]]|statModifier=Defence+8}} | ||
{{CharacterEquipmentList|entry|item=[[Kamikazee | {{CharacterEquipmentList|entry|item=[[Kamikazee bracer]]|statModifier=Defence+15}} | ||
{{CharacterEquipmentList|entry|item=[[Kerplunk | {{CharacterEquipmentList|entry|item=[[Kerplunk bracer]]|statModifier=Defence+15}} | ||
{{CharacterEquipmentList|entry|item=[[Recovery | {{CharacterEquipmentList|entry|item=[[Recovery ring]]|statModifier=Defence+15}} | ||
{{CharacterEquipmentList|entry|item=[[Ruby of | {{CharacterEquipmentList|entry|item=[[Ruby of protection]]|statModifier=Defence+15}} | ||
{{CharacterEquipmentList|entry|item=[[Goddess | {{CharacterEquipmentList|entry|item=[[Goddess ring]]|statModifier=Wisdom+33}} | ||
{{CharacterEquipmentList|entry|item=[[Lucida | {{CharacterEquipmentList|entry|item=[[Lucida shard]]|statModifier=Luck+5}} | ||
{{CharacterEquipmentList|entry|item=[[Bunny | {{CharacterEquipmentList|entry|item=[[Bunny tail]]|statModifier=Luck+8}} | ||
{{CharacterEquipmentList|entry|item=[[Gospel | {{CharacterEquipmentList|entry|item=[[Gospel ring]]|statModifier=Luck+50}} | ||
{{CharacterEquipmentList|entry|item=[[Elevating | {{CharacterEquipmentList|entry|item=[[Elevating shoes]]|statModifier=Luck+50}} | ||
{{CharacterEquipmentList|footer}}}} | {{CharacterEquipmentList|footer}}}} | ||
{{clear}} | |||
====A.I. Agony==== | ====A.I. Agony==== | ||
Kiryl is infamous in the original 8-bit version of ''IV'' for continuously casting Whack and Thwack during boss battles, wasting his MP and time when he should be keeping the party alive. The reason for this is how the A.I. is programmed in the NES version: instead of fully comprehending a monsters' resistances and vulnerabilities at the start of battle as in later titles, characters "learn" these aspects as the battle continues. It will take up to three turns to fully understand what will work against a given foe for any character regardless of their wisdom stat. This issue is further compounded by the fact that the game reads each mode switch or transformation an enemy undertakes as an entirely new for A.I. processing, and made even worse by the fact that the final boss has no less than seven "forms". | Kiryl is infamous in the original 8-bit version of ''IV'' for continuously casting Whack and Thwack during boss battles, wasting his MP and time when he should be keeping the party alive. The reason for this is how the A.I. is programmed in the NES version: instead of fully comprehending a monsters' resistances and vulnerabilities at the start of battle as in later titles, characters "learn" these aspects as the battle continues. It will take up to three turns to fully understand what will work against a given foe for any character regardless of their wisdom stat. This issue is further compounded by the fact that the game reads each mode switch or transformation an enemy undertakes as an entirely new for A.I. processing, and made even worse by the fact that the final boss has no less than seven "forms". | ||
Thankfully this bad behavior was sorted out in the PSX remake and all subsequent versions, wherein the A.I. logic processing has been improved give characters a full | Thankfully this bad behavior was sorted out in the PSX remake and all subsequent versions, wherein the A.I. logic processing has been improved to give characters a full understanding of foes at the beginning of battle. | ||
====Selected quotes==== | |||
<center><small>Main article: [[Dragon Quest VI Party Chat]]</center></small> | |||
{| border="0" cellpadding="5" cellspacing="0" width="100%" | |||
| valign="top" width="25%" | | |||
{{quote|style=2|quote=Indeed, starlit night make me think also of my hometown. My hometown, and face of Tsarevna- Oplya! Erm... Beautiful stars, nyet?|source= Kiryl, in [[Desert Bazaar]]|console=[[Cell phone]]|align=center}} | |||
|} | |||
{| border="0" cellpadding="5" cellspacing="0" width="100%" | |||
| valign="top" width="25%" | | |||
{{quote|style=2|quote=He has problem with clever talk? I will therefore refrain from utilising my intimidating vocabulary. | |||
|source= Kiryl, in [[Woodcutter's cabin]]|console=[[Cell phone]]|align=center}} | |||
|} | |||
{| border="0" cellpadding="5" cellspacing="0" width="100%" | |||
| valign="top" width="25%" | | |||
{{quote|style=2|quote= | |||
Tree is so much large it is capable to be seen clearly from faraway distance. It is too much ostentatious, I mind... | |||
It is my opinion that things are more prettier when they are being done to moderation, furthermore- Oplya, why do you glare so much fiercely?|source= Kiryl, in [[El Forado]]|console=[[Cell phone]]|align=center}} | |||
|} | |||
{| border="0" cellpadding="5" cellspacing="0" width="100%" | |||
| valign="top" width="25%" | | |||
{{quote|style=2|quote=Are we scaling tower without clear purpose? I, I must protest at this decision! | |||
...Wh-What!? Nyet! I resent very much your implication! My opposition is not due to overwhelming fear of high places. Not slightly...! (gulp) | |||
|source= Kiryl, in [[Birdsong Tower]]|console=[[Cell phone]]|align=center}} | |||
|} | |||
==={{DQ6}}=== | ==={{DQ6}}=== | ||
| Line 229: | Line 258: | ||
==={{DQ9}}=== | ==={{DQ9}}=== | ||
Kiryl | On September 9, 2010, Kiryl began appearing as a special guest at the [[Quester's Rest]] in [[Stornway]]. This could be downloaded through the [[DQVC]] using Nintendo's Wi-Fi channel when it was still available. When spoken to, he will give the hero different pieces of his outfit is certain conditions are fulfilled. | ||
*[[Kiryl's clothes]] - Recieved when talking to him. | |||
*[[Kiryl's kamilavka]] - Recieved when it is the player's birthday. | |||
*[[Kiryl's trousers]] - Recieved after the inn is fully expanded. | |||
*[[Kiryl's boots]] - Recieved when the Hero is a Priest. | |||
A special [[Accolade]] is earned if the [[Hero (Dragon Quest IX)|Hero]] wears all of the parts of Kiryl's costume. | |||
===''[[Dragon Quest & Final Fantasy in Itadaki Street Special]]''=== | ===''[[Dragon Quest & Final Fantasy in Itadaki Street Special]]''=== | ||
Along with [[Alena]], [[ | Along with [[Alena]], [[Ragnar McRyan]] and [[Torneko]], Kiryl appears as a playable character in ''Itadaki Street Special''. | ||
===''[[Dragon Quest: Monster Battle Road]]''=== | ===''[[Dragon Quest: Monster Battle Road]]''=== | ||
Kiryl can be summoned to perform a special attack. After leaping from the wagon, Kiryl tries and fails to cast [[Thwack]] multiple times, before finally stomping on the text windows in disgust and(successfully) unleashing a magnified version of [[Kathwack]] in the form of angry spirits. Though these ghosts cannot inflict instant death, they deal colossal damage to all enemies. | Kiryl can be summoned to perform a special attack. After leaping from the wagon, Kiryl tries and fails to cast [[Thwack]] multiple times, before finally stomping on the text windows in disgust and(successfully) unleashing a magnified version of [[Kathwack]] in the form of angry spirits. Though these ghosts cannot inflict instant death, they deal colossal damage to all enemies. | ||
=== | ==={{DQH}} and {{DQH2}}=== | ||
Just as in ''Monster Battle Road'', Kiryl's special attack is trying and failing multiple times to cast Thwack before casting Kathwack. | Just as in ''Monster Battle Road'', Kiryl's special attack is trying and failing multiple times to cast Thwack before casting Kathwack. | ||
==Etymology== | ==Etymology== | ||
Kiryl is the Slavic derivative of the Greek Cyril. It means "Lordly". | Kiryl is the Slavic derivative of the Greek Cyril. It means "Lordly". | ||
==See also== | |||
*[[Kiryl's costume]] | |||
==Gallery== | ==Gallery== | ||
Revision as of 04:12, 10 February 2020
| Kiryl | |
| Dragon Quest IV: Chapters of the Chosen | |

| |
| Sprite(s) | 
|
| Japanese name | クリフト |
| Romaji | Kurifuto |
| Old localization | Cristo |
| Title | Chancellor |
| Class | Priest |
| Race | Human |
| Age | 18 |
| Voice actor | Daiki Nakamura (CD Theater) Hikaru Midorikawa (Heroes & Heroes II) Alec Newman (Heroes & Heroes II, English) |
"Thwack! Thwack! Thwack! Thwack! Thwack! Thwack! Thwack! Thwack! Be gone away!"
—Kiryl, performing his High Tension attack in Dragon Quest Heroes.
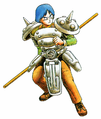
Kiryl is a character in the Dragon Quest series that appears as a playable party member in Dragon Quest IV: Chapters of the Chosen. He is an apprentice priest in the castle of Zamoksva, and a close friend and retainer of Tsarevna Alena. When the latter escapes from the confines of her room to explore the world, he elects to accompany her along with the court magician Borya in the second chapter.
Appearance and personality
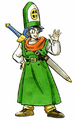
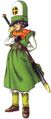
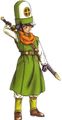
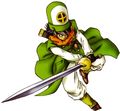
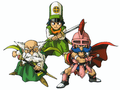
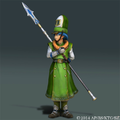
Kiryl wears a green and white Kalimavkion resembling the traditional hat of a priest, along with a green overcoat and a white long-sleeved undershirt. He carries a long and narrow sword on his back, and keeps a muted orange scarf around his neck.
He is very loyal to Princess/Tsarevna Alena, as evidenced by how he immediately rushes after her when she escapes. It is also made apparent that he has a crush on the princess as well. Aside from his not-so-subtle remarks regarding his feelings for Alena (which somehow always elude her), signs include him keeping a drawing of her hidden in his room. Beyond his relationship with Alena, Kiryl is a very studious and dedicated young man with a deep sense of faith; he has been training for some time to take over as the resident priest of Zamoksva and his room is filled with religious texts.
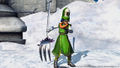
In the remake version of the game, it is revealed that he is scared heights if you use the party chat in certain areas, most notably El Forado.
|
|
This section is a stub. You can help by expanding it. |
Appearances
Dragon Quest IV: Chapters of the Chosen
Base stats
| Attribute | Starting Stats | Maximum Stats |
| Level | 1 | 99 |
| HP | 18 | 618 |
| MP | 7 | 565 |
| Strength | 3 | 109 |
| Agility | 5 | 208 |
| Resilience | 9 | 144 |
| Wisdom | 7 | 238 |
| Luck | 2 | 190 |
| Initial gear | Oaken club, Wayfarer's clothes | |
- PSX version
Spells
Kiryl corresponds to the priest vocation, and as such he learns strong healing and defensive spells, but is fairly limited in the weapons and armor he can equip.
The NES version of Kiryl is infamous for his poorly-programmed AI, which would continuously cast the Whack and Thwack spells above all others, even when healing is necessary and the enemy is immune to them. While this problem was eliminated since the remakes permit manual control, it has become a running gag related to the character, such as his special appearance in Dragon Quest: Monster Battle Road.
| Level Learned | Original Japanese | NES Version | DS Version | Spanish Version |
| Lvl Learned | Japanese Name | DW IV | DQ IV DS | Spanish Name |
| 1 | Hoimi | Heal | Heal | Minicuración |
| 4 | Scara | Upper | Buff | Fortalecimiento |
| 6 | Manusa | Surround | Dazzle | Engaño Ilusorio |
| 8 | Kiari | Antidote | Squelch | Antitoxinas |
| 12 | Mahoton | Stopspell | Fizzle | |
| 14 | Sukuruto | Increase | Kabuff | |
| 16 | Behoimi | Healmore | Midheal | |
| 18 | Zaki | Beat | Whack | |
| 21 | Zaoraru | Vivify | Zing | |
| 24 | Zaraki | Defeat | Thwhack | Engaño |
| 27 | Behoma | Healall | Fullheal | |
| 30 | Behomara | Healus | Multiheal | |
| 33 | Zaoriku | Revive | Kazing |
Equipment
| Dragon Quest IV (All) | |
|---|---|
| Helmet | Modifier(s) |
| Leather hat | Defense +2 |
| Hardwood headwear | Defense +6 |
| Happy hat | Attack +15 |
| Iron helmet | Defense +16 |
| Liquid metal helm | Defense +50 |
| Death mask | Defense +200 |
| Dragon Quest IV (All) | |
|---|---|
| Armor | Modifier(s) |
| Plain clothes | Defense+4 |
| Wayfarer's clothes | Defense+8 |
| Leather armour | Defense+12 |
| Chain mail | Defense+18 |
| Fur coat | Defense+22 |
| Bronze armor | Defense+25 |
| Iron armour | Defense+30 |
| Robe of serenity | Defense+33 |
| Glombolero | Defense+47 |
| Liquid metal armor | Defense+95 |
| Dragon Quest IV (All) | |
|---|---|
| Shields | Modifier(s) |
| Leather shield | Defense+4 |
| Scale shield | Defense+7 |
| Iron shield | Defense+12 |
| Power shield | Defense+40 |
| Mirror shield | Defense+45 |
| Liquid metal shield | Defense+60 |
| Dragon Quest IV (Remakes) | |
|---|---|
| Accessories | Modifier(s) |
| Strength ring | Strength+8 |
| Mighty armlet | Strength+25 |
| Mercury's bandana | Agility+15 |
| Meteorite bracer | Agilityx2 |
| Prayer ring | Defence+5 |
| Gold bracer | Defence+5 |
| Fishnet stockings | Defence+8 |
| Kamikazee bracer | Defence+15 |
| Kerplunk bracer | Defence+15 |
| Recovery ring | Defence+15 |
| Ruby of protection | Defence+15 |
| Goddess ring | Wisdom+33 |
| Lucida shard | Luck+5 |
| Bunny tail | Luck+8 |
| Gospel ring | Luck+50 |
| Elevating shoes | Luck+50 |
A.I. Agony
Kiryl is infamous in the original 8-bit version of IV for continuously casting Whack and Thwack during boss battles, wasting his MP and time when he should be keeping the party alive. The reason for this is how the A.I. is programmed in the NES version: instead of fully comprehending a monsters' resistances and vulnerabilities at the start of battle as in later titles, characters "learn" these aspects as the battle continues. It will take up to three turns to fully understand what will work against a given foe for any character regardless of their wisdom stat. This issue is further compounded by the fact that the game reads each mode switch or transformation an enemy undertakes as an entirely new for A.I. processing, and made even worse by the fact that the final boss has no less than seven "forms".
Thankfully this bad behavior was sorted out in the PSX remake and all subsequent versions, wherein the A.I. logic processing has been improved to give characters a full understanding of foes at the beginning of battle.
Selected quotes
|
Quote
|
|
Quote
|
|
Quote
|
|
Quote
|
Dragon Quest VI: Realms of Revelation
Kiryl is present in the near-future version of Reaper's Peak, trying to prevent Alena from climbing down the well to confront Nokturnus.
Dragon Quest IX: Sentinels of the Starry Skies
On September 9, 2010, Kiryl began appearing as a special guest at the Quester's Rest in Stornway. This could be downloaded through the DQVC using Nintendo's Wi-Fi channel when it was still available. When spoken to, he will give the hero different pieces of his outfit is certain conditions are fulfilled.
- Kiryl's clothes - Recieved when talking to him.
- Kiryl's kamilavka - Recieved when it is the player's birthday.
- Kiryl's trousers - Recieved after the inn is fully expanded.
- Kiryl's boots - Recieved when the Hero is a Priest.
A special Accolade is earned if the Hero wears all of the parts of Kiryl's costume.
Dragon Quest & Final Fantasy in Itadaki Street Special
Along with Alena, Ragnar McRyan and Torneko, Kiryl appears as a playable character in Itadaki Street Special.
Dragon Quest: Monster Battle Road
Kiryl can be summoned to perform a special attack. After leaping from the wagon, Kiryl tries and fails to cast Thwack multiple times, before finally stomping on the text windows in disgust and(successfully) unleashing a magnified version of Kathwack in the form of angry spirits. Though these ghosts cannot inflict instant death, they deal colossal damage to all enemies.
Dragon Quest Heroes: The World Tree's Woe and the Blight Below and Dragon Quest Heroes II: Twin Kings and the Prophecy's End
Just as in Monster Battle Road, Kiryl's special attack is trying and failing multiple times to cast Thwack before casting Kathwack.
Etymology
Kiryl is the Slavic derivative of the Greek Cyril. It means "Lordly".
See also
Gallery

Famicom art
PlayStation art
PlayStation art
PlayStation art

Casting Whack on a Lickspittle.
Wearing the Liquid metal armour

Wearing the Liquid metal armour and helmet and wielding the Liquid metal sword

With Alena

High resilience

Mutsumi Inomata art

Itadaki Street DS

Fortune Street
Dragon Quest Heroes: The World Tree's Woe and the Blight Below

Kiryl using his Coup-de-Grâce, Kathwack
Kiryl wielding the Imp's Fork in Heroes II


Categories:
- Pages using Tabber parser tag
- Articles with section stubs
- Party members
- Dragon Quest IV characters
- Dragon Quest VI characters
- Dragon Quest IX characters
- Fortune Street characters
- Dragon Quest Heroes: The World Tree's Woe and the Blight Below characters
- Dragon Quest Heroes II: Twin Kings and the Prophecy's End characters
- Dragon Quest Rivals characters