Cave to Rendarak: Difference between revisions
m (→Overview) |
m (→{{Monster}}s: Whackolyte also is here) |
||
| (21 intermediate revisions by 7 users not shown) | |||
| Line 1: | Line 1: | ||
{{LocationInfobox | {{LocationInfobox | ||
|game = | |game = {{Dragon Quest II}} | ||
|title = Cave to Rendarak | |title = Cave to Rendarak | ||
|type= Dungeon | |type= Dungeon | ||
|image = [[Image:Cave_to_Rendarak.png|center|310px]] | |image = [[Image:Cave_to_Rendarak.png|center|310px]] | ||
|caption = | |caption = | ||
|japanese= | |japanese=ロンダルキアへの洞窟 | ||
|romanji= | |romanji= | ||
}} | }} | ||
The '''Cave to [[Rendarak]]''' | The '''Cave to [[Rendarak]]''', also known as '''Road to Rhone''' or '''Cave to Rhone''' in previous versions, is the largest dungeon in {{DQ2}}. | ||
== | It is also the penultimate dungeon in the game. It is located in the south central region of [[Torland]] and accessible only via [[teleportal]]. | ||
==Appearances== | |||
==={{DQ2}}=== | |||
[[File:DQII Trio Falling.png|right|thumb|200px|Falling into the pitfall.]] | [[File:DQII Trio Falling.png|right|thumb|200px|Falling into the pitfall.]] | ||
The Cave to Rendarak is infamous among fans, due to its length, the strong enemies within, and the existence of pitfalls and infinite loops. | The Cave to Rendarak is infamous among fans, due to its length, the strong enemies within, and the existence of pitfalls and infinite loops that no first-time player can be expected to know of. | ||
The cave is only accessible via a travel gate in [[Beran]] requiring the [[ | The cave is only accessible via a travel gate in [[Beran]] requiring the [[Jailor's Key]]. To open the cave, the [[False Idol]] must be used next to the entrance which is disguised as an impassable mountain tile. | ||
== | ==[[5 Sigils#Locations|Soul Sigil]]== | ||
Bottom right corner of floor B1. | Bottom right corner of floor B1 in all versions from the [[Nintendo Entertainment System]] to the {{Game Boy Color}} version. See the remake section for more details. | ||
===Thunderbolt | ====[[Thunderbolt blade]]==== | ||
Find your way to floor 5. Make your way all the way north, then east into the side room; go down the flight of stairs. There is a pitfall in the almost-bottom-leftmost corner of the (huge) room; find and fall in it. You'll land right next to the sword. | Find your way to floor 5. Make your way all the way north, then east into the side room; go down the flight of stairs. There is a pitfall in the almost-bottom-leftmost corner of the (huge) room; find and fall in it. You'll land right next to the sword. | ||
===Erdrick's | ====[[Erdrick's Armour]]==== | ||
Much easier than locating the | Much easier than locating the [[Thunderbolt blade]], simply find the staircase in the bottom right area of Floor 3 and take the stairs right to the {{chest}}. | ||
===Other treasures=== | ====Other treasures==== | ||
{| border="0" cellpadding="5" cellspacing="0" width="100%" | {| border="0" cellpadding="5" cellspacing="0" width="100%" | ||
| valign="top" width=" | | valign="top" width="5%" | | ||
====( | ====(All versions)==== | ||
*[[ | *[[Tombola ticket]] | ||
* | | valign="top" width="5%" | | ||
| valign="top" width=" | ====({{NES}} version)==== | ||
==== | *3 different chests of {{Gold}} (varying amount) | ||
*[[ | *Trap chest | ||
*[[Thanatos shield]] | | valign="top" width="5%" | | ||
====({{Super Famicom}} and other following versions)==== | |||
*2 different {{chest}}s of {{Gold}} (varying amount) | |||
*[[Mad cap]] | |||
*[[Thanatos' shield]] | |||
|} | |} | ||
=== | ===={{Monster}}s==== | ||
*[[Killing machine]] | *[[Killing machine]] | ||
*[[Berserker]] | *[[Berserker]] | ||
*[[Eyelasher]] | *[[Eyelasher]] | ||
*[[Dancing | *[[Dancing flame]] | ||
*[[Gargoyle]] | *[[Gargoyle]] | ||
*[[Green dragon]] | *[[Green dragon]] | ||
*[[Healslime]] | |||
*[[Hargonaut]] | *[[Hargonaut]] | ||
*[[ | *[[Walking corpse]] | ||
*[[ | *[[Ghoul]] | ||
*[[Tyrannodactyl]] | |||
*[[Chasmonaut]] | *[[Chasmonaut]] | ||
*[[Silvapithecus]] | |||
*[[Metal slime]] | |||
*[[Liquid metal slime]] | *[[Liquid metal slime]] | ||
*[[Hunter mech]] | *[[Hunter mech]] | ||
*[[Orc king]] | *[[Orc king]] | ||
*[[Grimlin]] | *[[Grimlin]] | ||
*[[ | *[[Striking sabrecat]] | ||
*[[Whackolyte]] | |||
==Nearby | ====Nearby {{MFamilies}}s==== | ||
{| border="0" cellpadding="5" cellspacing="0" width="100%" | {| border="0" cellpadding="5" cellspacing="0" width="100%" | ||
| valign="top" width="50%" | | | valign="top" width="50%" | | ||
===(Swamp entrance)=== | ===(Swamp entrance)=== | ||
*[[Orc | *[[Orc chieftain]] | ||
*[[Bloody hand]] | *[[Bloody hand]] | ||
*[[Brainy badboon | *[[Brainy badboon]] | ||
*[[Headhunter]] | *[[Headhunter]] | ||
*[[Drackmage]] | *[[Drackmage]] | ||
| valign="top" width="50%" | | | valign="top" width="50%" | | ||
===(Entrance from the Valley of | ===(Entrance from the Valley of Rendarak)=== | ||
*[[Killing machine]] | *[[Killing machine]] | ||
*[[Frostburn]] | *[[Frostburn]] | ||
| Line 72: | Line 82: | ||
|} | |} | ||
== | ==={{DQ11}}=== | ||
[[ | The Cave to Rendarak is the finale locale from the second game available via the [[Echo Chamber]]. A restless armor has taken upon itself to inhabit [[Erdrick's Armour]] itself, and it must be dealt with by the {{Luminary}} and his party. Unlike the truncated versions of other dungeons that appear in the [[Echo Chamber]], the cave is very faithful to it's original design and will prove the most difficult dungeon out of all the past tomes. | ||
==Remake changes== | |||
*The following changes were made in the [[Cell phone]] ports of the game: | |||
**The [[Seed of strength]] is found in the cave basement while the [[5 Sigils#Locations|Soul Sigil]] is found instead from the King of [[Tantegel]]. | |||
**A fire spirit {{NPC}} prevents the party from accessing the cave until both the [[False Idol]] and [[Eye of Rubiss]] are obtained. | |||
==Map & Gallery== | |||
<center><gallery> | |||
DQ II NES Cave to Rhone.png|Map. ({{NES}}) | |||
DQ II SFC Cave To Rendarak.png|Map. ({{SFC}}) | |||
DQ II Android Cave To Rendarak Closed.jpg|Cave to [[Rendarak]] closed. ([[Cell phone]]) | |||
DQ II Android Cave To Rendarak Opened.jpg|Cave to [[Rendarak]] opened with the [[False Idol]]. ([[Cell phone]]) | |||
DQ II Android Cave To Rendarak Exit.jpg|Entrance from within [[Rendarak]]. ([[Cell phone]]) | |||
DQ II Android Cave To Rendarak 1.jpg|Inside the cave. ([[Cell phone]]) | |||
DQ II Android Cave To Rendarak 2.jpg|[[Thunderbolt blade]]. ([[Cell phone]]) | |||
</gallery></center> | |||
{{DQII}} | {{DQII}} | ||
{{DQXI}} | |||
[[Category:Dragon Quest II locations]] | [[Category:Dragon Quest II locations]] | ||
[[Category:Dragon Quest XI locations]] | |||
Latest revision as of 01:04, 6 November 2023
| Dungeon | |
|---|---|
| Cave to Rendarak | |
 | |
| Japanese | ロンダルキアへの洞窟 |
| Game | Dragon Quest II |
The Cave to Rendarak, also known as Road to Rhone or Cave to Rhone in previous versions, is the largest dungeon in Dragon Quest II: Luminaries of the Legendary Line.
It is also the penultimate dungeon in the game. It is located in the south central region of Torland and accessible only via teleportal.
Appearances[edit]
Dragon Quest II: Luminaries of the Legendary Line[edit]

The Cave to Rendarak is infamous among fans, due to its length, the strong enemies within, and the existence of pitfalls and infinite loops that no first-time player can be expected to know of.
The cave is only accessible via a travel gate in Beran requiring the Jailor's Key. To open the cave, the False Idol must be used next to the entrance which is disguised as an impassable mountain tile.
Soul Sigil[edit]
Bottom right corner of floor B1 in all versions from the Nintendo Entertainment System to the Game Boy Color version. See the remake section for more details.
Thunderbolt blade[edit]
Find your way to floor 5. Make your way all the way north, then east into the side room; go down the flight of stairs. There is a pitfall in the almost-bottom-leftmost corner of the (huge) room; find and fall in it. You'll land right next to the sword.
Erdrick's Armour[edit]
Much easier than locating the Thunderbolt blade, simply find the staircase in the bottom right area of Floor 3 and take the stairs right to the chest.
Other treasures[edit]
(All versions)[edit] |
(NES version)[edit]
|
(Super Famicom and other following versions)[edit]
|
Monsters[edit]
- Killing machine
- Berserker
- Eyelasher
- Dancing flame
- Gargoyle
- Green dragon
- Healslime
- Hargonaut
- Walking corpse
- Ghoul
- Tyrannodactyl
- Chasmonaut
- Silvapithecus
- Metal slime
- Liquid metal slime
- Hunter mech
- Orc king
- Grimlin
- Striking sabrecat
- Whackolyte
Nearby monsters[edit]
(Swamp entrance)[edit] |
(Entrance from the Valley of Rendarak)[edit] |
Dragon Quest XI: Echoes of an Elusive Age[edit]
The Cave to Rendarak is the finale locale from the second game available via the Echo Chamber. A restless armor has taken upon itself to inhabit Erdrick's Armour itself, and it must be dealt with by the Luminary and his party. Unlike the truncated versions of other dungeons that appear in the Echo Chamber, the cave is very faithful to it's original design and will prove the most difficult dungeon out of all the past tomes.
Remake changes[edit]
- The following changes were made in the Cell phone ports of the game:
- The Seed of strength is found in the cave basement while the Soul Sigil is found instead from the King of Tantegel.
- A fire spirit NPC prevents the party from accessing the cave until both the False Idol and Eye of Rubiss are obtained.
Map & Gallery[edit]
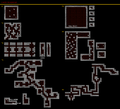
Map. (NES)
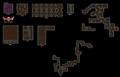
Map. (SFC)
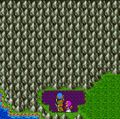
Cave to Rendarak closed. (Cell phone)

Cave to Rendarak opened with the False Idol. (Cell phone)

Entrance from within Rendarak. (Cell phone)
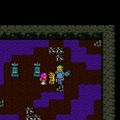
Inside the cave. (Cell phone)


