Orgodemir
| Orgodemir | |
| Dragon Quest VII | |
| Japanese name | オルゴ・デミーラ |
| Romaji | Orugo-Demira |
| Title | Demon King |
| Race | Demon |
| Age | Ageless |
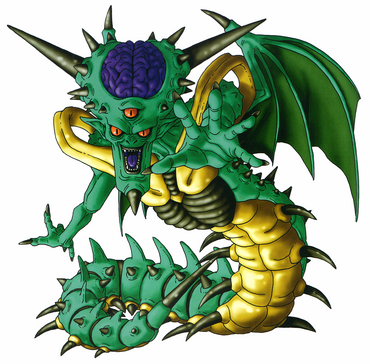
Orgodemir (オルゴ・デミーラ, Orugo demīra) is the final boss and main antagonist of Dragon Quest VII. Known as the Demon King, he is the force behind all the evil that the Hero and his party encounter during the game. A villain with multiple forms, Orgodemir sought to replace the Almighty, and had nearly the entire world sealed away to keep his foe from being resurrected.
Orgodemir has appeared in various spinoffs in the series, including Dragon Quest Monsters: Joker, Dragon Quest Monsters: Joker 2 and Dragon Quest IX as a Legacy Boss.
History
Long before the game begins, Orgodemir set out to seal all lands and cast them in darkness. He was opposed by the Almighty and the Four Elemental Spirits: Earth, Fire, Water, and Wind. The Almighty was defeated and the four spirits were scattered. However, the Almighty had put a system into place that would allow the world to be reborn again within the Shrine of Mysteries.
Characteristics
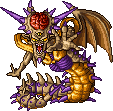
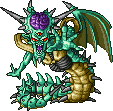
Orgodemir's true form is a monstrous demonic centipede with the upper body of a humanoid and draconic features. His head is enlarged, has a pair of large spikes on each side of it, and exposes his brain. His brain also has smaller spikes surrounding it. Orgodemir has three eyes with vertical pupils, pointed ears, a black spike on his chin, and a mouth lined with sharp fangs and a purple tongue. He has a pair of dragon wings on his back, a yellow bone-like structure which surrounds his torso, and a section on his chest similar in appearance to a rib cage. His lower back is covered in dorsal fins and small black spines, ending in a long black spike. The underside of his lower body is yellow. Orgodemir moves about by crawling on his various legs in a fashion similar to real-world centipedes. In the past, most of Orgodemir's body is beige, he has yellow eyes, his brain is red, the webbing on his wings is orange, and his chest, legs, and various spikes are all purple. In the present, most of Orgodemir's body is dark green, his eyes are red, his brain is purple, and the spikes on his body are black. In both of his forms, Orgodemir has long, sharp nails on his hands, which are purple in the past and black in the present.
Orgodemir can also disguise himself in a humanoid form, retaining the pair of wings on his back along with his three eyes and long, pointed ears (however, the shape of wings differs rather noticeably, from ones of his real form). His skin is now pale green and his exaggerated facial features are meant to be physically attractive. He wears his silver hair in a long, slick forelock falling over his face. His eyes are white with red pupils and he wears dark blue eyeshadow on all three of his eyelids, as well as dark purple lipstick. Orgodemir wears a red-lined suit with a coattail and puffed sleeves that exposes most of his chest, a leather codpiece with a skull belt around his waist, and leather shoes with steel tips. He also wears an extensive amount of jewelry, including a single black hoop earring on his right ear and numerous earrings on his left ear, a leather choker and chain necklace around his neck, and various bones on his fingers. In the past, the suit he wears is red and the webbing on his wings is orange, while in the present he wears a purple suit and the webbing on his wings is green.
Synopsis
Strategy
The player fights Orgodemir twice at the end of each disc. In the first battle, he has two forms, and in the second battle, he has four forms.
First Encounter Stats
| Sprite | HP | MP | Attack | Defense |
 |
3000 | Infinite | 182 | 127 |
| Agility | Experience | Gold | Tame Rate | |
| 107 | 0 | 0 | 0 | |
| Bestiary No. | 314 |
| Spell(s) | Kaboom Kafrizzle |
| Skill(s) | Acts three times Disruptive Wave Lullub-eye Lightning Magma Blast Wind Sickles |
| Location(s) | |
| Item(s) Dropped |
| Evasion | Frizz Resistance * | Sizz Resistance * | Fire Breath Resistance * |
| 1⁄64 | 30% | 30% | 30% |
| Bang Resistance * | Crack Resistance * | Ice Breath Resistance * | Woosh Resistance * |
| 30% | 30% | 0% | 0% |
| Strike/Rock Resistance * | Zap Resistance * | Drain Magic Resistance * | Whack Resistance * |
| 0% | 0% | 100% | 100% |
| Poof Resistance * | Poison Resistance * | Burning Breath Resistance | Fuddle Resistance * |
| 100% | 100% | 100% | 100% |
| Snooze Resistance * | Dazzle Resistance * | Fizzle Resistance * | Ban Dance Resistance |
| 100% | 100% | 100% | 100% |
| Stun Resistance * | Sap Resistance * | Army Resistance * | |
| 100% | 100% | 30% | |
| 3DS version changes |
| None |
| Sprite | HP | MP | Attack | Defense |
 |
4200 | 0 | 230 | 90 |
| Agility | Experience | Gold | Tame Rate | |
| 82 | 0 | 0 | 0 | |
| Bestiary No. | 314 |
| Spell(s) | |
| Skill(s) | Acts twice per turn Disruptive WaveFreezing Blizzard Inferno Spike Charge Thin Air |
| Location(s) | |
| Item(s) Dropped |
| Evasion | Frizz Resistance * | Sizz Resistance * | Fire Breath Resistance * |
| 1⁄32 | 0% | 0% | 0% |
| Bang Resistance * | Crack Resistance * | Ice Breath Resistance * | Woosh Resistance * |
| 0% | 0% | 0% | 0% |
| Strike/Rock Resistance * | Zap Resistance * | Drain Magic Resistance * | Whack Resistance * |
| 0% | 0% | 100% | 100% |
| Poof Resistance * | Poison Resistance * | Burning Breath Resistance | Fuddle Resistance * |
| 100% | 100% | 100% | 100% |
| Snooze Resistance * | Dazzle Resistance * | Fizzle Resistance * | Ban Dance Resistance |
| 100% | 100% | 100% | 100% |
| Stun Resistance * | Sap Resistance * | Army Resistance * | |
| 100% | 100% | 0% | |
| 3DS version changes |
| None |
Second Encounter Stats
| Sprite | HP | MP | Attack | Defense |
 |
3500 | Infinite | 330 | 200 |
| Agility | Experience | Gold | Tame Rate | |
| 80 | 0 | 0 | 0 | |
| Bestiary No. | 316 |
| Spell(s) | |
| Skill(s) | Disruptive Wave Freezing Blizzard Scorch Tail whip |
| Location(s) | Cathedral of Blight |
| Item(s) Dropped |
| Evasion | Frizz Resistance * | Sizz Resistance * | Fire Breath Resistance * |
| 1⁄64 | 0% | 0% | 0% |
| Bang Resistance * | Crack Resistance * | Ice Breath Resistance * | Woosh Resistance * |
| 0% | 0% | 0% | 0% |
| Strike/Rock Resistance * | Zap Resistance * | Drain Magic Resistance * | Whack Resistance * |
| 70% | 0% | 100% | 100% |
| Poof Resistance * | Poison Resistance * | Burning Breath Resistance | Fuddle Resistance * |
| 100% | 100% | 100% | 100% |
| Snooze Resistance * | Dazzle Resistance * | Fizzle Resistance * | Ban Dance Resistance |
| 100% | 100% | 100% | 100% |
| Stun Resistance * | Sap Resistance * | Army Resistance * | |
| 100% | 100% | 0% | |
| 3DS version changes |
| None |
- Orgodemir is considered a dragon in this encounter, leaving him vulnerable to the associated skills and weapons.
| Sprite | HP | MP | Attack | Defense |
 |
3300 | Infinite | 330 | 200 |
| Agility | Experience | Gold | Tame Rate | |
| 135 | 0 | 0 | 0 | |
| Bestiary No. | 316 |
| Spell(s) | Kaboom Kafrizzle |
| Skill(s) | Acts Twice Disruptive Wave Energy Balls(Attack/2+67) Intense Flames(168~188) Knuckle Sandwich Lullub-eye Wind Sickles |
| Location(s) | Cathedral of Blight |
| Item(s) Dropped |
| Evasion | Frizz Resistance * | Sizz Resistance * | Fire Breath Resistance * |
| 1⁄32 | 0% | 0% | 0% |
| Bang Resistance * | Crack Resistance * | Ice Breath Resistance * | Woosh Resistance * |
| 0% | 0% | 0% | 0% |
| Strike/Rock Resistance * | Zap Resistance * | Drain Magic Resistance * | Whack Resistance * |
| 70% | 0% | 100% | 100% |
| Poof Resistance * | Poison Resistance * | Burning Breath Resistance | Fuddle Resistance * |
| 100% | 100% | 100% | 100% |
| Snooze Resistance * | Dazzle Resistance * | Fizzle Resistance * | Ban Dance Resistance |
| 100% | 100% | 100% | 100% |
| Stun Resistance * | Sap Resistance * | Army Resistance * | |
| 100% | 100% | 0% | |
| 3DS version changes |
| None |
| Sprite | HP | MP | Attack | Defense |
 |
3000 | Infinite | 350 | 170 |
| Agility | Experience | Gold | Tame Rate | |
| 116 | 0 | 0 | 0 | |
| Bestiary No. | 316 |
| Spell(s) | |
| Skill(s) | Acts twice per turn Disruptive Wave Ferocious Roar Magma Blast Venom Mist Weird Whacker |
| Location(s) | Cathedral of Blight |
| Item(s) Dropped |
| Evasion | Frizz Resistance * | Sizz Resistance * | Fire Breath Resistance * |
| 1⁄64 | 0% | 0% | 0% |
| Bang Resistance * | Crack Resistance * | Ice Breath Resistance * | Woosh Resistance * |
| 0% | 0% | 0% | 0% |
| Strike/Rock Resistance * | Zap Resistance * | Drain Magic Resistance * | Whack Resistance * |
| 30% | 0% | 100% | 100% |
| Poof Resistance * | Poison Resistance * | Burning Breath Resistance | Fuddle Resistance * |
| 100% | 100% | 100% | 100% |
| Snooze Resistance * | Dazzle Resistance * | Fizzle Resistance * | Ban Dance Resistance |
| 100% | 100% | 100% | 100% |
| Stun Resistance * | Sap Resistance * | Army Resistance * | |
| 100% | 100% | 0% | |
| 3DS version changes |
| None |
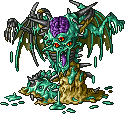
- As infered from his rotting appearance, Orgodemir is now vulnerable to Undead Undoer and Zombiesbane.
| Sprite | HP | MP | Attack | Defense |
 |
4500 | Infinite | 300 | 140 |
| Agility | Experience | Gold | Tame Rate | |
| 85 | 0 | 0 | 0 | |
| Bestiary No. | 316 |
| Spell(s) | Magic Barrier Magic Burst Snooze |
| Skill(s) | Acts Twice Charges Party (50% damage to all) Evil Prayer Frigid Ice (125~155) Meditate Paralysis Attack Scorch Summons minions |
| Location(s) | |
| Item(s) Dropped |
| Evasion | Frizz Resistance * | Sizz Resistance * | Fire Breath Resistance * |
| 1⁄64 | 0% | 0% | 0% |
| Bang Resistance * | Crack Resistance * | Ice Breath Resistance * | Woosh Resistance * |
| 0% | 0% | 0% | 0% |
| Strike/Rock Resistance * | Zap Resistance * | Drain Magic Resistance * | Whack Resistance * |
| 0% | 0% | 100% | 100% |
| Poof Resistance * | Poison Resistance * | Burning Breath Resistance | Fuddle Resistance * |
| 100% | 100% | 100% | 100% |
| Snooze Resistance * | Dazzle Resistance * | Fizzle Resistance * | Ban Dance Resistance |
| 100% | 100% | 100% | 100% |
| Stun Resistance * | Sap Resistance * | Army Resistance * | |
| 100% | 100% | 0% | |
| 3DS version changes |
| None |
- Orgodemir is still vulnerable to Undead Undoer and Zombiesbane.
Other Appearances
Outside his main role in Dragon Quest VII, Orgodemir also makes appearances in the following titles.
Dragon Quest IX
| #304 - Orgodemir | |||||||||||||||||||||||||||||||||||||||||||
|---|---|---|---|---|---|---|---|---|---|---|---|---|---|---|---|---|---|---|---|---|---|---|---|---|---|---|---|---|---|---|---|---|---|---|---|---|---|---|---|---|---|---|---|
| |||||||||||||||||||||||||||||||||||||||||||
| Family | ??? | ||||||||||||||||||||||||||||||||||||||||||
| Bestiary # | 304 | ||||||||||||||||||||||||||||||||||||||||||
| Game | Dragon Quest IX | ||||||||||||||||||||||||||||||||||||||||||
| Console | DS | ||||||||||||||||||||||||||||||||||||||||||
| Description | "Screams enemies into submission with a blood-curdling cry, then hits hard with Hellfire. Always attacks twice.
Doesn't like people to know he's really a dumpy dragon, so disguises himself as a dashing young dandy." | ||||||||||||||||||||||||||||||||||||||||||
| Additional Attributes | ||||||
|---|---|---|---|---|---|---|
| Fire | Ice | Wind | Earth | Light | Dark | |
| 150 | 100 | 100 | 50 | 100 | 100 | |
| Blast | Dazzle | Sleep | Death | Drain MP | Confusion | |
| 100 | 25 | 0 | 0 | 100 | 0 | |
| Fizzle | Inaction | Paralyze | Poison | Charm | Magic Res | |
| 0 | 0 | 0 | 0 | 10 | 50 | |
| Blunt | Sap | Decelerate | ||||
| 5 | 25 | 75 | ||||
Orgodemir appears as a Legacy Boss, obtained after completing Quest #176 (or received at special events). He will become enraged once his health drops to orange range.
Treasure
|
Skills
|
Dragon Quest Monsters 2
Dragon Quest Monsters: Joker
Dragon Quest Monsters: Joker 2
Orgodemir is a Rank X monster in Dragon Quest Monsters: Joker 2. One can be synthesized by mixing Mortamor and an alabast dragon.
Dragon Quest Monsters: Joker 2 Professional
|
|
This article is a stub. You can help by expanding it. |
Gallery
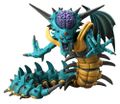
As seen in the Sofubi Monster merchandise series..
