Baramos: Difference between revisions
No edit summary |
|||
| Line 14: | Line 14: | ||
}} | }} | ||
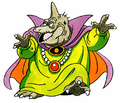
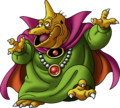
'''Baramos''', known as the '''Demon Lord''' and the '''Arch Fiend''', is one of the main villains of ''[[Dragon Quest III]]'', and a recurring monster in the [[Dragon Quest (series)|series]]. | '''Baramos''', known as the '''Demon Lord''' and the '''Arch Fiend''', is one of the main villains of ''[[Dragon Quest III]]'', and a recurring monster in the [[Dragon Quest (series)|series]]. He can be found in [[Baramos's Lair|his lair south of Isis]]. | ||
==Characteristics== | ==Characteristics== | ||
Baramos and his forces menaced the world for an unknown number of years prior, which necessitated the hero [[Ortega]] departing from [[Aliahan]] to slay him in the game's opening prolog. Though the king of Aliahan states that the world at large is unaware of the fiend's activities, his very presence emboldens monsters the world over to assault human settlements. | |||
Throughout the first half of ''III'' Baramos is believed to be the final boss, but this is malicious facade; when the [[Erdrick|hero]] defeats Baramos and returns to Aliahan triumphant, [[Zoma]] interrupts the celebrations to reveal Baramos was just an underling of his--an advance force to clear the way for his master. Having failed, Zoma announces that he will personally plunge the world into eternal darkness, causing the hero to continue his quest. | |||
Baramos will attack the party twice more in [[Zoma's Castle]], both as a ghost and a shambling corpse. There is no dialogue prior or during these encounters, implying that Baramos is not truly "revived" and is forced into further servitude by Zoma's magic. In the ''[[Dragon Quest III]]'' remakes, a common enemy in [[Cloudsgate Citadel]] is a pallete-swap known as a [[Baramonster]]. Whether the baramonsters were in Zoma's employ is not certain. | |||
==Appearences== | ==Appearences== | ||
===''[[Dragon Quest III]]''=== | ===''[[Dragon Quest III]]''=== | ||
{{ | {{DQ3Enemy | ||
|name = Baramos | |name=Baramos | ||
| | |kanji= | ||
| | |romanji= | ||
| | |bestiaryNumber=133 | ||
| | |sprite=[[Image:Baramos DQIII NES.gif]] | ||
| | |lvl=63 | ||
| | |hp=900 | ||
| | |mp=255 | ||
| | |exp=0 | ||
| | |gold=0 | ||
| | |attack=220 | ||
| | |defense=100 | ||
| | |agility=85 | ||
|spells=[[Bazoom]]<br>[[Fuddle]]<br>[[Kaboom]]<br>[[Kafrizzle]] | |spells=[[Bazoom]]<br>[[Fuddle]]<br>[[Kaboom]]<br>[[Kafrizzle]] | ||
| | |skills=[[Inferno]]<br>Recovers 90~110 HP per turn | ||
| | |item=None | ||
| | |locations=[[Baramos' Lair]] | ||
|evasion={{fraction|0|64}} | |||
|fire-resist=70% | |||
|crack-resist=25% | |||
|woosh-resist=25% | |||
|zap-resist=0% | |||
|whack-resist=100% | |||
|kamikazee-resist=100% | |||
|poof-resist=100% | |||
|dazzle-resist=25% | |||
|snooze-resist=70% | |||
|drain-magic-resist=100% | |||
|fizzle-resist=70% | |||
|fuddle-resist=100% | |||
|sap-resist=70% | |||
|deceleratle-resist=100% | |||
|remake-sprites= | |||
|remake-changes=HP is 3000 (still regenerates), attack is 240, defense is 200, EXP is 65535 | |||
}} | }} | ||
===''[[Dragon Quest IX]]''=== | ===''[[Dragon Quest IX]]''=== | ||
| Line 157: | Line 174: | ||
===''[[Dragon Quest Monster Battle Road Victory]]''=== | ===''[[Dragon Quest Monster Battle Road Victory]]''=== | ||
==Trivia== | |||
*Baramos' design bears a slight similarity to the ''Dragon Ball'' character of Pian, one of Demon King Piccolo's henchmen. | |||
*Oddly, Baramos comes after his own ghost and corpse in the numerical list of monsters in ''III''. | |||
==Gallery== | ==Gallery== | ||
<center><gallery> | <center><gallery> | ||
Image:BaramosArt.png|<center>Original artwork of ''Dragon Quest III'' (NES)</center> | Image:BaramosArt.png|<center>Original artwork of ''Dragon Quest III'' (NES)</center> | ||
Image:Baramos DQM GBC.png|<center>Sprite in ''Dragon Quest Monsters'' (GBC)</center> | Image:Baramos DQM GBC.png|<center>Sprite in ''Dragon Quest Monsters'' (GBC)</center> | ||
Image:Baramos DQM PSX.gif|<center>Sprite in ''Dragon Quest Monsters'' (PSX)</center> | Image:Baramos DQM PSX.gif|<center>Sprite in ''Dragon Quest Monsters'' (PSX)</center> | ||
Image:Baramos DQM2 GBC.png|<center>Sprite in ''Dragon Quest Monsters II'' (GBC)</center> | Image:Baramos DQM2 GBC.png|<center>Sprite in ''Dragon Quest Monsters II'' (GBC)</center> | ||
Image:DQIX NDS Baramos.png|<center>Sprite in ''Dragon Quest IX''</center> | Image:DQIX NDS Baramos.png|<center>Sprite in ''Dragon Quest IX''</center> | ||
Image:DQIII Baramos artwork.png|Modern artwork | Image:DQIII Baramos artwork.png|Modern artwork (older color scheme) | ||
Image:DQM2-3D Baramos Icon.jpg|<center>Icon in ''Monsters 2: 3D''</center> | Image:DQM2-3D Baramos Icon.jpg|<center>Icon in ''Monsters 2: 3D''</center> | ||
Image:DQMBRV Baramos model.png|<center>Model in ''Monster Road Victory''</center> | Image:DQMBRV Baramos model.png|<center>Model in ''Monster Road Victory''</center> | ||
Revision as of 23:32, 9 December 2017
"Thou wilt regret thy coming indeed! You shall be dead for good, for I wilt surely feast on thine innards!"
| Baramos | |
| Dragon Quest III | |
| Japanese name | バラモス |
| Romaji | Baramosu |
| Title | Archfiend |
| Race | Demon |
| Age | Unknown |
Baramos, known as the Demon Lord and the Arch Fiend, is one of the main villains of Dragon Quest III, and a recurring monster in the series. He can be found in his lair south of Isis.
Characteristics
Baramos and his forces menaced the world for an unknown number of years prior, which necessitated the hero Ortega departing from Aliahan to slay him in the game's opening prolog. Though the king of Aliahan states that the world at large is unaware of the fiend's activities, his very presence emboldens monsters the world over to assault human settlements.
Throughout the first half of III Baramos is believed to be the final boss, but this is malicious facade; when the hero defeats Baramos and returns to Aliahan triumphant, Zoma interrupts the celebrations to reveal Baramos was just an underling of his--an advance force to clear the way for his master. Having failed, Zoma announces that he will personally plunge the world into eternal darkness, causing the hero to continue his quest.
Baramos will attack the party twice more in Zoma's Castle, both as a ghost and a shambling corpse. There is no dialogue prior or during these encounters, implying that Baramos is not truly "revived" and is forced into further servitude by Zoma's magic. In the Dragon Quest III remakes, a common enemy in Cloudsgate Citadel is a pallete-swap known as a Baramonster. Whether the baramonsters were in Zoma's employ is not certain.
Appearences
Dragon Quest III
| Sprite | Level | HP | MP | |
 |
63 | 900 | 255 | |
| Attack | Defense | Agility | Experience | Gold |
| 220 | 100 | 85 | 0 | 0 |
| Bestiary No. | 133 |
| Spell(s) | Bazoom Fuddle Kaboom Kafrizzle |
| Skill(s) | Inferno Recovers 90~110 HP per turn |
| Location(s) | Baramos' Lair |
| Item Dropped | None |
| Evasion | Fire Resistance * | Crack Resistance * | Woosh Resistance * | ||
| 0⁄64 | 70% | 25% | 25% | ||
| Zap Resistance * | Drain Magic Resistance | Whack Resistance * | Kamikazee Resistance | ||
| 0% | 100% | 100% | 100% | ||
| Poof Resistance | Fuddle Resistance | Snooze Resistance | Dazzle Resistance | ||
| 100% | 100% | 70% | 25% | ||
| Fizzle Resistance | Sap Resistance * | Deceleratle Resistance * | |||
| 70% | 70% | 100% | |||
Dragon Quest IX
| Baramos | |||||||||||||||||||||||||||||||||||||||||||
|---|---|---|---|---|---|---|---|---|---|---|---|---|---|---|---|---|---|---|---|---|---|---|---|---|---|---|---|---|---|---|---|---|---|---|---|---|---|---|---|---|---|---|---|
| |||||||||||||||||||||||||||||||||||||||||||
| Family | ??? | ||||||||||||||||||||||||||||||||||||||||||
| Game | Dragon Quest IX | ||||||||||||||||||||||||||||||||||||||||||
| Console | DS | ||||||||||||||||||||||||||||||||||||||||||
| Description | "Windproof king and wizard who wastes no time in whipping out Kaboom, Kafrizz, and all kinds of calamity-inducing conjury.
Takes great pleasure in obliterating people while they're busy poking fun at his bizarre appearance." | ||||||||||||||||||||||||||||||||||||||||||
| Additional Attributes | ||||||
|---|---|---|---|---|---|---|
| Fire | Ice | Wind | Earth | Light | Dark | |
| 100 | 150 | 50 | 100 | 100 | 100 | |
| Blast | Dazzle | Sleep | Death | Drain MP | Confusion | |
| 100 | 0 | 0 | 0 | 100 | 0 | |
| Fizzle | Inaction | Paralyze | Poison | Charm | Magic Res | |
| 0 | 25 | 0 | 0 | 5 | 50 | |
| Blunt | Sap | Decelerate | ||||
| 5 | 25 | 75 | ||||
Baramos appears as a Legacy Boss, obtained after completing Quest #062. He is the weakest of the Legacy bosses, but he is still very powerful and capable of casting Kafrizz and Kaboom and can also use fire breath and regular attacks (which are prone to inflicting critical hits). Ice attacks are his weakness, but he resists wind attacks.
Treasure
|
Skills
|
Other appearences
Dragon Quest Monsters
He appears as the boss of the gate of mastermind. He then talks to you and makes a odd threat of eating your guts so you will never be brought back to life.
Dragon Quest Monsters 2
Dragon Quest Monsters: Joker 2
Baramos is a Rank S monster in Dragon Quest Monsters: Joker 2. He can be synthesized by mixing a gemon with Hargon.
Dragon Quest Monsters: Terry's Wonderland 3D
Dragon Quest Monsters 2: Iru and Luca’s Marvelous Mysterious Key
Dragon Quest Monster Battle Road Victory
Trivia
- Baramos' design bears a slight similarity to the Dragon Ball character of Pian, one of Demon King Piccolo's henchmen.
- Oddly, Baramos comes after his own ghost and corpse in the numerical list of monsters in III.
Gallery


