Kol: Difference between revisions
No edit summary |
No edit summary |
||
| (46 intermediate revisions by 10 users not shown) | |||
| Line 1: | Line 1: | ||
'''Kol''' | {{LocationInfobox | ||
|game = {{Dragon Quest}}<br/>{{Dragon Quest III}}<br/>{{DQ1&2HD}}<br>{{DQ3HD}}<br>{{DQB}} | |||
|title = Kol | |||
|type= Village | |||
|image = [[File:Kol.jpg|250px]] | |||
|caption = | |||
|japanese=マイラ | |||
|romaji=Maira | |||
|old=Same | |||
}} | |||
'''Kol''' is a village in northeastern [[Alefgard]]. It sits in the middle of a large forest with a tall mountain chain to the north, and the buildings are made of timber rather than stone. | |||
It is visited in {{DQ}}, {{Dragon Quest III}}, the {{DQ2HD}}, and {{DQB}}. | |||
=== | ==Appearances== | ||
==={{DQ}}=== | |||
Kol is typically the third town the player visits. It is a quiet forest village with a large hot spring for bathing, and it does not contain any essential items for completing the game. The [[Faerie Flute]] is hidden four steps south of the bath and is useful for defeating the [[Golem]] outside [[Cantlin]], especially so in the remade versions of the game. | |||
====Puff-Puff==== | |||
In all versions of the game, the {{Hero 1}} can receive a [[Puff-Puff]] from one of the ladies near the bath for 20 {{Gold}}. All references to the hero's indulgence and the woman's sultry behavior were removed from the original {{NES}} version as they were seen as too risque for a Western audience, but this censorship was revoked for the [[Cell phone]] version. | |||
*The {{Famicom}} version of the scene is different from how the act would be portrayed in later games, with the screen fading to black instead of the usual onomatopoeia playing. It also costs 50 {{Gold}} instead of just 20. | |||
=== Dragon | ====Shops and Services==== | ||
{{ItemShop/Start}} | |||
{{ItemShop/Item|name=Medicinal herb|price=24g|attributes=Heals a small amount of HP}} | |||
{{ItemShop/Item|name=Torch|price=8g|attributes=Lights a radius around the Hero}} | |||
{{ItemShop/Item|name=Dragon's scale|price=20g|attributes=Provides a small amount of Defense}} | |||
{{ItemShop/Item|name=Chimaera wing|price=70g|attributes=Warps the Hero back to [[Tantegel]]}} | |||
{{ItemShop/End}} | |||
{{WeaponShop/Start}} | |||
{{WeaponShop/Item|name=Copper sword|price=180|attributes=Attack +10}} | |||
{{WeaponShop/Item|name=Iron axe|price=560|attributes=Attack +15}} | |||
{{WeaponShop/Item|name=Iron armour|price=1000|attributes=Defense +16}} | |||
{{WeaponShop/Item|name=Full plate armour|price=3000|attributes=Defense +24}} | |||
{{WeaponShop/Item|name=Leather shield|price=90|attributes=Defense +4}} | |||
{{WeaponShop/End}} | |||
=== | ====Treasures==== | ||
*[[Faerie Flute]] | |||
*[[Plain clothes]] | |||
*[[Seed of strength]] | |||
====Nearby {{MFamilies}}s==== | |||
*[[Drackolyte]] | |||
*[[Scorpion]] | |||
*[[Skeleton]] | |||
=== | ==={{DQ3}}=== | ||
The people of Kol frequently mention the legendary [[Sword of Kings]] and how it was so dangerous to the [[Zoma|devil]] that he spent three years doing all he could to destroy it. Furthermore, a merchant sitting in the large common room mentions that the blade was forged of the infallible [[orichalcum]] metal. The remarkable smithing skills of the item merchant are also told to the player, which signifies that all three are related and bringing the ore to the merchant will result in the sword. | |||
The item merchant was once a [[Jipangese swordsmith|swordsmith living in Jipang]], who fled with his wife once she was selected to be the next sacrifice to [[Orochi]]. The couple wandered the world until they stumbled upon The [[Great Pit of Giaga]] and fell through the crack in the firmament, possibly leading to the construction of the guard post at the site when their fall was mistaken for attempted suicide. The husband has adopted the speaking mannerisms of their new home, but his wife still speaks in haiku as is Jipangese custom. | |||
In order to obtain the [[Sword of Kings]], the player must sell the oricalchum found in [[Damdara]] to the Jipangese merchant. The sword can then be purchased for 35,000 {{Gold}}. | |||
The faerie flute is found in the same location as it was in the first game, and is needed to free the Goddess [[Rubiss]] from her petrification in the [[Tower of Rubiss]]. | |||
== | ====Shops and Services==== | ||
{{ItemShop/Start}} | |||
{{ItemShop/Item|name=Medicinal herb|price=8g|attributes=Heals a small amount of HP}} | |||
{{ItemShop/Item|name=Holy water|price=20g|attributes=Keeps away low level monsters}} | |||
{{ItemShop/Item|name=Chimaera wing|price=25g|attributes=Same effect as [[zoom]] spell}} | |||
{{ItemShop/Item|name=Moonwort bulb|price=30g|attributes=Cures paralysis}} | |||
{{ItemShop/End}} | |||
{{ | {{WeaponShop/Start}} | ||
{{WeaponShop/Item|name=Steel broadsword|price=1500|attributes=Attack +33}} | |||
{{WeaponShop/Item|name=Sledgehammer|price=6500|attributes=Attack +55}} | |||
{{ | {{WeaponShop/Item|name=Dragon mail|price=9800|attributes=Defence +45}} | ||
{{WeaponShop/Item|name=Flowing dress|price=12500|attributes=Defence +50}} | |||
{{ | {{WeaponShop/Item|name=Silver shield|price=8800|attributes=Defence +40}} | ||
{{WeaponShop/Item|name=Iron mask|price=3500|attributes=Defence +25}} | |||
{{WeaponShop/End}} | |||
{{ | |||
{{ | |||
{{ | |||
{{ | |||
{{ | |||
== | ====Treasures==== | ||
*[[Faerie Flute]] | |||
*[[Mini medal]]s (3) | |||
*[[Plain clothes]] | |||
*[[Seed of magic]] | |||
*[[T'n'T ticket]] (3) (removed for [[Cell phone]] version) | |||
====Nearby {{MFamilies}}s==== | |||
*[[Flying flayer]] | |||
*[[Ghoul]] | |||
*[[Muddy hand]] | |||
*[[Skelegon]] | |||
{{ | |||
== | ==={{DQ3HD}}=== | ||
Kol remains mostly unchanged in the shift to HD, such as the [[Faerie Flute|faerie flute]] being in the same location, though the village is now set on a hill within the forest instead of flat ground. Due to the removal of [[Treasures 'n' Trapdoors]] boards the well is now home to a [[List of recruitable monsters in Dragon Quest III HD-2D Remake|friendly silhouette]]. | |||
The Jipangese swordsmith has been fleshed out into a proper character in this version of the game, and the process to obtain the Sword of Kings has been embellished. The swordsmith's wife states that he left behind his family's [[Forging hammer|heirloom smithing hammer]] when the two fled from Jipang, with the smith himself lamenting that he has been unable to perform his trade ever since and has been forced to scrape by as a merchant. When the player presents him with the forging hammer the swordsmith is beyond elation and swears that he will find a way to return the favor; in the mean time the quality of the items he sells have increased considerably now that he can smith again. | |||
Upon obtaining the [[Broken Blade]] from the researcher in Cantlin and speaking to the swordsmith again he will recognize it despite the ruined condition, wondering how such an incredible weapon could be shattered. If the player has already obtained the orichalcum from Damdara then he will begin reforging the sword immediately, stating it would be an honor to work with such fine materials and as to pay the Hero back for freeing Jipang from Orochi. The sword is handed over freely once it is completed, with the smith refusing payment. | |||
{{ | ====Shops & services==== | ||
{{ | {{ItemShop/Start|title=|subtitle=|float=}} | ||
{{ | {{ItemShop/Item|name=Medicinal herb III HD|display='''[[Medicinal herb]]'''|price=8|attributes=Restores at least 30 HP to a single ally}} | ||
{{ | {{ItemShop/Item|name=Strong medicine III HD|display='''[[Strong medicine]]'''|price=48|attributes=Restores at least 50 HP to a single ally}} | ||
{{ | {{ItemShop/Item|name=Chimaera wing III HD|display='''[[Chimaera wing]]'''|price=25|attributes=Can be used to return to previously visited locations}} | ||
{{ | {{ItemShop/Item|name=Moonwort bulb III HD|display='''[[Moonwort bulb]]'''|price=30|attributes=Cures paralysis}} | ||
{{ | {{ItemShop/Item|name=Dazzle-me-not III HD|display='''[[Dazzle-me-not]]'''|price=120|attributes=Lifts illusions}} | ||
{{ItemShop/Item|name=Falcon blade III HD|display='''[[Falcon blade]]'''|price=38,500|attributes=Attack +55}} | |||
{{ItemShop/Item|name=Sandstorm spear III HD|display='''[[Sandstorm spear]]'''|price=13,700|attributes=Attack +76<br>Casts [[Dazzle]]}} | |||
{{ItemShop/Item|name=Dragon dojo duds III HD|display='''[[Dragon dojo duds]]'''|price=31,500|attributes=Defence +87<br>-25% breath damage}} | |||
{{ItemShop/Item|name=Flowing dress III HD|display='''[[Flowing dress]]'''|price=26,000|attributes=Defence +75<br>-25% Fire, Ice, & Explosion damage}} | |||
{{ItemShop/Item|name=Spiked armour III HD|display='''[[Spiked armour]]'''|price=11,500|attributes=Defence +88<br>50% recoil damage}} | |||
{{ItemShop/Item|name=Slime earrings III HD|display='''[[Slime earrings]]'''|price=950|attributes=Defence +5}} | |||
{{ItemShop/End|note=}} | |||
{{Clear}} | |||
{{WeaponShop/Start|title=Weapon & armour shop|subtitle=|float=}} | |||
{{ItemShop/Item|name=Zombiesbane III HD|display='''[[Zombiesbane (Weapon)|Zombiesbane]]'''|price=12,800|attributes=Attack +68<br>+130% damage to [[Undead family|zombies]]}} | |||
{{ItemShop/Item|name=War hammer III HD|display='''[[War hammer]]'''|price=12,100|attributes=Attack +81}} | |||
{{WeaponShop/Item|name=Sage’s staff III HD|display='''[[Sage's staff]]'''|price=22,600|attributes=Attack +84<br>Casts [[Midheal]]}} | |||
{{WeaponShop/Item|name=Dragontail whip III HD|display='''[[Dragontail whip]]'''|price=6,200|attributes=Attack +62<br>+130% damage to [[Dragon family|dragons]]}} | |||
{{WeaponShop/Item|name=Silver shield III HD|display='''[[Silver shield]]'''|price=13,700|attributes=Defence +63}} | |||
{{WeaponShop/Item|name=Mirror shield III HD|display='''[[Mirror shield]]'''|price=26,000|attributes=Defence +81<br>20% chance to [[Bounce]] spells}} | |||
{{WeaponShop/End|note=}} | |||
== | ====Treasures==== | ||
{| class="wikitable" | |||
| [[File:ICON-Faerie flute III HD.png|link=Faerie flute]] || [[File:Moonwort bulb III HD icon.png|link=Moonwort bulb]] || [[File:Seed of life III HD icon.png|link=Seed of life]] || [[File:Seed of magic III HD icon.png|link=Seed of magic]] || [[File:Care rivière III HD icon.png|link=Care rivière]] || [[File:Spirit bracer III HD icon.png|link=Spirit bracer]] || [[File:Plain clothes III HD icon.png|link=Plain clothes]] | |||
|- | |||
| x1 || x1 || x1 || x2 || x1 || x1 || x1 | |||
|} | |||
====Nearby monsters==== | |||
{ | {| class="wikitable" | ||
| [[File:Flying flayer DQ III HD sprite.png|link=Flying flayer]] || [[File:Ghoul DQ III HD sprite.png|link=Ghoul]] || [[File:Muddy hand DQ III HD sprite.png|link=Muddy hand]] || [[File:Skelegon DQ III HD sprite.png|link=Skelegon]] | |||
|} | |||
== | ==={{DQ1HD}}=== | ||
{{ | |||
Kol is attacked at one point, and you have to defend it against a boss right before getting the [[Ultimate Key]]. | |||
== | ==={{DQ2HD}}=== | ||
Kol returns in the HD-2D remake of [[Dragon Quest II]], where a descendent of the smith who forged the [[Sword of Kings]] ([[Erdrick's Sword]]) offers to restore it if he can get his hands on some orichalcum. Before he restores it, it is called the Faded Blade and is nowhere near endgame quality. | |||
== | A wild goose chase for the [[Fairy Flute]] across several towns ends with it being dropped in its usual location in Kol. | ||
{{ | |||
==={{DQB}}=== | |||
In this game, Kol (along with [[Galenholm]]) consists of different areas that can be reached by using teleportals: the Ruins, the Island of Lava, and the Island of Ice. The boss at the end of Chapter 3 is a [[Magmalice]] and a [[Firn fiend]]. The articles for each area within the region are: | |||
*[[Bleak and Burning Badlands]] | |||
*[[Island of Lava]] | |||
*[[Galenholm]] | |||
*[[Island of Ice]] | |||
*[[Galenholm Ruins]] | |||
==={{DQTact}}=== | |||
The [[Hero (Dragon Quest Tact)|Master]] and [[Majellan]] pay a visit to the town in Chapter 2, Episode 1 of the game's limited ''Dragon Quest I'' event. Majellan wants to relax in the town's hot springs before he remembering they're trying to locate the missing [[Mindini]], much to his dismay. In the town, they encounter a fortune-telling old man who points them in the direction of the [[Quagmire Cave]]. | |||
==Map & Gallery== | |||
<center><gallery> | |||
Kol_DQI_GBC_1.PNG|Villager's greeting | |||
Fairyflute.png|The flute's location ({{GBC}}) | |||
DQ Android Kol 1.jpg| | |||
DQ Android Kol 2.jpg| | |||
DQ NES Kol.gif|Map for {{Dragon Quest}}. ({{NES}}) | |||
DW III NES Kol.png|Map for {{Dragon Quest III}}. ({{NES}}) | |||
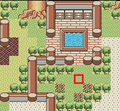
DQ SFC Kol.png|Map for {{I}}. ({{SFC}}) | |||
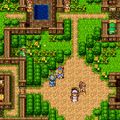
DQ III SFC Kol.png|Map for {{III}}. ({{SFC}}) | |||
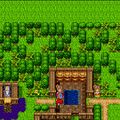
File:Kol map III HD2D.png|HD map. | |||
Image:DQ III Android Kol.jpg | |||
DQ III Android Kol 1.jpg| | |||
DQ III Android Kol 2.jpg| | |||
DQ III Android Kol 3.jpg| | |||
DQ III Android Kol 4.jpg| | |||
DQ Android Kol.jpg|Kol from {{I}}. ([[Cell phone]]) | |||
DQ II Android Site Of Kol.jpg|Former site of Kol from {{II}}. ([[Cell phone]]) | |||
DQT Kol.jpg|Majellan visiting Kol in {{Tact}}. ([[Cell phone]]) | |||
</gallery></center> | |||
{{DQI}} | {{DQI}} | ||
{{DQIII}} | {{DQIII}} | ||
{{DQI&IIHD}} | |||
{{DQIIIHD}} | |||
{{DQBI}} | |||
[[Category:Dragon Quest I locations]] | [[Category:Dragon Quest I locations]] | ||
[[Category:Dragon Quest III locations]] | [[Category:Dragon Quest III locations]] | ||
[[Category:Dragon Quest I & II HD-2D Remake locations]] | |||
[[Category:Dragon Quest III HD-2D Remake locations]] | |||
[[Category:Dragon Quest Builders locations]] | |||
[[Category:Dragon Quest Tact locations]] | |||
Latest revision as of 07:59, 30 December 2025
| Village | |
|---|---|
| Kol | |

| |
| Japanese | マイラ |
| Romaji | Maira |
| Game | Dragon Quest Dragon Quest III Dragon Quest I & II HD-2D Remake Dragon Quest III HD-2D Remake Dragon Quest Builders |
| Old localization | Same |
Kol is a village in northeastern Alefgard. It sits in the middle of a large forest with a tall mountain chain to the north, and the buildings are made of timber rather than stone.
It is visited in Dragon Quest, Dragon Quest III, the Dragon Quest II HD-2D Remake, and Dragon Quest Builders.
Appearances[edit]
Dragon Quest[edit]
Kol is typically the third town the player visits. It is a quiet forest village with a large hot spring for bathing, and it does not contain any essential items for completing the game. The Faerie Flute is hidden four steps south of the bath and is useful for defeating the Golem outside Cantlin, especially so in the remade versions of the game.
Puff-Puff[edit]
In all versions of the game, the Hero can receive a Puff-Puff from one of the ladies near the bath for 20 gold coins. All references to the hero's indulgence and the woman's sultry behavior were removed from the original NES version as they were seen as too risque for a Western audience, but this censorship was revoked for the Cell phone version.
- The Famicom version of the scene is different from how the act would be portrayed in later games, with the screen fading to black instead of the usual onomatopoeia playing. It also costs 50 gold coins instead of just 20.
Shops and Services[edit]
| Item | Price | Attributes |
| 24g | Heals a small amount of HP | |
| 8g | Lights a radius around the Hero | |
| 20g | Provides a small amount of Defense | |
| 70g | Warps the Hero back to Tantegel |
| Item | Price | Attributes |
| 180 | Attack +10 | |
| 560 | Attack +15 | |
| 1000 | Defense +16 | |
| 3000 | Defense +24 | |
| 90 | Defense +4 |
Treasures[edit]
Nearby monsters[edit]
Dragon Quest III: The Seeds of Salvation[edit]
The people of Kol frequently mention the legendary Sword of Kings and how it was so dangerous to the devil that he spent three years doing all he could to destroy it. Furthermore, a merchant sitting in the large common room mentions that the blade was forged of the infallible orichalcum metal. The remarkable smithing skills of the item merchant are also told to the player, which signifies that all three are related and bringing the ore to the merchant will result in the sword.
The item merchant was once a swordsmith living in Jipang, who fled with his wife once she was selected to be the next sacrifice to Orochi. The couple wandered the world until they stumbled upon The Great Pit of Giaga and fell through the crack in the firmament, possibly leading to the construction of the guard post at the site when their fall was mistaken for attempted suicide. The husband has adopted the speaking mannerisms of their new home, but his wife still speaks in haiku as is Jipangese custom.
In order to obtain the Sword of Kings, the player must sell the oricalchum found in Damdara to the Jipangese merchant. The sword can then be purchased for 35,000 gold coins.
The faerie flute is found in the same location as it was in the first game, and is needed to free the Goddess Rubiss from her petrification in the Tower of Rubiss.
Shops and Services[edit]
| Item | Price | Attributes |
| 8g | Heals a small amount of HP | |
| 20g | Keeps away low level monsters | |
| 25g | Same effect as zoom spell | |
| 30g | Cures paralysis |
| Item | Price | Attributes |
| 1500 | Attack +33 | |
| 6500 | Attack +55 | |
| 9800 | Defence +45 | |
| 12500 | Defence +50 | |
| 8800 | Defence +40 | |
| 3500 | Defence +25 |
Treasures[edit]
- Faerie Flute
- Mini medals (3)
- Plain clothes
- Seed of magic
- T'n'T ticket (3) (removed for Cell phone version)
Nearby monsters[edit]
Dragon Quest III HD-2D Remake[edit]
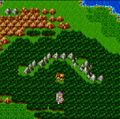
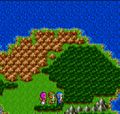
Kol remains mostly unchanged in the shift to HD, such as the faerie flute being in the same location, though the village is now set on a hill within the forest instead of flat ground. Due to the removal of Treasures 'n' Trapdoors boards the well is now home to a friendly silhouette.
The Jipangese swordsmith has been fleshed out into a proper character in this version of the game, and the process to obtain the Sword of Kings has been embellished. The swordsmith's wife states that he left behind his family's heirloom smithing hammer when the two fled from Jipang, with the smith himself lamenting that he has been unable to perform his trade ever since and has been forced to scrape by as a merchant. When the player presents him with the forging hammer the swordsmith is beyond elation and swears that he will find a way to return the favor; in the mean time the quality of the items he sells have increased considerably now that he can smith again.
Upon obtaining the Broken Blade from the researcher in Cantlin and speaking to the swordsmith again he will recognize it despite the ruined condition, wondering how such an incredible weapon could be shattered. If the player has already obtained the orichalcum from Damdara then he will begin reforging the sword immediately, stating it would be an honor to work with such fine materials and as to pay the Hero back for freeing Jipang from Orochi. The sword is handed over freely once it is completed, with the smith refusing payment.
Shops & services[edit]
| Item | Price | Attributes |
| 8 | Restores at least 30 HP to a single ally | |
| 48 | Restores at least 50 HP to a single ally | |
| 25 | Can be used to return to previously visited locations | |
| 30 | Cures paralysis | |
| 120 | Lifts illusions | |
| 38,500 | Attack +55 | |
| 13,700 | Attack +76 Casts Dazzle | |
| 31,500 | Defence +87 -25% breath damage | |
| 26,000 | Defence +75 -25% Fire, Ice, & Explosion damage | |
| 11,500 | Defence +88 50% recoil damage | |
| 950 | Defence +5 |
| Item | Price | Attributes |
| 12,800 | Attack +68 +130% damage to zombies | |
| 12,100 | Attack +81 | |
| 22,600 | Attack +84 Casts Midheal | |
| 6,200 | Attack +62 +130% damage to dragons | |
| 13,700 | Defence +63 | |
| 26,000 | Defence +81 20% chance to Bounce spells |
Treasures[edit]
| x1 | x1 | x1 | x2 | x1 | x1 | x1 |
Nearby monsters[edit]
Dragon Quest I HD-2D Remake[edit]
Kol is attacked at one point, and you have to defend it against a boss right before getting the Ultimate Key.
Dragon Quest II HD-2D Remake[edit]
Kol returns in the HD-2D remake of Dragon Quest II, where a descendent of the smith who forged the Sword of Kings (Erdrick's Sword) offers to restore it if he can get his hands on some orichalcum. Before he restores it, it is called the Faded Blade and is nowhere near endgame quality.
A wild goose chase for the Fairy Flute across several towns ends with it being dropped in its usual location in Kol.
Dragon Quest Builders[edit]
In this game, Kol (along with Galenholm) consists of different areas that can be reached by using teleportals: the Ruins, the Island of Lava, and the Island of Ice. The boss at the end of Chapter 3 is a Magmalice and a Firn fiend. The articles for each area within the region are:
Dragon Quest Tact[edit]
The Master and Majellan pay a visit to the town in Chapter 2, Episode 1 of the game's limited Dragon Quest I event. Majellan wants to relax in the town's hot springs before he remembering they're trying to locate the missing Mindini, much to his dismay. In the town, they encounter a fortune-telling old man who points them in the direction of the Quagmire Cave.
Map & Gallery[edit]

Villager's greeting
The flute's location (GBC)
Map for Dragon Quest. (NES)
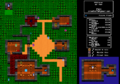
Map for Dragon Quest III. (NES)
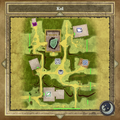
HD map.

- Error creating thumbnail: File missing
- Error creating thumbnail: File missing
- Error creating thumbnail: File missing
- Error creating thumbnail: File missing
Kol from DQ. (Cell phone)
Former site of Kol from II. (Cell phone)

Majellan visiting Kol in Tact. (Cell phone)


